
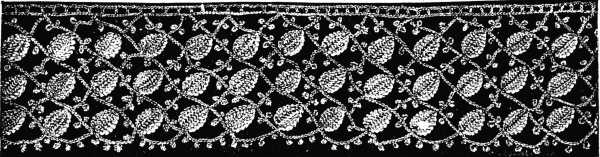
 Crochet lace.—Close leaves and bars with picots
Crochet Work.
Crochet work, so called from the hook, French croche or croc, with which it is done, is not only one of the easiest but in comparison with the cost and labour, one of the most effective kinds of fancy-work. It is also one of the most useful, as it can be applied to the domestic requirements of every-day life, to wearing apparel, house-linen and upholstery; and we are sure that the patterns contained in this chapter, which have in addition to their other merits that of novelty, will meet with a favorable reception.
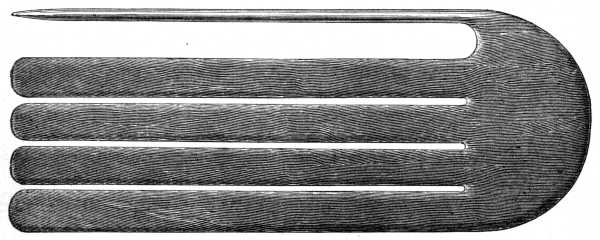
Hooks, or needles, as they are generally called, made of wood, bone or tortoise-shell are used for all the heavier kinds of crochet work in thick wool or cotton, and steel ones for the finer kinds. The Tunisian crochet is done with a long straight hook, which is made all in one piece. The points should be well polished inside and not too sharp, the backs slightly curved, and the handles, whether of bone, steel or wood, so light as not to tire the hand. Those represented here, we consider the best, as regards shape. As it is most essential that the needle should be suited to the cotton in size, we subjoin a comparative table of the numbers of the D.M.C threads and cottons and of the different needles.
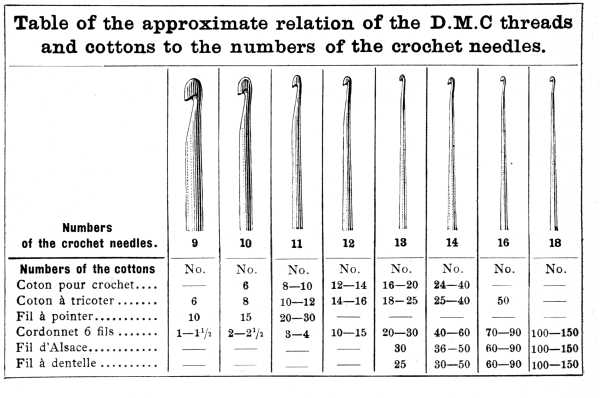 Table of the approximate relation of the D.M.C threads and cottons to the numbers of the crochet needles.
Crochet stitches.—In point of fact, there is only one, because all crochet work consists of loops made by means of the hook or needle, and connected together by being drawn the one through the other.
Crochet work may however, be divided into two kinds, German crochet, and Victoria or Tunisian crochet; the latter is known also under the name of tricot-crochet.
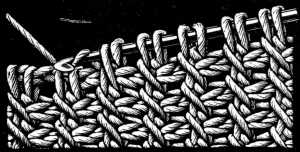
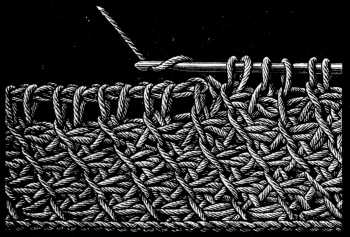
In German crochet there are eight different kinds of stitches: (1) chain stitch, (2) single stitch, (3) plain stitch, (4) treble stitch, (5) knot stitch, (6) bullion stitch, (7) cluster or scale stitch, (8) double stitch.
The rows are worked, according to the kind of stitch, either to and fro, or all from one end. In the former case, the work has to be turned at the end of each row, and the subsequent row begun with 1, 2 or 3 chain stitches to prevent the contraction of the outside edge.
When the rows are all worked one way, the thread must be fastened on afresh each time, which is done by putting the needle into the first chain stitch of the preceding row, drawing the thread through it so as to form a loop, and making one or more chain stitches according to the height required.
At the end of each row, cut the thread and draw the end through the last loop; in this manner all crochet work is finished off. Some crochet workers make a few extra chain stitches with the ends of the thread at the beginning and end of each row, or fasten them off with a few stitches on the wrong side.
They can also, when the occasion requires, be formed into a fringe or tassels as a finish to the work.
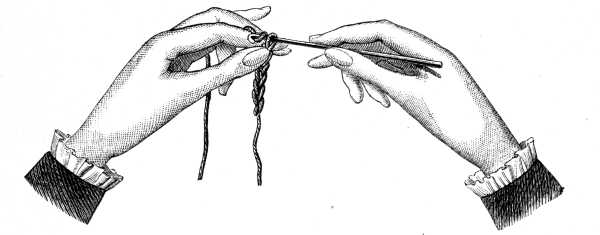
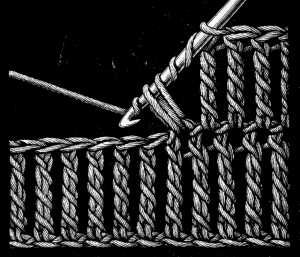
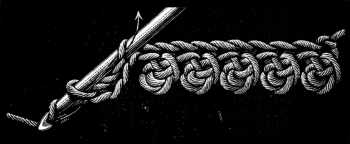
Position of the hands and explanation of (1) chain stitch (fig. 403).—Take the thread in the left hand between the finger and thumb, hold the needle between the thumb and first finger of the right hand, letting it rest on the second finger, in the same manner in which you hold your pen, and put it into the loop, which you hold between the finger and thumb of the left hand. Take up the thread, lying on your finger, with the needle and make your first stitch as you do in knitting, tightening the loop just enough to leave an easy passage through it for the needle. The end of the thread must be held by the thumb and forefinger. The next stitches are made by taking up the thread with the needle and drawing it through the loop. The throwing of the thread round the needle by a jerk of the wrist is called an 'over'.
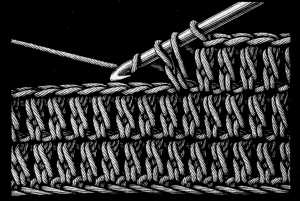
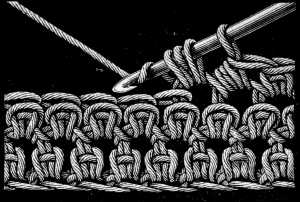
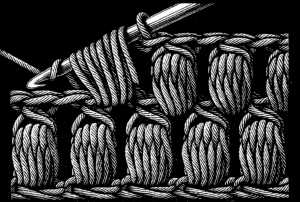
(2) Single stitch (fig. 404).—Put the needle in from the right side of the work, into the uppermost loop of the preceding row, take up the thread on the needle and draw it through both loops.
(3) Plain stitch (fig. 405).—Put the needle through, as in fig. 404, from the right side to the wrong, under the upper side, either of a chain, or of a stitch of the preceding row, draw the thread through it in a loop, turn the thread round the needle and draw it through both loops on the needle. By making the rows of plain stitches follow each other in different ways, a great variety of stitches can be produced, as the illustrations and written instructions here given will show.

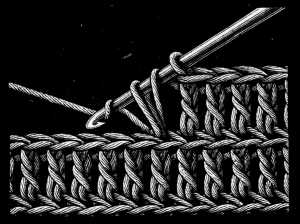
Rose stitch (fig. 406).—This consists of rows of plain stitches, worked backwards and forwards. Insert the needle from the right side, under both the horizontal loops of the preceding row.
Russian stitch (fig. 407).—This is worked like the foregoing, only that all the rows have to be begun from the same end, and the thread has to be cut off at the end of each row.
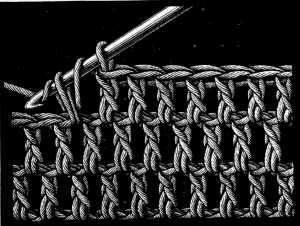
Ribbed stitch (fig. 408).—Worked backwards and forwards, the hook being passed through the back part only of the stitches of the preceding row.
Chain stitch.—Worked like fig. 408, but on one side only.
Piqué stitch.—This stitch also is only worked on one side. Put the needle in under one of the vertical threads of a stitch and complete the plain stitch. This is a stitch that looks very well on the wrong side; the bars of the loop lie quite close together, which makes it particularly suitable for unlined articles of clothing. It requires a large-sized needle to do this stitch well, especially if the material be a heavy one.
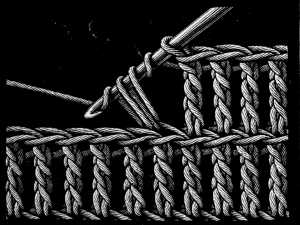
Slanting stitch (fig. 409).—Worked entirely on the right side. Take up the back thread of a stitch in the preceding row, take hold of the crochet thread without turning it round the needle and draw it through in a loop, and then finish the stitch like a plain stitch.
Crossed stitch.—The name which is given to the preceding stitch when both the threads of the stitches in the row before, are taken up together, instead of the back one only.

Russian crossed stitch (fig. 410).—To work this stitch which runs in slanting lines, put the needle in between the vertical threads of the stitches and underneath the two horizontal ones.
Counterpane stitch (fig. 411).—Counterpanes can be made in a less close stitch than those just described.
To produce a soft and elastic fabric turn the thread round the needle and insert it under both the horizontal threads of a loop, take up the thread without turning it round the needle, draw it through in a loop, make an over, and draw the thread through all the three loops, that you have on the needle.
Knotted stitch (fig. 412).—This stitch likewise is composed of plain stitches, which, however differ in a slight degree from those we have described hitherto.
Make an over, put the needle through the two horizontal threads of the stitch below, make another over and draw it back through the two loops and the first over, make another over, and draw the thread through the last two loops.
Loop stitch (fig. 413).—Worked as follows: when you have put the needle into the loop of a stitch below, carry the thread, downwards from above, round a stripe of cardboard or a flat wooden ruler, then finish the stitch in the usual way. These long loops, each about 2 c/m. in length, can also be made over the forefinger and held fast by the thumb as you work, but it is more difficult to make them regular in this way.
Each row of long stitches is followed by a row of plain stitches. The side, where the long loops lie, becomes the right side. If you wish this stitch to be very thick and handsome, wind the thread three times round the ruler, or finger, and secure it with a plain stitch; in this case, you should make one plain stitch between every two clusters. A loose, fleecy thread is generally used for this stitch, and for washing articles more especially, we recommend Coton à repriser D.M.C.
Plain stitches for a chain (fig. 414).—Begin with two chain stitches, put the needle in between the two threads of the first chain stitch, turn the thread round the needle and draw it through in a loop, turn it round again and draw it through the two loops; then, put the needle into the left part of the stitch that was just made, turn the thread round the needle, draw it through the two loops and so on, to the end.
A chain of this kind makes a very good substitute for mignardise when that can not be got of the right size and colour for the required purpose.
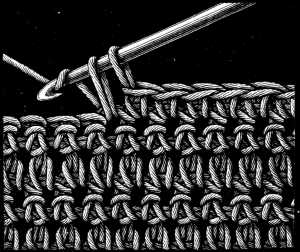
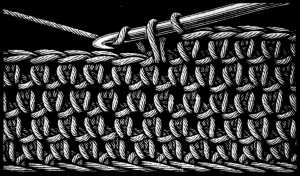
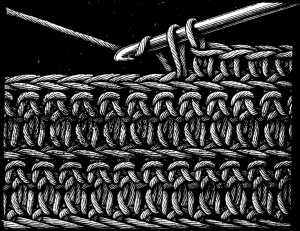
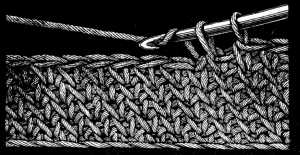
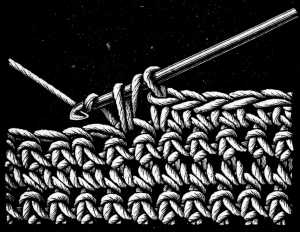
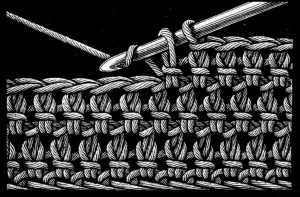
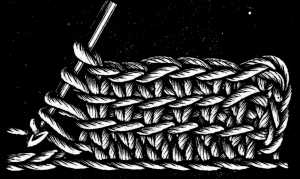
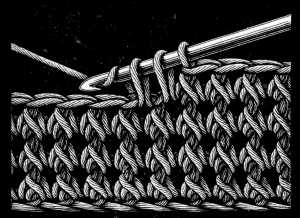
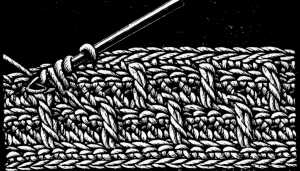
(4) Trebles.—Trebles are little columns, or bars made of loops or stitches. They can be worked, like all other crochet, either to and fro, or all one way. There are different kinds of trebles; half or short trebles, trebles, double trebles, called also 'long stitch', and quadruple and quintuple trebles, called 'extra long stitch', connected trebles and crossed trebles.
Half trebles (fig. 415).—Turn the cotton round the needle from behind, put the needle in between the trebles of the preceding row, or into one edge of a chain stitch; make an over, bring the needle forward again with the thread, make another over and draw the needle through all three loops.
Trebles (figs. 416 and 417).—Begin, as for the half treble, by turning the thread round the needle, and putting it in under one edge of the stitch beneath, then take up the thread on the needle and bring it through two of the loops, take it up again, and draw it through the two remaining loops.
In fig. 417, we have trebles made in the same manner as fig. 416, only that instead of putting the needle under one edge of the stitch beneath, you put it under both, and between the trebles of the last row.
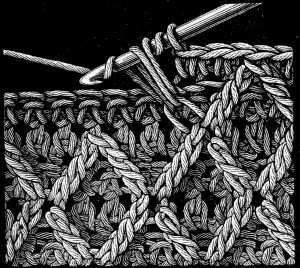
Double trebles or 'long stitch' (fig. 418).—Turn the thread twice round the needle, put it into a stitch of the work and bring the thread through in a loop, then take up the thread on the needle and bring it through two of the loops, three times in succession.
Triple and quadruple trebles or 'extra long stitch' (fig. 419).—For a triple treble, twist the cotton three times round the needle, for a quadruple one, four times, then form the treble in the usual way by bringing the needle through two of the loops at a time. To make a series of trebles, of gradually increasing length, bring the needle, at every other treble, through the last three loops, so that before making a triple treble you will have to make columns, respectively, 1 treble, 1½ treble, 2 trebles and 2½ trebles long. Columns like these, of different lengths, are often required in crochet work, for leaves and scalloped edgings.
Connected trebles (fig. 420).—Trebles, connected together, can be worked to and fro, and take the place of plain stitches. Begin with a chain, then make a treble of the required height, form as many loops as you made overs for the treble, take up the upper thread of the stitch nearest the treble, turn the thread round the needle, bring it back to the right side and draw the needle through the trebles, two at a time.
Crossed trebles (figs. 421 and 422).—Trebles of this sort produce an open stitch, which is often used for the footing of lace, or for an insertion. Make a foundation of chain, or other stitches, and proceed as follows: 3 chain, miss 2 stitches of the row beneath, make 1 treble in the third stitch, 5 chain, 1 over, put the needle in between the loops of the connected trebles and finish with a treble. Then make a double over, put the needle into the next loop of the preceding row, make another over, draw the needle through the loops, make another over and join the two next loops. This leaves 3 loops on the needle. Make an over, put the needle into the third stitch of the row beneath, make an over, and bring the needle back to the right side.
Join the 5 loops on the needle together, 2 and 2, make 2 chain, 1 over, put the needle into the upper parts of the connected trebles and finish with a treble, and so on.
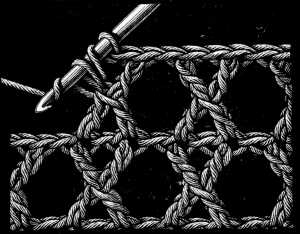
These trebles also can be lengthened if necessary, but in that case, the width of the crossed treble must correspond with the height. Generally speaking you make the trebles over the same number of stitches as you made overs on the needle, which should always be an even number.
Trebles for a chain.—A quicker way of making a wide footing for a crochet lace is to make the trebles in the following manner.
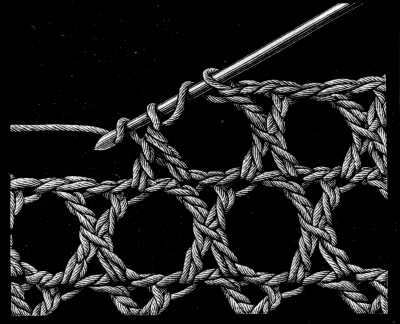
Make 4 chain stitches, 2 overs, put the needle into the first of the 4 chain, 1 over, draw the thread through the stitch *, 1 over, draw the thread through the next 2 loops and repeat twice from * = ** 2 overs, put the needle into the left bottom part of the treble, close the treble as before and repeat from **.
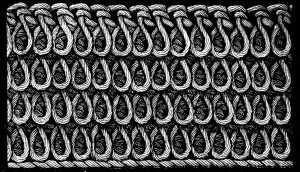
(5) Knot stitch (fig. 423).—This stitch which is composed of several loops forming a tuft, can only be worked from one side, consequently all one way. It looks best in a coarse material to show the interlacing of the threads.
Enter the needle through the two loops of the stitches of the bottom row, turn the thread round the needle, but away from you towards the back; bring it forward to the right side, put the needle again through one of the bottom stitches, make another over like the first and draw the needle through all the bars at once.
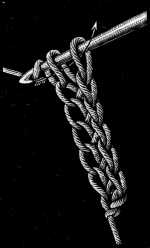
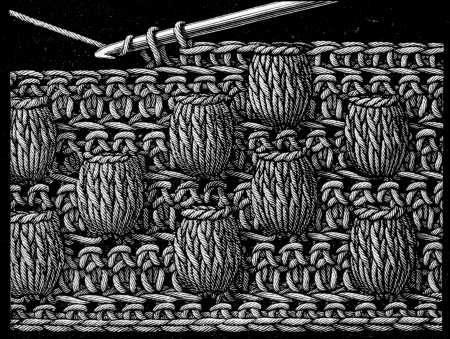
(6) Bullion Stitch (figs. 424 and 425).—For bullion stitch, select a needle, a little thicker towards the handle, and finer than you would use for any other crochet stitch.
Begin by making a chain of very loose stitches, then wind the thread several times, very evenly, round the needle. Insert the needle into a loop of the chain, make a single over, and draw it with the last over upon it, through all the other overs.
Trebles in bullion stitch, fig. 425, are worked in just the same manner, only that you have to turn the thread, at least 10 or 12 times round the needle and draw it through all the overs at once. To facilitate the passage of the needle, keep the overs in their place with the thumb and forefinger of the left hand.
Bullion stitch can only be worked with wool or a very fleecy thread, such as Coton à repriser D.M.C,[A]but trebles in bullion stitch can be worked in any of the D.M.C threads and cottons.
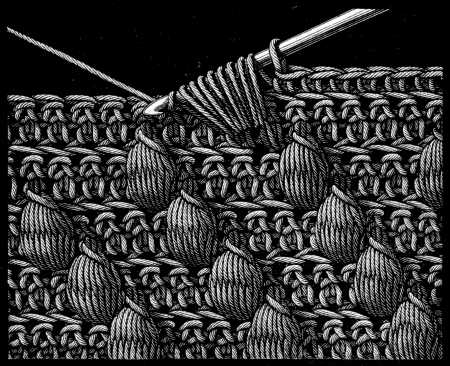
(7) Cluster stitch (fig. 426).—Generally used as an insertion between rows of plain crochet.
Put the needle under one stitch of the preceding row, make an over, draw the thread through in a loop, make another over, put the needle in again under the same stitch, bring it back, make a third over, and pass a third time under the same stitch; bring the needle back, make a fourth over and pass the needle through all the loops that are upon it.
Then, after making a chain stitch, begin the same stitch over again, placing it in the second stitch of the lower row.
Cluster stitch may also be finished off by retaining the two last loops on the needle, making an over, and ending with a plain stitch.
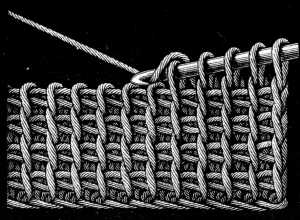
(8) Double stitch (fig. 427).—A rather coarse thread, such as Coton à tricoter D.M.C Nos. 6 to 12, Cordonnet 6 fils D.M.C Nos. 3 to 10, or Fil à pointer D.M.C Nos. 10 to 30[A] is better for this stitch than a loose fleecy thread which is apt to render it indistinct. Take up a loop right and left of a stitch of the preceding row, so that counting the loop of the last stitch, you have 3 loops on the needle, make an over and draw it through the 3 loops. Then take up a loop again by the side of the one you made on the left, and which now lies on the right. Take 2 loops in the next stitch, make an over and draw it through all the loops.
Raised stitch (fig. 428).—All the stitches that come under this heading require a foundation of a few plain rows for the raised trebles. In fig. 428, you will observe that the fourth stitch in the fourth row is a double treble, connected with a loop of the fourth stitch of the first row.
Miss the stitch of the preceding row, which is hidden under the treble, make 3 plain stitches, 1 double treble, and so on.
Having finished this row, turn the work and make a plain row. In the next row begin with 4 plain stitches, then make 1 double treble between the 3 stitches that are between the first trebles, 3 plain stitches, 2 double trebles and so on.
In the 8th row of plain stitches, the trebles must be placed in the same order as in the 4th.
Raised stitch with crossed trebles (fig. 429).—Begin, as in fig. 428, by 3 rows of plain stitches. The 4th row begins with 2 plain stitches followed by: * 1 double treble joined to the upper part of the 1st stitch of the 1st row; keep the 2 last loops of this treble on the needle; make a double over for the next treble, pass the needle through the fourth stitch of the first row, make an over, turn the thread round the needle, bring it back, finish the treble all but the last 3 loops, which you crochet together. Miss the stitch behind the treble, make 3 plain stitches and repeat from *.
Then turn the work, make one plain row, and turn the work back to the right side.
The second row of trebles begins with a plain stitch. The way in which the trebles are to be crossed is shewn in the illustration.
Raised stitch with dots (fig. 430).—After making 3 plain rows, begin the 4th with 3 plain stitches, and proceed as follows: * 6 trebles into the 4th plain stitch of the preceding row, leaving the last loop of each treble on the needle, so that altogether you have 7 loops upon it; then you turn the thread once round the needle and draw it through the loops; miss the stitch that is underneath the dot, make 3 plain stitches and repeat from *.
Then make 3 rows of plain stitches; in the 4th row, the 1st dot is made in the 4th stitch, so that the dots stand out in relief.
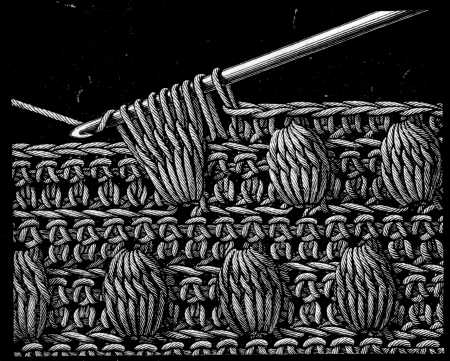
Raised dots with trebles (fig. 431).—Turn the work after making 3 rows of plain stitches, make 3 stitches more in the 4th stitch of the 1st row, * 6 trebles, drop the last stitch of the 6th treble, put the needle into the stitch between the last plain stitch and the 1st treble, take the dropped loop of the last treble and draw it through the one on the needle; miss the stitch under the dot, make 5 plain stitches and repeat from *.
Raised dots in slanting lines (fig. 432).—On the rows of stitches that have been previously prepared, make, for the 4th stitch of the 4th row, a cluster stitch, as in fig. 426, with 1 quadruple over and then 4 plain stitches, 1 cluster stitch and so on. The next row is plain; in the second you have to make 1 plain stitch more, and fasten the cluster stitches into the loops to the left of the second of the 3 covered rows. In this way you have to make each raised stitch, one stitch, in advance and to the left of the last, so that they run in slanting lines over the surface.
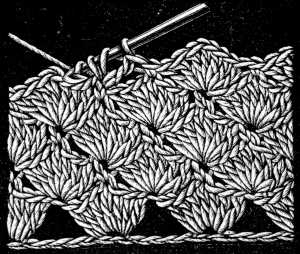
Close shell stitch (fig. 433).—This pretty stitch which can only be worked in rows, all one way, is more especially suitable for children's jackets and petticoats; it is easy, and has the merit of being quickly done. On a foundation of chain, or other stitches, make: 2 chain, 7 trebles on the 4th stitch, * 1 chain, 7 trebles on the 5th stitch of the last row and repeat from *.
2nd row—** 7 trebles on the chain stitch of the last row which connects 7 bars, 1 plain stitch on the 4th of the 7 trebles of the first row and repeat from **.
Picots.—The edges of most crochet work are ornamented with picots, or small points of different shapes, called severally close picots, chain picots and lace picots.
Close picots may be subdivided into, large and small, pointed, and rounded, picots with rounded leaves and picots with pointed leaves.
Small rounded picots.—These may either be made separately and then sewn on, or made at once, on to a crochet border. In the first case, begin with 3 chain, then coming back, make 1 plain stitch on the second and on the first chain stitch. In the second case make: 1 chain, take the needle out of the stitch and put it in from the right side, under both edges of the last stitch, take up the dropped stitch, bring it to the right side, * 3 chain; then returning: 1 plain stitch on each chain, draw the needle out, put it in from the right side into the second stitch of the row beneath, take up the loop, bring it back to the right side, and repeat from *.
Large rounded picots.—5 chain, miss 3, 1 treble on the 2nd and 1 treble on the 1st chain stitch.
When you want to attach these picots at once to an existing piece of work, drop the last loop and bring it back again with the needle from the wrong side to the right and miss 2 stitches, instead of one, as in the case of the small picots.
Pointed picots.—Cast on 6 chain, then returning, and missing the 6th stitch: 1 single stitch, 1 plain stitch, 1 half treble, 1 treble, 1 double treble.
Picots with rounded leaves.—* 4 chain, and 3 trebles on the first stitch, and 1 single on the same stitch on which the trebles were, **, or 6 chain and repeat from * to **.
When these picots serve as a finish to a straight edge, make 2 single stitches in the preceding row instead of 2 chain.
Picots with pointed leaves.—6 chain, on the first chain stitch: 3 double trebles, of which you retain the two last loops on the hook, 1 over, draw the thread through the 4 loops, 5 chain, 1 single on the stitch on which the trebles are.
Chain picots.—For the small chain picots, make: 5 chain and 1 plain stitch on the first of these 5 stitches. For the large ones: 5 chain and 1 treble on the first stitch.
Picots in bullion stitch (figs. 424 and 425).—5 chain, 1 treble in bullion stitch drawn up into a ring, and joined to the 5th chain stitch.
Drooping picots (fig. 434).—5 chain, drop the loop, put the needle into the first of the 5 chain, take up the dropped loop, and draw it through the stitch.
Lace picots (figs. 435 and 436).—Fig. 435 represents picots formed of chain stitches, as follows: 2 chain, put the needle into the first, 1 over, bring the thread back to the front, 2 chain: * put the needle into the two loops, and at the same time, into the second loop and the first chain, draw the thread through in a loop, make 2 chain and repeat from *.
In order to make the picots more even and regular, it is advisable to form them over a coarse knitting needle or mesh.
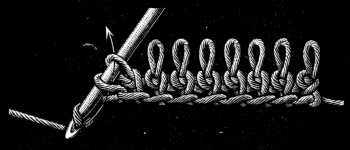
Fig. 436 represents picots attached by plain stitches to the edge of a finished piece of work; this is done as follows: 1 plain stitch, draw out the loop to the proper length for a picot, and slip it on a mesh: put the needle into the horizontal parts of the last stitches, turn the thread round the needle, draw it through in a loop, and make 1 plain stitch on the next stitch and so on.
Method for copying tapestry patterns in crochet work (figs. 437 and 438).—Printed cross stitch and embroidery patterns can very well be copied in crochet work especially when they are in two colours only, or rather, are drawn in one colour, on a plain ground.

The way in which such patterns are copied in crochet is by means of chain stitches and trebles, which, rising one above the other in rows, form little squares. For each square marked on the pattern, you must count, in the grounding, 1 treble and 2 chain stitches; in the solid parts, 3 trebles.
The squares formed by the chain stitches should always begin and end with a treble.
When, therefore, a solid square comes between empty or foundation squares, count 4 trebles for the solid square, because the last treble of the last empty square touches the third treble of the solid one.
Thus for 2 solid squares, side by side, count 7 trebles, and for 3 squares, 10. Embroidery patterns worked in several colours can be reproduced in crochet either by trebles and rows worked one way only, cutting off the thread at the end of each row, or by plain stitches, worked in rows to and fro.
When only three colours are used, pass two threads under the stitches; when more than two, leave those which are not in use, at the back of the work and only bring them to the front as they are wanted. The thread, you lay aside, takes at the back the place of the one in use. Of course, the threads not in use can only can be disposed of in this way when the work has a wrong side, otherwise they must be passed underneath the stitches. The colours should alternate in the order the pattern prescribes; moreover, the last stitch before you take another colour cannot be finished with the same thread, you must pass the new thread through the last loop and draw it up with that.
Crochet with Soutache or Lacet (braid) (figs. 439 and 440).—These are two patterns of crochet, worked with the ordinary crochet cottons and with Soutache or Lacet D.M.C, a material which has not been used for crochet work before.
Both patterns are worked entirely with trebles; in fig. 439, the red braid passes over and under 2 trebles; in fig. 440, it is brought, it will be observed, from the wrong side to the right after every 2 trebles, and passed between them, in such a manner as to form a slanting stitch between the rows of stitches.
Fig. 440. Crochet with soutache or lacet (braid).
Materials: Coton à tricoter D.M.C Nos. 6 to 12 or Cordonnet 6 fil D.M.C Nos. 3 to 10. Soutache D.M.C No. 2 or 3 or Lacets superfins D.M.C Nos. 2 to 5.
Colours: The cotton, white or écru. The Soutache or Lacet: Rouge-Cardinal 347, or Rouge-Grenat 326, or Bleu-Indigo 312.[A]
Crochet square (fig. 441).—Begin with 4 chain stitches, and work 1 single on the 1st chain, to make a round. Work, 1 chain and 2 plain on the next chain, 3 plain on each of the next 3 chain, 1 plain on the stitch on which the two first plain are worked.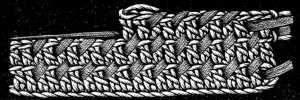
Materials: Coton à tricoter D.M.C Nos. 6 to 12 or Cordonnet 6 fil D.M.C Nos. 3 to 10. Soutache D.M.C No. 2 or 3 or Lacets superfins D.M.C Nos. 2 to 5.
Colours: The cotton, white or écru. The Soutache or Lacet: Rouge-Cardinal 347, or Rouge-Grenat 326, or Bleu-Indigo 312.[A]
Slip the next stitch, that is, put the needle in between the horizontal bars of the 1st plain stitch of the previous row, and draw the thread out without making a stitch.
Then make 1 chain and 2 plain on the slipped stitch.
After which, you make 3 plain on the second of the 3 plain that form the corner, and 1 plain on all the other stitches of the last row. The beginning and end of each row, are worked as described above.
Fig. 441 represents a square, worked in consecutive rows. In making a crochet square, the rows may end in the middle of a side.
When you use a stitch that has to be worked to and fro, you turn your work at the end of every row and work back along the stitches you have just made.

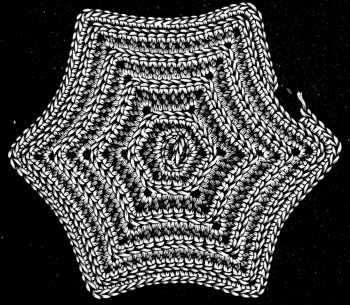
Crochet hexagon (fig. 442).—Make a foundation chain of 6 stitches, join the round; 12 plain on the 6 chain; finish the row as indicated for the previous figure == turn the work == * 1 plain, 3 plain on the second plain of the last row; repeat 5 times from *. Finish the row with 1 single == turn the work == 2 plain, 3 plain on the second of the first 3 plain; 3 plain and so on. These hexagons can be made of any size.
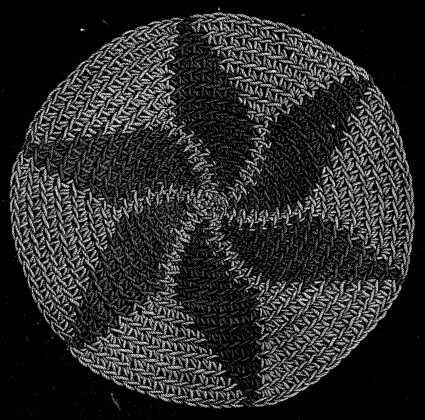
Coloured star worked into a light ground (fig. 443).—Begin with 3 chain, join the ring = 2 plain on each of the 3 chain; then for the foundation, 1 plain with the dark thread, and 1 with the light on each of the 6 plain.
In each subsequent row, make one dark stitch more, increasing regularly, that is, making 2 stitches on the last light stitch that comes before the dark ones.
Proceed in this manner until you have 6 or 8 dark stitches, in all and then begin to decrease in every row by one, until there is at last only one dark stitch remaining.
These stars are used in the making of purses, cap-crowns and mats for lamps, etc.
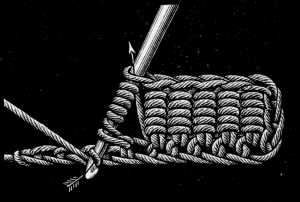
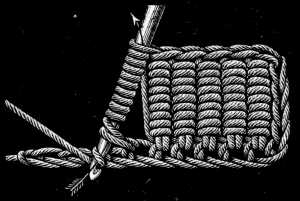
Tunisian crochet.—Tunisian crochet is also called crochet-knitting because, you have to cast on all the first row of stitches, as in knitting.
Materials—Every kind of cotton, as well as wool and silk, can be used for Tunisian crochet: the stitches look equally well in all these materials, but for things that require frequent washing or cleaning, a good washing material should be selected, such as Coton à tricoter D.M.C and Cordonnet 6 fils D.M.C[A], both strong and suitable in all ways.
As we have already said, Tunisian crochet requires to be done with a long straight needle, with a knob at one end and it can only be worked on the right side.
Plain Tunisian crochet (fig. 444).—After making a foundation chain of the required length, begin the first, or loop row as it is called. Put the needle into the 2nd chain stitch, draw a loop through and so on, until you have taken up all the chain stitches on the needle. After having made the last stitch of the loop row, make 1 chain stitch and then pass to the second row that completes the stitch. Turn the thread round the needle, draw it through two loops, turn the thread round again, and again draw it through two loops, and so on to the end.
Straight plaited Tunisian stitch (fig. 445).—Worked thus: miss the first loop in the 1st row, take up the second, and come back to the first, so that the 2 loops are crossed. Work the second row in the same manner as the second row of the preceding figure.
Diagonal plaited Tunisian stitch (fig. 446).—Worked like the preceding, taking up first the second loop and then the first: the second row also, in the same way as before. In the third row, take up the first stitch, and draw the third through the second, so as to produce diagonal lines across the surface of the work.
Open Tunisian stitch.—This is an easy kind of Tunisian crochet. The first row is worked as in fig. 444. In the row of plain stitches, you alternately join 2 and 3, or 3 and 4 loops of the preceding row together, and replace them by as many chain stitches.
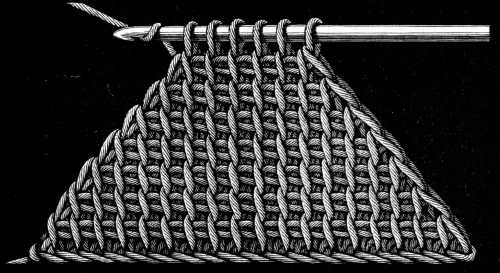
Decreasing and increasing in Tunisian crochet (fig. 447). Our illustration shows how to decrease on both sides and by that means form scallops.
You miss a stitch alternately on the right and left. On the right you crochet the first two stitches together, and at the end of the row, the last two, and so on, to the end. You increase in the same order, first on the right and then on the left.
Hairpin crochet (figs. 448, 449, 450).—So called because it is worked on a kind of large steel hairpin or fork with two or more prongs. Wooden and nickel varieties of this implement, which are patented by Mme Besson, of Paris, are also used.
Very pretty laces, fringes, gimp headings and the like can be made in this kind of crochet work. It is often used in combination with ordinary crochet and plain and scalloped braids and gimps, or as a heading for fringes made of tufts and pendant balls. There are a great many stitches which can be worked in hairpin-crochet. We shall only describe those here that will best teach our readers how the work is done.
Materials.—For washing laces, Cordonnet 6 fils D.M.C is the best; for furniture fringes, the lower numbers of Coton à tricoter D.M.C, and for producing the appearance of filoselle, the lower numbers of Coton à repriser D.M.C are to be taken.

Stitches.—Begin by a chain stitch, made with an ordinary crochet needle, take the needle out of the loop, and insert the left prong of the fork upwards from below, holding the fork between the thumb and finger of the left hand. The thread should always be in front. Then put the thread over the right prong and the needle into the loop on the left prong, take up the thread, draw it through the loop, put the thread over the needle and draw it through the loop that is on the needle, twist the loop round the left prong, turn the needle round to the right (the thread will now be wound round the right prong); put the needle into the loop on the left prong, throw the thread over the needle, draw it through, tighten the loops and so on.
These stitches may be doubled, or you may make several trebles on each loop, or arrange the plain stitches in different ways.
Hairpin insertion (fig. 451).—Begin by making stripes with the fork, covering each thread with two plain stitches. Then join the stripes together by the loops, drawing the left loop over the right one and the right one over the left. When you come to the end of the stripes fasten off the last loops by a few stitches. To strengthen the edges, join two loops together by 1 plain, 2 chain, 1 plain and so on.
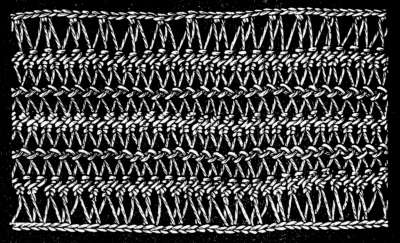 Fig. 451. Hairpin insertion.
Materials: Fil à pointer D.M.C No. 20 or 30, or Cordonnet 6 fils D.M.C Nos. 4 to 15, white or écru.[A]
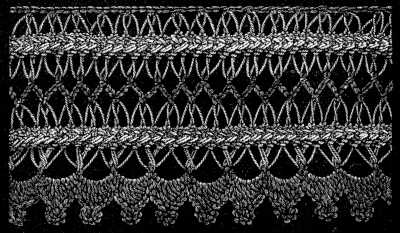 Fig. 452. Hairpin lace.
Materials—For the hairpin work: Fil à pointer D.M.C Nos. 20 to 30, or Cordonnet 6 fils D.M.C Nos. 3 to 10, white or écru. For the edge. Coton à tricoter D.M.C Nos. 16 to 30.
Colours: Rouge-Cardinal 347, or Jaune-Rouille 364, or Brun-Marron 406.[A]
1st row—join 3 loops by: 1 plain, 5 chain.
2nd row—on the 5 chain stitches: 1 plain, 1 half-treble, 3 trebles, 1 picot, made with 5 chain (for the chain picots, see p. 237), 1 half-treble, 1 plain. The footing of this lace is made like the one in fig. 451.
Hairpin fringes (figs. 453, 454, 455, 456).—Fig. 453 is made with a fork composed of one branch and 3 or 4 rulers, round which the thread is wound in succession, so as to form loops of different lengths. You may use for this, either a single very coarse thread, or else several fine ones, used together as one.
The heading of the fringe is plain, and heavy tassels are fastened into the loops. The tassels are made as follows: take a thick skein of the same thread the fringe is made of, pass it through the loop, leaving just the length required for the tassel, at one end, thread a needle with the same thread and twist it round the skein, the right distance from the top to form the head of the tassel and then cut the ends even, at the bottom. As the loops are of different lengths, the tassels will hang in steps and the fuller and heavier they are, the handsomer the fringe will be.
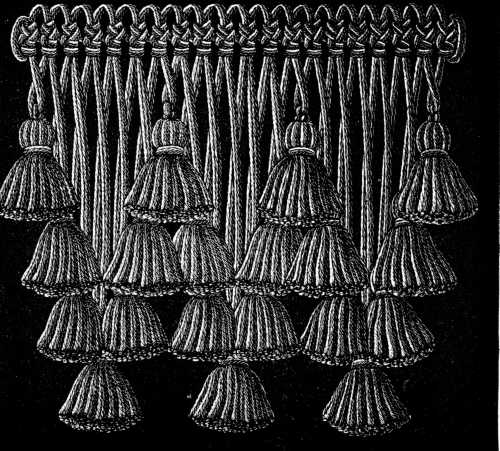
Fig. 454 represents another pattern of fringe, the first part of which is made with the same fork as the preceding one. Instead however of winding the thread round the several prongs in succession, you pass it alternately round the two first and the fourth, thus making loops of two lengths only. Tassels of a length, suited to the purpose the fringe is intended for, depend from these loops and may be varied in the second row by balls made to issue from the middle, or by long meshes, which are made over the whole width of the fork and affixed to the loops.
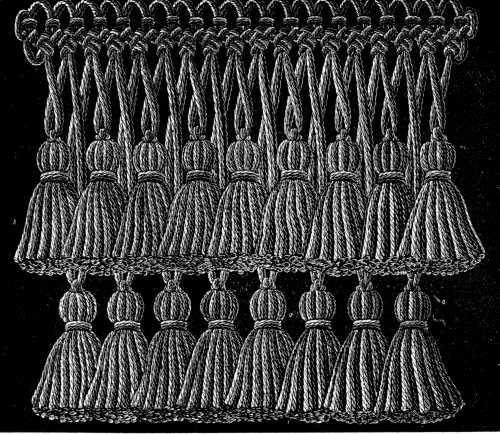 Fig. 454. Hairpin fringe with tassels.
Materials: Coton à tricoter D.M.C Nos. 6 to 16.[A]
Colours: Écru and Jaune-Rouille 363, 368, or Gris-Tilleul 331 and Rouge-Cornouille 449 and 450, or three other shades.[A]
The loops in fig. 455 are all of one length and a ball hangs from every third. In the last chapter but one, a minute description is given of the way in which these balls are made. The heading of the loops is formed by a row of chain stitches, varying in number from four to six, according to the size of the cotton. The edge is ornamented with little picots. The fringe, in fig. 456, consists of three long and three short loops alternately, which causes, the balls that are made to depend from them, to form two parallel lines.
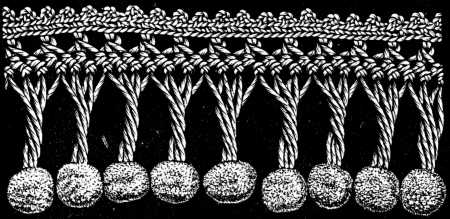
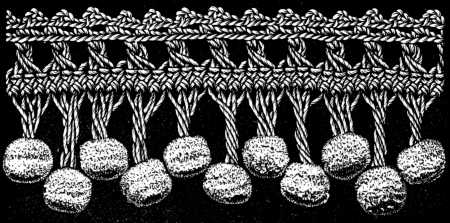 Fig. 456. Hairpin fringe with two lines of balls, one above the other.
Materials—For the crochet-work: Cordonnet 6 fils D.M.C Nos. 3 to 10, or Fil à pointer D.M.C Nos. 10 to 30. For the balls: Coton à repriser D.M.C Nos. 8 to 16.
The picots are made with 6 chain stitches, you put the needle back into the fifth stitch after closing the picot, make 1 chain, 2 plain, in the preceding row, 1 picot and so on.
Fringe made with Lacet or braid (fig. 457).—This is an easy fringe to make and a very effective trimming for table-cloths, curtains etc., which are embroidered on coarse stuffs.
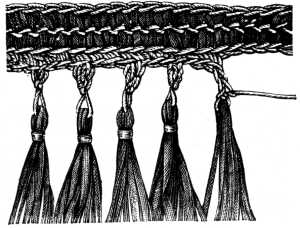 Fig. 457. Fringe made with lacet or soutache (braid).
Materials: Lacet D.M.C No. 4 or Soutache D.M.C NO. 2½ in red. Cordonnet 6 fils D.M.C Nos. 3 to 10. Fil à pointer D.M.C Nos. 10 to 30, écru.[A]
In the next row, you use the twist and the braid together, as follows—with the twist = 1 chain stitch, put the needle into the first stitch of the foundation chain, take up the braid, draw it through, turn the twist round the needle, draw it through the braid and the chain stitch. To make the braid loops longer, they may be made over a wooden ruler. To the two rows of braid stitches, represented in the pattern, you may add as many other rows as you please. On the fringed side make: 4 plain, 3 chain, draw out one very long loop and fasten into it a cluster of lengths of braid from 10 to 12 c/m. long, and draw the loop tightly round it to secure the tassel; 3 plain on the chain stitches. Repeat from *.
Lace made on Point Lace braid (fig. 458).—For the rounds: 1 plain on the braid, 10 chain, then coming back, 1 single on the 4th chain.
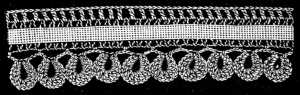 Fig. 458. Lace made on point lace braid.
Materials: Fil d'Alsace D.M.C Nos. 30 to 50, or Cordonnet 6 fils D.M.C No. 80, white[A] and Point Lace braid.
Crochet guipure lace (fig. 459).—This charming little lace makes a very good substitute for real guipure. It can be made on a row of trebles, just as well as on point lace braid, or on a mignardise, after you have raised the picots of it by single and chain stitches.
 Fig. 459. Crochet guipure lace.
Materials: Fil d'Alsace D.M.C Nos. 70 to 90. Cordonnet 6 fils D.M.C Nos. 80 to 120, or Fil à dentelle D.M.C Nos. 40 to 70.
1st scallop—7 plain, 5 chain, join to the 4th chain; on the 5th chain: 6 plain; on the 8th chain: 3 plain.
2nd scallop—on the 10 chain: 7 plain, 5 chain, join to the 4th chain = on the 5 chain: 6 plain = on the 10 chain, 5 plain, 5 chain, join to the 4th chain, 6 plain, 5 chain, join to the 4th chain, 6 chain, 1 plain on the 10th chain.
3rd scallop—like the first, then repeat from *.
Lace made on Point Lace braid (fig. 460).—On the braid, work a row of trebles, 1 or 2 chain stitches apart, according to the size of the braid and on this row of trebles, make two other rows as follows:
1st row—5 chain, 1 treble on the treble of the preceding row, 5 chain, 1 treble, on the same stitch to which the first treble is joined, 5 chain, miss 3 trebles, 1 treble on the 4th treble of the row beneath.
2nd row—1 plain on the 3rd of the 5 first chain, 3 plain, 1 treble on the 3rd of the chain stitches between the two trebles of the first row that come close together; 3 chain, 1 treble on the same stitch, 3 chain, 1 treble on the same stitch, 3 chain, 1 treble on the 3rd of the next 5 chain.
Crochet lace (fig. 461).—1st row—3 plain close together, in the braid; * 13 chain, join to the 1st plain. On each of the first 6 chain; 1 plain; = on the 7th chain: 3 plain, then on the other chain stitches: 6 plain. In the braid: 7 plain and repeat from *.
2nd row—* miss 2 plain of the first row, 5 plain to reach the 2nd stitch added in the first row, 4 plain on the 2nd added stitch, 4 plain on the next stitches. Repeat from *.
 Fig. 461. Crochet lace.
Materials: Lacet superfin D.M.C No. 14 and Fil d'Alsace D.M.C Nos. 30 to 70.[A]
Crochet lace with mignardise (fig. 462).—This and all the patterns that follow, up to fig. 473, make very useful trimmings for all kinds of underclothing. Begin by raising the picots on both sides of the mignardise by: 1 plain stitch and 1 chain.
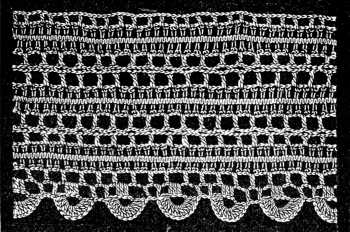 Fig. 462. Crochet lace with mignardise.
Materials—According to the mignardise used. Fil d'Alsace D.M.C Nos. 30 to 70, or Fil à dentelle D.M.C Nos. 25 to 70.[A]
Work the edge in two rows.
1st row—1 treble between 2 picots, 3 chain, miss 2 picots, 1 treble.
2nd row—1 treble on 3 chain, 3 chain, 1 treble, 3 chain, 3 trebles, 7 chain, turn back and join to the 1st of the 3 trebles, 2 chain, join them to the 2nd treble, 2 trebles on the 7 chain; keep the last loops of the last treble on the needle and join them to those of the next treble.
Lace with two rows of leaves (fig. 463).—This is one of the pleasantest crochet patterns to work that we know. The leaves are made separately and fastened into a foundation with thread, at least two numbers finer than that of which the leaves are made.
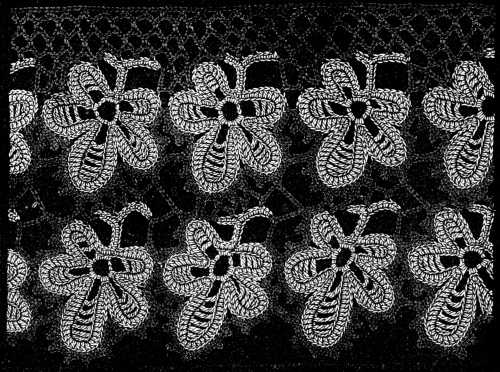 Fig. 463. Lace with two rows of leaves.
Materials: Fil d'Alsace D.M.C Nos. 20 to 100, Cordonnet 6 fils D.M.C Nos. 25 to 80 or Fil à dentelle D.M.C Nos. 25 to 100.
2nd petal: 15 chain, miss 3 chain, 1 half-treble *, 1 chain, miss 1 chain, 1 treble *. Repeat 4 times from * to *; add: 1 chain, 2 trebles on the ring.
3rd petal: 21 chain, miss 3 chain, 1 half-treble *, 1 chain, miss 1, 1 treble *. Repeat 7 times from * to *; add: 1 chain, miss 1, 2 trebles in the ring.
The 4th petal to be worked like the 3rd; the 5th like the 1st.
When the 5 petals are finished, make 2 plain stitches on the ring; then on the chain stitches of the 1st petal: 2 plain, 7 trebles, 2 trebles on the 10th stitch; then descending again: 7 trebles, 2 plain and 3 single on the 3 plain stitches of the ring.
On the 2nd petal work: 3 plain, 10 trebles, 2 trebles on the 14th chain, 10 trebles, 3 plain, 2 single, on the 2 trebles on the ring.
3rd petal: 2 single, 3 plain, 14 trebles, 2 trebles on the 20th chain, 14 trebles, 3 plain, a single.
The 4th petal is worked like the 2nd; the 5th like the 1st, to be followed by 1 single on the 1st of the 3 chain stitches of the ring.
For the stalk: 14 chain; miss 1, 9 plain on the 9 chain; 6 chain, miss 1, 5 plain on the 5 chain, 4 plain on the chain stitches that are still disengaged, 2 single on the ring and then fasten the thread off with a few stitches.
When you have enough leaves, join them together by a row of picots, working from left to right as follows: * take the second petal on the right side of a leaf, put the thread into the 12th stitch; make 2 plain, 1 picot, 1 plain on the stitch on which the picot was made = in all the leaves, the 3rd plain before the picot and the first after, meet in the same stitch beneath = 2 plain, 1 picot, 3 plain, 2 chain = on the 8th stitch of the 3rd petal: 1 plain, 2 plain more on the next stitches **, 1 picot, 3 plain. Repeat 6 times from ** and finish with 2 chain.
On the 7th stitch of the 4th petal: 1 plain, 2 plain on the next stitches ***, 1 picot, 3 plain. Repeat 4 times from ***.
On the 5th stitch of the 5th petal: 1 plain, and on the 4 next, 4 plain ****. Repeat from * to ** round each leaf, then instead of a picot, make 4 chain, join between the 1st and 2nd picot, 4 chain, close the picot. From this point the preceding series of stitches takes the place of the picot that immediately follows the sign **; proceed to ****.
Foundation for the footing of the lace, with a single row of leaves.—When all the leaves are joined together, take the finer number of cotton and fasten your thread to the last stitch of the small stalk; then make: * 2 chain, 1 plain on the 9th stitch of the 5th petal; 6 chain, miss 2, 1 plain on the 3rd stitch; 6 chain, 1 plain on the 3rd stitch, 1 chain, 1 plain on the 5th stitch of the 4th petal; 6 chain, 1 plain on the 3rd chain; 2 chain, 1 plain on the 4th stitch (counting from the bottom) of the 5th petal of the next leaf; 3 chain, 1 single on the last stitch of the long stalk; 3 chain, join to the 3rd chain stitch, 3 chain, draw the thread again in coming back through the 3rd of the second set of 6 chain stitches in the 1st petal; 1 single; turning back and from left to right: 1 single on the plain stitch between the chain stitches, 6 chain, 1 plain on the 2nd of the last 3 chain, 6 chain, 1 plain on the stalk, 6 chain, 1 plain on the 3rd stitch of the stalk; 6 chain, 1 plain on the 4th stitch of the stalk; 7 chain, 1 plain at the top of the little stalk, then repeat from *. The network in the next rows, which may be of any width, is composed of: 6 chain stitches and, 1 plain on the loop of the last row.
For the last row but one of the network, make: 4 chain, 1 plain over each loop, and complete the lace by a row of plain stitches.
To make the leaves stand out from the foundation, use two shades of thread, white and écru, white and Jaune-Rouille 365, or white and Gris-Cendre 415.
The following is the way to join two rows of leaves together, that have previously been edged with picots.
Fasten the thread on to the little stalk, * 3 chain, 1 plain on the 8th stitch of the leaf, 2 chain, join to the middle picot of the 3rd petal of the top leaf; 2 chain, 3 plain on the 5th petal of the bottom row, 1 picot, 3 plain.
For the 2nd petal of the bottom leaf: 3 plain, 1 picot, 3 plain.
For the 5th petal of the next leaf below: 3 plain, 4 chain, 1 single on the long stalk, 5 chain, 1 plain on the 2nd picot of the 1st petal of the preceding leaf, 5 chain, 1 single on the 2nd picot of the 4th petal of the top leaf, 4 chain, 1 plain on the 4th single of the stalk, 3 chain, 1 single on the 7th picot of the 3rd petal of the top leaf, 3 chain, miss 1 stitch of the stalk, 1 plain on the stalk, 3 chain, 1 plain on the 6th picot of the top leaf, 3 chain, 1 plain on the little stalk. Repeat from *.
Three and even four rows of leaves may be joined together in this manner and make a very handsome lace, particularly suitable for church linen.
Insertion with waved braid (fig. 464).—1 plain stitch at the point of the braid, 7 chain, 1 single on the 2nd chain. On the next chain stitches: 1 half-treble, 1 treble, 1 double treble, 1 triple treble, 1 plain on the next point of the braid.
Repeat the same stitches on the second side, only that after the 6th chain stitch, you draw the thread through the 7th of the 1st finished row.
Little wheels, set between the crochet pyramids, and described in the chapters on filet-guipure and Irish lace, complete the insertion.
 Fig. 464. Insertion with waved braid.
Materials.—According to the size of the braid: Fil d'Alsace D.M.C Nos. 20 to 70, or Cordonnet 6 fils D.M.C Nos. 40 to 70.[A]
Take 2 leaves of the braid, fold them one upon the other: 1 treble near the stalk of these folded leaves, tighten the loops of the 2 trebles; chain ***, 1 picot, 2 chain, 1 plain, 2 chain. Repeat 5 times from ***.
Proceed with 1 picot, 2 chain,—there will be 7 picots round the folded leaves—1 treble on the folded leaves and repeat from ** to *, therefore the inverse way, and begin again from *.
 Fig. 465. Crochet lace made with leaf braid.
Materials: Fil d'Alsace D.M.C Nos. 50 to 100 or Fil à dentelle D.M.C Nos. 50 to 80.[A]
1st row—* 1 double treble close to the stalk of the leaf, 5 chain, 1 treble, at the third of the leaf, 1 double treble at the 2nd third of the leaf, 5 chain, 2 double trebles, one on the right leaf, one on the left, draw the last loops of the 2 trebles up together and repeat from *.
2nd row—On each of the little loops formed by the 5 chain of the last row: 1 plain, 3 chain, 1 picot in bullion stitch, 7 chain, 1 picot, 3 chain; 1 plain on the next loop and so on.
3rd row—1 plain on the 4th of the 7 chain, 5 chain, 1 plain and so on.
4th row—1 plain on each loop of the last row.
Crochet lace made with leaf braid (fig. 466).—Begin with the outside edge:
1st row:—At the end of a leaf: 1 treble, 6 chain, 1 picot in bullion stitch, 6 chain, 1 treble = at the beginning of a 2nd leaf: 6 chain, 1 picot, 6 chain, 1 treble at the end of the leaf = 7 chain, 1 picot, 7 chain, 1 treble on the 3rd leaf = 6 chain, 1 picot, 6 chain, 1 treble at the end of the 3rd leaf = 6 chain, 1 treble, 6 chain, 1 treble on the 4th leaf = 1 double treble joined to the 4th and 1st leaf of the next scallop = 1 treble at the end of the 1st leaf, join and draw the last loops of these 3 trebles together.
2nd row—over each treble and picot: * 1 plain, 3 chain, 1 picot, 7 chain, 1 picot, 3 chain, 1 plain = repeat 6 times from *.
At the indent and before the last picot: 2 chain, 1 picot, 2 chain = 1 plain before the 1st picot of the next scallop.
3rd row—1 treble, 8 chain, repeat 6 times. In the indent join the 4th of the 7 chain stitches right and left together by 1 treble.
4th row—15 single on each loop of 8 chain.
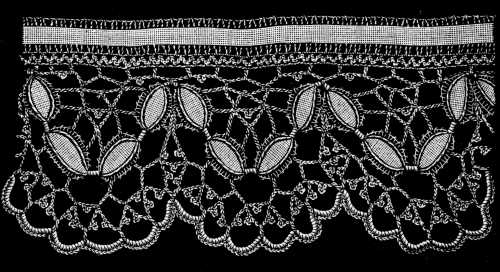 Fig. 466. Crochet lace made with leaf braid.
Materials: Cordonnet 6 fils D.M.C Nos. 40 to 80 or Fil à dentelle Nos. 50 to 80.[A]
Going back to the beginning: 5 chain, 1 single on the 10 chain above the picot = 5 chain, 1 single on the 5th of the first 10 chain = 12 chain, 1 plain on the loop of the last triple treble, 7 chain, 1 picot in bullion stitch, 6 chain = 1 plain on the stalk between the 2 leaves; 6 chain, 1 picot, 7 chain, 1 triple treble on the leaf, 5 chain, repeat from *.
2nd row—5 chain, 1 treble on the lower loops. Distribute the chain stitches equally.
3rd row—1 plain in the braid that forms the footing of the lace, 2 chain, 1 plain on the last chain stitches, 2 chain, 1 plain in the braid, continuing in this manner to join the crochet work and the braid together.
Irish lace (fig. 467).—Begin with the semicircles in the middle of the pattern, which arch over two scallops, and cast on 117 chain. Then lay a double or threefold thread of Cordonnet 6 fils D.M.C No. 2, over the chain stitches, and make one plain stitch on each; then cut the padding thread short off.
 Fig. 467. Irish lace.
Materials: Cordonnet 6 fils D.M.C Nos. 25 to 100, Fil à pointer D.M.C No. 30 or Fil d'Alsace D.M.C Nos. 30 to 100.[A]
Repeat 11 times from * to **; the 11th time making only 6 chain.
2nd and 3rd row—On the upper side, over a double thread of twist: 1 plain on each stitch of the last row; cut off the padding thread = 2 chain, 1 picot, 7 chain, 1 picot, 2 chain, 1 plain on the 4th of the 7 chain stitches after the first picot of the preceding row = 3 chain, 1 picot, 3 chain, 1 plain on the 4th of the next 7 chain stitches **. Repeat 11 times from * to ** and then make: 2 chain, 1 picot, 7 chain, 1 picot, 2 chain, 1 plain.
On the upper side and without a padding thread: 3 plain, 1 picot, * 5 plain, 1 picot, **. Repeat 20 times from * to **. Continue with: 3 plain, 10 chain, 1 picot, 2 chain, 2 plain on the 4th of the first 7 chain of the 2nd row on the inside of the semicircle = 2 chain, 1 picot, 7 chain, 1 picot, 2 chain, 1 plain on the plain stitch of the previous row = 1 plain on the 1st of the 3 chain = 2 chain, 1 picot, 7 chain, 1 picot, 2 chain, 2 plain as before, = 2 chain, 1 picot, 7 chain, 1 picot, 2 plain = 2 chain, 1 picot, 9 chain, 1 plain, return and make on the 9 chain: 7 plain, 2 chain, 1 picot, 2 chain, 2 plain = make 4 more scallops like the previous one = 2 chain, 1 picot, 9 chain, 1 plain = return and make on the 9 chain: 7 plain, 2 chain, 1 picot, 2 chain, 2 plain = make 2 more scallops, and then a 3rd joined to the scallop that terminates the semicircle on the right by the 2 plain stitches = 2 chain, 1 picot, 7 chain, 1 picot, 2 chain, 2 plain on the point of the crescent = 22 scallops consisting of: 2 chain, 1 picot, 7 chain, 1 picot, 2 chain, 2 plain.
9 plain on the scallop that terminates the semicircle on the left, 7 chain, 2 plain on the next scallop, 2 chain, 1 picot, 2 chain, 2 plain on the next scallop = make 2 bars more of the same kind = 7 chain, 2 plain = 3 bars like the previous ones = 7 chain, 2 plain = 3 bars as before = 2 plain, 7 chain, 7 plain on the next scallop = 1 bar consisting of 3 chain, 1 picot, 3 chain, 2 plain over all the scallops of the preceding row (24 scallops in all).
4th row—3 chain *, 8 trebles on the 7 chain that follow the 7 plain = turn the work = 1 single on the last treble, 3 chain, 1 treble on the 7th and 1 on the 6th of the 8 trebles, 2 chain, 1 treble on the 5th and 1 on the 4th of the 8 trebles, 2 chain, 1 treble on the 3rd and 1 on the 2nd of the 8 trebles, 3 chain, 1 single on the 1st of the 8 trebles = turn the work = ** on the 3 chain: 1 plain, 1 half-treble, 1 treble, 1 half-treble, 1 plain = 1 plain between the 2 trebles below = on the 2 chain, 1 plain, 1 half-treble, 1 treble, 1 half-treble, 1 plain *** = 1 plain between the 2 trebles beneath, repeat from *** to **, therefore the reverse way.
Go on with 2 scallops consisting of 2 chain, 1 picot, 7 chain, 1 picot, 2 chain, 2 plain = after the 2nd scallop: 2 chain, 1 picot, 5 chain = 8 trebles on the 7 chain over the 7 plain and finish the little flowers consisting of 4 scallops each, like the first from * to *** and from *** to ** = 2 plain to get back to the scallop = 1 chain, 1 picot, 2 chain, 2 plain, 3 chain, 1 picot, 7 chain, 1 picot, 2 chain, 2 plain, 3 chain, 1 picot, 3 chain, and make a 3rd flower of 4 scallops like the 2 others = 2 single to come back to the scallop, 2 chain, 1 picot, 2 chain, 2 plain = 2 more scallops like the previous ones, then make the 4th flower of 4 scallops, which must come before the 7 plain stitches of the previous row = 20 scallops consisting of: 2 chain, 1 picot, 7 chain, 1 picot, 2 chain, 2 plain = the last scallop is to be joined to the 1st scallop of the 1st flower, under the left point of the semicircle = 3 single along the small scallop, 3 trebles, 2 chain, 1 picot, 2 chain, 2 plain on the point of the scallop = 3 bars like the previous ones to be joined to the 2 next scallops = 3 similar bars between the small scallops = 1 single on the scallop between the 2 flowers and 1 single on the 2nd set of chain stitches in the scallop that precedes the 3rd flower = 1 single on the point of the 1st scallop of the 3rd flower = continue the little bars along the 2nd side until past the 4th flower = after the 4th flower make 2 bars consisting of 2 chain, 1 picot, 2 chain, 2 plain = 3 chain, 1 picot, 3 chain, 2 plain on the next scallop **** 7 chain, 2 plain on the next scallop, 3 chain, 1 picot, 3 chain, 2 plain on the next scallop, 3 chain, 1 picot, 3 chain, 2 plain on the next scallop, 3 chain, 1 picot, 3 chain, 2 plain on the next scallop ***** repeat five times from **** to *****. At the 2nd repetition make 1 bar with 1 picot more, so that you have 4 bars instead of 3. At the 5th repetition you decrease by 1 bar, so that you have 2 instead of 3.
1 plain on the point of the scallop of the flower, 3 chain, 1 picot, 7 chain, 1 picot, 3 chain, 3 plain, one of which is made on the 2nd plain of the previous row, and the 2nd on the bar of chain stitches = 3 plain, 1 picot, 7 chain, 1 picot, 3 chain, 2 plain = 2 more similar scallops = then 3 chain, 1 picot, 9 chain, 1 plain on the 2nd plain of the previous row = join and on the 9 chain make 7 plain = 3 chain, 1 picot, 3 chain, 2 plain.
Over the 1st little flower inside the semicircles, make 1 scallop like the previous ones = then 3 chain, 1 picot, 7 chain, 2 plain on the 3rd point of the first flower = 2 chain, 2 plain on the 2nd point of the second flower = 6 plain on the scallop and joined to the 3rd point of the first flower = 3 chain, 1 picot, 3 chain = 2 plain = 1 scallop like the previous ones, 2 plain on the 4th point of the small flower, 3 chain, 1 picot, 9 chain, 1 plain = 7 plain over the 9 chain = 3 chain, 1 picot, 3 chain, 2 plain.
Make 7 scallops of: 3 chain, 1 picot, 7 chain, 1 picot, 3 chain, 2 plain, after the 7th scallop make 1 chain only, which must come just before the 7th chain to the left without a picot and above the point of the semicircle.
Over the 7 chain make a flower like the first with 4 scallops = then 3 scallops, 3 chain, 1 picot, 7 chain, 1 picot, 3 chain, 2 plain. Make one more flower with 4 scallops, 3 scallops like the previous ones = a third flower with 4 scallops, 2 chain, 2 plain, one of them above the point of the row beneath, 12 chain, 1 plain over the next scallop = turn the work and coming back over the row just made, make: 7 plain on the first 7 of the 12 chain, 1 plain on the point of the scallop, 4 chain, 1 picot, 4 chain, 1 plain on the next scallop, carry on the bars over the flowers and scallops, making 1 plain on the scallops of the flower and 2 plain on the other scallops, up to the 5 plain stitches between the 2 flowers underneath the semicircle.
After the plain stitch that joins the last bar, turn the work and make 23 scallops consisting of: 4 chain, 1 picot, 7 chain, 1 picot, 4 chain, 2 plain.
Cut off the thread and fasten it on above the semicircle and at the plain stitch which precedes the 7 chain without picot and make the second side like the first = having reached the middle, close to the 5 plain, turn the work = make the half round of bars and fasten off at the 4th scallop of the flower above the semicircle.
Fasten on at the point under the flowers where the work was turned and on the wrong side, and from right to left, work: 21 scallops consisting of 4 chain, 1 picot, 7 chain, 1 picot, 4 chain, 2 plain = then add: 4 chain, 1 picot, 10 chain, 1 plain above the point of the scallop of the small flower = turn the work: 7 plain over the 10 chain.
22 bars of 3 chain, 1 picot, 3 chain, 2 plain = after the 22nd bar, 10 chain = come back and join to the picot of the 21st bar = 2 chain, 8 trebles over the 10 chain and complete the flower as before. After the 4th scallop of the flower: 2 chain, 1 single, quite close to the 8 trebles, 3 chain, 2 plain on the next bar, 3 chain, 1 picot, join to the 2nd stitch of the 4th scallop of the flower, 3 chain, carry on the bars the same distance as on the first side.
Footing of the lace—On the chain stitches that follow the 3rd plain stitch and above the last little figure: 1 triple treble, 6 chain, join to the middle plain stitch = miss 1 scallop, 1 treble, 6 chain = miss 1 scallop, 1 double treble, 6 chain, = miss 1 scallop, 1 triple treble, 6 chain, = miss 1 scallop of the figure on the left, 1 double treble, 6 chain = miss 1 scallop, 1 treble, 6 chain = miss 1 scallop, 1 double treble, 6 chain = miss 1 scallop, 1 treble, 6 chain = miss 1 scallop, 1 treble, 6 chain = miss 1 scallop, 1 double treble, 6 chain, 1 triple treble, 6 chain, 1 quadruple treble on the next plain stitch. Repeat the whole, reversed, and finish off the footing with a row of plain stitches.
Edge of the lace.—Fasten on, where the semicircles join: 1 double treble on the first 3 chain stitches of the empty scallop, 5 chain, 1 double treble on the next disengaged chain stitches of the half scallop; continue the same on all the chain scallops and distribute the trebles so that there may be in all, 13 times 5 chain stitches.
Add 2 triple trebles, the last loops of them, connected by a plain stitch; the 1st triple treble on the 3 last chain stitches of the last scallop, the 2nd on the plain stitch, that follows the 1st scallop of the middle figure = 4 chain, 1 treble on the plain stitch of the 2nd point. Repeat the same, reversed.
2nd row—On the first 5 chain of the last row: 5 plain = on the next 5 chain: 5 plain = on the 3 chain, leave a space: 5 plain, 12 chain, come back and join to the 8th chain stitch by a single stitch = on the scallop: 4 plain, 1 picot, 3 plain, 1 picot, 4 plain = and so on, until you have 8 points altogether.
The plain stitches must be distributed as follows:
For the 2nd point: in the 4th space 4 plain, in the 5th space 3 plain = for the 3rd point: in the 5th space, 2 plain, in the 6th space, 5 plain = for the 4th point: in the 6th space 1 plain, in the 7th space 6 plain = for the 5th point: in the 8th space 4 plain, in the 9th space 3 plain = for the 6th point: in the 9th space 3 plain, in the 10th space 4 plain = for the 7th point: in the 11th space 7 plain = for the 8th point: in the 12th space 7 plain = 5 plain in each of the 2 remaining spaces.
Crochet lace (fig. 468).—This is always an effective pattern, in any number of thread. It is not new, however, and is probably already known to many of our readers as a pillow lace. Those who are not fond of making pillow lace, will be glad to learn how to reproduce it in crochet, as it makes a pretty trimming, both for wearing apparel and furniture. For furniture, it should be made in unbleached cotton, for articles of dress, in any of the of the finer numbers, referred to above.
 Fig. 468. Crochet lace.
Materials.—For trimming curtains and coarse linen table covers: Fil à pointer D.M.C No. 25 or 30, or Cordonnet 6 fils D.M.C Nos. 10 to 25 écru. For articles of dress: Fil d'Alsace D.M.C Nos. 30 to 70, Cordonnet 6 fils D.M.C Nos. 25 to 70, or Fil à dentelle D.M.C Nos. 25 to 70 écru.[A]
1st row—* 5 chain, 1 plain on the ring. Repeat 3 times from *.
2nd row—1 chain, 1 plain on the first 5 chain: * 5 chain, 1 plain = on the first 5 chain of the 1st row: 2 chain, 1 plain on the second 5 chain of the 1st row. Repeat 3 times from *.
3rd row—1 plain on the first 5 of the 2nd row: * 5 chain, 1 plain, 2 chain, 1 plain, 2 chain, 1 plain. Repeat 3 times from *.
In the 4th and following rows, go on increasing, as in the 3rd row, until, on all 4 sides, you have 11 plain stitches between every 5 chain.
12th row—1 plain, 5 chain, 1 plain, * 1 picot made of 4 chain, 1 plain between the 1st and the 2nd plain of the last row, 2 chain, 1 plain between the next 2 plain. Repeat 3 times from *, and fasten off.
Crochet the squares together, as you finish them. After the 12th and last plain stitch, make: 2 chain, drop the loop, put the hook into the 3rd of the 5 chain stitches that form one corner of the square, draw the dropped loop through, 2 chain, close the picot, finish the square.
For the star that connects the squares—10 chain, close the ring; * 4 chain, 1 picot, 4 chain, 1 over, join the 2 picots right and left of the squares that are to be joined together, by 1 treble; 4 chain, 1 picot, 3 chain, drop the loop, put the needle into the first of the first 4 chain stitches, draw the thread through, 2 plain on the ring, 8 chain, 1 treble on the 3rd picot and 1 treble on the 4th picot of the square = coming back: 1 plain on each of the 8 chain; 2 plain on the ring, and repeat 3 times from *.
For the half-star, that fills the space under the footing of the lace: 10 chain, close the ring = 9 chain, 1 treble on the 1st picot of the square; 4 chain, 1 picot, 3 chain; draw the thread through the 1st of the 9 chain = 2 plain, 8 chain, join the 3rd and 4th picots of the square by 1 treble bar on each picot = 8 single stitches on the 8 chain, 2 plain on the ring; 4 chain, 1 picot, 4 chain = on the 1st and last picot of the 2 opposite squares: 1 treble, 4 chain, 1 picot, 3 chain, drop the loop, draw it through the 1st of the 4 chain stitches = 2 plain, 8 chain, join 2 picots by 2 trebles = 8 single, 2 plain on the ring, 4 chain, 1 picot, 4 chain, 1 treble on the last picot = 8 chain, draw the thread through the 1st of the 4 chain.
The footing is made as follows—* 1 plain on the 5 upper chain stitches of the square; 17 chain up to the ring, 3 plain, 17 chain and repeat from *. A row of plain stitches completes the footing.
Outer edge—* 2 treble on the 1st picot, 4 chain, and repeat 5 times from *.
On the 5 chain stitches, in the corner, make: 1 treble = 4 chain, 1 treble on the 5 chain and finish the second side of the square like the first. Omit the chain stitches, between the 1st and last trebles of the squares.
The next and last row consists of: 2 plain, 1 picot, 2 plain every 4 chain. On the last 4 chain, at the point where 2 scallops join, make 4 plain stitches, without picots.
Lace with stars (fig. 469).—Begin with the stars, make a chain of 18 stitches, close the ring, mount it on a mould, wind a soft thread, such as Coton à repriser D.M.C No 60, seven or eight times round it, and make 30 plain stitches upon it, joining the last to the first by a single stitch.
 Fig. 469. Lace with stars.
Materials: Fil d'Alsace D.M.C Nos. 30 to 70, Fil à pointer D.M.C No. 25 or 30, Coton pour crochet D.M.C Nos. 8 to 12.[A]
2nd row—1 plain, on the upper stitch that was missed in the 1st row; * 17 chain, 1 plain on the next point. Repeat 5 times from *.
3rd row—* 6 plain, 3 chain, miss 2 stitches of the lower row. Repeat from *.
4th row—All round the last row, on each of the bottom stitches 1 plain; after every 6 stitches, 1 picot. This will give you 19 picots in all, separated from each other by 6 stitches.
Inner connection—Fasten on the thread at the 5th treble, counting from the ring: 1 single, 8 chain. Draw out the thread, from the back, through the 9th of the 17 chain round the star = 8 chain * join with 1 chain to the 5th treble, passing the thread through to the back = work on the wrong side: 3 chain, bring the thread back between the 5th treble to the right side, and repeat 5 times from *. In joining the stars, place them so that 9 picots are turned to the edge, and 8 to the footing. The 10th and the 19th picots serve to join the stars.
1st row—2 trebles between the 19th and the 9th of the * 9 picots, 7 chain, 1 treble; repeat 9 times from *.
After the 10th treble, make no more chain stitches, but 1 treble immediately between the 19th and the 1st picot of the next row.
2nd row—On the 7 first chain stitches of the last row: 3 plain, 4 half-trebles, 3 trebles, 1 picot, 3 trebles, 1 picot, and so on, until in the semicircle over the picots, you have 7 times 7 chain stitches and 16 picots = on the ninth set of 7 chain: 3 trebles, 4 half trebles, 3 plain.
The scallops are joined by smaller ones, formed of: 3 plain, 4 half trebles, 3 trebles, 1 picot, 2 trebles, 7 chain, drop the loop, put the needle into the same treble of the last scallop; draw the loop through and make on the 7 chain: 1 plain, 1 half-treble, 5 trebles, 1 picot, 5 trebles, 1 half-treble, 1 plain; continue the large scallop, as described above.
The footing is composed of rings and trebles.—Begin with a ring, like those in the middle of the stars, worked as follows: 18 chain, with 28 plain upon them = miss 1 plain stitch of the ring, 3 plain, 10 chain = miss 1 plain, 3 plain, 10 chain = miss 1 plain, 3 plain, 5 chain, 1 single on the 7th picot of the 1st star, 5 chain = miss 1 plain, 3 plain, 5 chain, 1 single on the 8th picot, 5 chain = miss 1 plain, 3 plain, 5 chain, 1 single on the 2nd picot, 5 chain, finish off.
Straight edge—Worked from right to left = 1 chain * turn the thread 7 times round the needle, join to the plain stitch between the 7th and 6th picot, complete the long treble, 7 chain, join 1 treble, consisting of six overs to the 1st treble; 1 quintuple treble between the 6th and the 5th picot; 7 chain, 1 quadruple treble joined to the previous treble = in all, 10 trebles, the 1st made with 7 overs, the 2nd with 6, the 3rd with 5, the 4th with 4, the 5th and 6th with 3, the 7th with 4, the 8th with 5, the 9th with 6, the 10th with 7; and between every 2 trebles, 7 chain.
The 3 long trebles of the ring are taken up with 1 plain and 7 chain between.
Guipure lace (fig. 470).—We advise our readers to work this charming pattern, in unbleached Fil à dentelle D.M.C No 50, because it imitates the appearance of old lace better than any other material.
 Fig. 470. Guipure lace.
Materials: Fil d'Alsace D.M.C Nos. 30 to 100, Cordonnet 6 fils D.M.C Nos. 25 to 100, or Fil à dentelle D.M.C Nos. 25 to 100.[A]
1st row—5 chain, 1 picot, 2 chain, 1 treble on the ring = 5 chain, 1 treble on the ring = 2 chain, 1 picot, 2 chain, 1 treble on the ring = 5 chain on the 3rd of the first 5 chain.
2nd row—12 chain, * 1 treble on the 1st treble of the 1st row = 4 chain, 1 treble on the 3rd of the next 5 chain = 5 chain, 1 treble on the same stitch as the last treble = 4 chain, ** 1 treble on the 2nd treble of the 1st row, 9 chain. Repeat from * to **; join the last 4 chain, to the 3rd of the first 12 chain, by a single stitch.
3rd row—1 chain, 4 plain, 3 plain on the 5th of the 9 chain of the last row = 12 plain, 5 plain on the 3rd of the 5 chain, between the 2 trebles, 12 plain, 3 plain on the 5th of the lower 9 chain = 12 plain, 5 plain on the 3rd of the 5 chain, 7 plain; finish the row with a single stitch.
4th row—3 chain, 1 treble on each of the next 5 plain; 3 trebles on the 6th plain; 1 treble on each of the next 15 plain, 5 trebles on the 16th stitch; 15 trebles on the 2nd side; and again 3 trebles on the 16th stitch; 15 trebles on the 3rd side; 5 trebles on the 16th stitch, 9 trebles and join to the 3rd of the 3 chain.
5th row—1 chain, 6 plain, 3 plain on the 7th stitch beneath, * 18 plain, 3 plain on the 19th stitch. Repeat twice from *.
6th row—1 chain, 1 picot, 2 plain, 1 picot, 2 plain, 1 picot = towards the point: 3 plain, 1 picot = on the 2nd side of the square: 3 plain, 1 picot, and 5 times 2 plain, 1 picot = towards the point: 4 plain, 1 picot.
On the 3rd side as on the 2nd, only reversed, first 4 plain, and at the point 3 plain; on the 4th side as on the 2nd; on the 1st side must still be added 3 plain, 1 picot, 2 plain, 1 picot, 2 plain, 1 picot, 2 plain; draw the thread through the loop and fasten off.
The oblong squares, that connect the lozenges, take 7 rows of plain stitches. Make a chain of 14 = turn the work = 13 plain; add 5 rows of the same number of stitches. On the short side, and at the edge of the square: 1 picot, 3 plain, * 9 chain, miss 1 chain = returning: 1 plain on the 8th chain = on the next 7 chain: 1 half treble, 3 trebles, 1 half treble, 2 plain on the last chain stitches = on the 2nd half of the short side: 3 plain, 1 picot = on the long side: 3 plain **, 1 picot, 3 plain ***. Repeat the whole twice from * to ***, and then once from * to ** only.
The row of bars, that encircles the small leaves, begins with 2 single stitches on the first picot, then add: **** 3 chain, 1 picot, 3 chain, 1 treble on the 9th chain of the small leaf; on the short side: 1 chain, 1 picot, 1 chain, 1 triple treble on the 9th chain of the leaf; drop the thread, bring it out from the back, by the side of the picot that forms the corner on the long side of the lozenge = 1 chain, 1 picot, 1 chain, 1 treble on the small leaf = 3 chain, 1 picot, 3 chain, 1 treble on the picot, forming the corner of the oblong square = 3 chain, 1 picot, 3 chain, 1 treble on the leaf on the long side of the square = 3 chain, 1 treble on the same stitch as the 1st treble is on = 3 chain, 1 treble on the same stitch as the 2 first trebles are on; 3 chain, 1 picot, 3 chain, 1 treble on the picot at the corner. Repeat once from ****.
Upper and lower edge—6 chain, 1 sextuple treble on the 2nd picot of the lozenge = 6 chain, 1 triple treble on the 4th picot of the lozenge. Coming back over the 2 trebles of 6 chain, work in 3 journeys to and fro, 13 plain stitches.
After the 2nd row of plain stitches, 1 quintuple treble on the 6th treble of the lozenge, and then 4 rows of plain stitches.
After the 6th row, pass at once to the leaves above the lozenge: ***** 15 chain, 1 plain on the picot that forms the point of the lozenge = turn the work to the wrong side = on the chain stitches work: ****** 3 plain, 1 half treble, 4 trebles, 1 half treble, 3 plain = turn the work to the right side = returning and starting from the point of the leaf: 1 chain and 1 plain on each of the lower stitches.
For the 2nd leaf: 12 chain = turn the work and repeat, as for the former leaf, from ***** to ******.
This leaf, being finished like the first, with this difference that it ends at the upper point, you pass to the 2nd little square: 6 chain, 1 sextuple treble on the picot next to the leaves; 3 chain, 1 triple treble on the 3rd picot, counted from the leaves = 6 chain, 1 sextuple treble on the 5th picot of the lozenge; keep the 2 last loops of the treble on the needle, 1 sextuple treble on the picot between every 3 chain of the small square with leaves; draw up the 2 last loops together with those already on the needle = 6 chain, 1 triple treble on the picot on the long side of the small square = 3 rows of 13 plain each.
With the last stitch of each of these rows, take 1 of the chain stitches between the long trebles.
After the 3rd row: 1 sextuple treble on the first treble on the small leaf of the small middle square = 3 rows of plain stitches to finish the square, and repeat from *****.
The upper row is similar to this but should be worked from right to left.
Scalloped edge.—In the right corner of the 1st oblong figure of the outside corner: 1 double treble, 2 chain, 1 double treble on the 4th plain stitch = 2 chain, 1 double treble on the stitch that forms the corner stitch of the square = 2 chain, 1 plain at the extremity of the first long leaf, 9 chain = 1 quadruple treble on the stitch between the 2 leaves = 2 chain, 1 quadruple treble on the same stitch and on the 1st treble = 2 chain, 1 quadruple treble on the same stitch = 9 chain, 1 plain on the last stitch of the 2nd long leaf = turn the work: 1 chain, 1 plain on each of the chain stitches, and on each treble, 27 plain stitches in all = turn the work: 1 chain, 1 plain, 2 chain, 1 plain on the 2nd plain; repeat the last 12 times. Take in 1 stitch on each side in every row, turn the work after each row, and at the end of the last fasten off. Fasten on at the foot of the scallop, not at the point, and work plain stitches all round it; 20 plain to the upper point, 40 in all.
The open-work edge of the scallops consists entirely of double trebles.—After the 40 plain stitches of the edge: 2 chain, 1 treble on the 1st plain stitch of the small square = turn the work: * 2 chain, 1 treble on the 2nd of the plain stitches, forming the edge of the scallop **; repeat 7 times from * to ** = *** 2 chain, 1 treble on the next plain stitch = 2 chain, 1 treble on the next plain = repeat 4 times from ***; and then 7 times from * to ** = 2 chain, 1 plain on the 4th treble of the square; 2 chain, 1 plain on the 3rd treble.
Work on, on the right side = **** 2 chain and 1 treble on the preceding treble as far as the 8th treble; after the 8th: ***** 10 chain, back to the 7th, and returning, join to the 7th treble = on the 10 chain: 16 plain, after the 16th draw the loop through the upper loop of the 8th treble = ****** 2 chain, 1 treble, 2 chain, 1 treble, 10 chain, return, and fasten the chain stitches to the last treble but one = 6 plain, 1 picot, 2 plain, 1 picot, 6 plain and join as before ******* = Repeat once from ***** to *******, then twice, from ***** to ******, then from **** to *****, as on the first side, only 1 treble less = then 1 treble on the 4th plain stitch of the small square, 2 chain, 1 treble on the 7th plain stitch of the square, 2 chain, 1 treble on the 10th plain stitch, 1 treble on the outside stitch, at the corner of the square, 2 chain, 1 plain on the last stitch of the leaf; 9 chain and so on, as above described.
Having reached the second scallop, on the 2nd row of trebles, at the sign ***, work: 2 chain, 1 treble to the left on the scallop just finished, keeping the last loops of the treble on the needle, 1 double treble to the right of the scallop and join it to the 2nd treble; draw the 4 loops together = 2 chain, 1 treble to the left, 1 quadruple treble to the right = 11 chain, drop the loop, bring it to the right side through the 4th treble of the right scallop = on these 11 chain stitches: 1 single, 1 plain, 1 half treble, 2 trebles, 1 half treble, 1 plain, 1 single = 1 double treble on the open-work edge, then 2 chain, 1 treble, 2 chain, 1 treble, 12 chain; join to the 6th treble of the right scallop = working back: 4 plain, 1 picot, 4 plain, 1 picot, 4 plain, 1 picot, 4 plain, join to the treble, thrice 2 chain, 1 treble. Go back to ***** and repeat twice to *******.
The footing of the lace is worked in 5 rows from right to left.
1st row—1 single, * 1 double treble on the 6th plain stitch of the square = 1 chain, 1 double treble on the 2nd plain stitch of the square = 3 chain, 1 picot downwards, 3 chain, 1 plain on the stitch at the extremity of the long leaf = 3 chain, 1 picot downwards, 3 chain, 2 quadruple trebles between the two leaves = 3 chain, 1 picot downwards, 3 chain, 1 plain on the last stitch of the 2nd leaf, 3 chain; repeat from *.
2nd row—1 plain on each stitch of the previous row.
3rd row—count 2 stitches before and above the 2 trebles on the squares and make: * 1 treble, miss 1 stitch, 1 treble, miss 1 stitch, 1 treble, miss 1 stitch, 1 treble = turn the work: 1 plain on each of the 4 trebles = turn the work, come back and make 4 plain on the first 4 = 5 chain, miss 2 stitches of the 2nd row, 1 treble on the 3rd plain, and continue from *.
4th row—1 treble on each of the 4 plain, 1 chain between each treble, 2 chain and so on.
5th row—1 plain stitch on each of the stitches of the 4th row.
Crochet Reticella lace (fig. 471).—This pattern, copied in crochet from an old piece of Reticella lace, only looks well, worked in very fine cotton, as indicated in our illustration, namely, in unbleached Fil à dentelle D.M.C No 150. To make it resemble the original more closely, the method adopted in Venetian point, of making all the stitches over a padding thread, has, in the case of the outside edge, been followed here.
 Fig. 471. Crochet reticella lace.
Materials: Fil d'Alsace D.M.C Nos. 30 to 100, or Fil à dentelle D.M.C Nos. 25 to 150.
For the inner squares = 4 chain, close the ring.
1st row—8 chain, 1 treble, 3 chain, 1 double treble, 3 chain, 1 treble, 3 chain, 1 double treble, 3 chain, 1 treble, 3 chain, 1 double treble, 3 chain, 1 treble, 3 chain, 1 single stitch on the 5th of the 8 chain.
2nd row—* 1 chain, 5 plain on the first 3 chain, 5 plain on the next 3 chain. On these 10 plain stitches, working to and fro, 9 rows of plain stitches, decreasing by 1 in each row; after the last stitch, come back along the side of the little triangle, and make 1 single stitch in every row, 1 plain on the treble of the 1st row **; repeat 3 times from * to **.
These small triangles must be worked over 1 single treble and between 2 double trebles.
When the 4th triangle is finished, make directly, starting from the last stitch at the point, and along the side: 3 plain, 1 picot, 3 plain, 1 picot, 3 plain; 1 single stitch on the treble; all the triangles must be edged, in this same manner on both sides; on the stitch that forms the point: 3 plain stitches.
3rd row—* 17 chain, drop the loop = bring it to the front, through the plain stitch that lies between 2 triangles; returning, make 10 single stitches backwards on the 10 chain. You make stitches like this, backwards, in all the trebles that follow, that is, the loop is dropped after each stitch, and brought forward from the wrong side to the right = 13 chain, join to the 5th single, counting upwards from below = 7 single on the chain stitches; 13 chain, join to the other trebles; 6 chain, 1 single on the stitch at the point of the triangle **; repeat 3 times from * to **. = The chain stitches for the trebles, must be drawn up very tight.
4th row—1 plain on each of the stitches of the preceding row, 3 plain on the corner stitch. On each side there must be 29 plain stitches, not counting the corner ones.
5th row = 6 chain, miss 2 stitches of the row beneath, * 1 double treble, 2 chain; repeat 3 times from * = 2 chain, 1 double treble, 2 chain, 1 double treble on the same stitch as the 1st treble = 2 chain, 1 double treble on the same stitch as the 1st treble = 2 chain, 1 double treble on the same stitch as the two first trebles = 10 times to the next corner: 2 chain, 1 double treble, 3 double trebles, each of them with 2 chain stitches at the corner; repeat the same on each of the 4 sides.
6th row—1 plain on each of the stitches of the last row, 3 plain on the corner stitch = cut off the thread. Join the next squares together at once by the last corner stitch.
Lower edge—You begin by making the large scallop at the point of the square, and pass the double thread over the 3rd treble that comes before the 3 trebles at the point of the square and make: 1 plain stitch on each stitch of the square, up to the 3rd treble on the opposite side; then draw out a long loop which you carry back to the beginning. In the 2nd row increase by 2 stitches, right and left of the middle stitches, for the rounding of the scallop, and decrease by 1 on each side. Make 10 rows in all, and in each row, decrease by 4 stitches and increase by 2. Fasten off after the 10th row.
The two little scallops, right and left of the big one, are worked in 5 rows, over 5 trebles and 4 intervals of chain stitches, taking off 2 stitches in every row. For the small triangle between, worked in 4 rows, you must increase on both sides by 2 stitches.
When all the scallops are finished, edge them with 3 plain stitches, 1 picot and 3 plain and work in all the ends of thread from the preceding rows at the same time.
For the footing and the small triangles, that fill up the spaces between the squares: 22 chain, miss 1, 10 rows of plain stitches, worked to and fro, decreasing by 1 in every row.
When the triangle is finished, make on one side, 1 single in every row; then, on the 11 remaining chain stitches, a second triangle, like the first, which you then join to the plain stitches, above the 5th treble; then returning along the side of the triangle, add 3 plain, 1 picot, 3 plain, 1 picot, 3 plain; 1 single on each of the 22 chain stitches.
Edge the next side of the 2nd triangle like the first, join the corner stitch to the 5th treble; edge the two inner sides 3 times with 3 plain stitches and 2 picots.
Then from right to left on the plain stitches: 6 plain, 15 chain, join them to the middle of the 2 triangles = 1 single on each chain, 5 plain on the square; 11 chain, 1 single on the 9th of the first 15 chain; 1 single stitch on each of the chain stitches; 1 plain on each stitch of the square, to the point where the squares join, 8 chain, 1 single on the 6th of the 11 chain, 1 single on each of the 8 chain.
On the 2nd side: 7 plain, 5 chain, 1 single on the 6th of the 11 chain, 1 single on each of the 5 chain, 5 plain, 9 chain, 1 single on the 9th of the 15 chain, 1 single on each of the 9 chain, 6 plain on the square; fasten off.
Fasten on, at the 2nd of the 3 corner stitches = 17 chain, 1 plain on the corner stitch of the triangle; 8 chain, 1 plain on the next corner stitch, 17 chain, and so on.
A row of plain stitches, or trebles, completes the lace.
Lace with corner, formed by increasing on the outside (fig. 472).—1st row—On a row of chain stitches or trebles, work alternately: 1 chain, 1 treble = on the corner: 1 chain, 1 treble, 2 chain, so that the last 3 trebles come on one stitch.
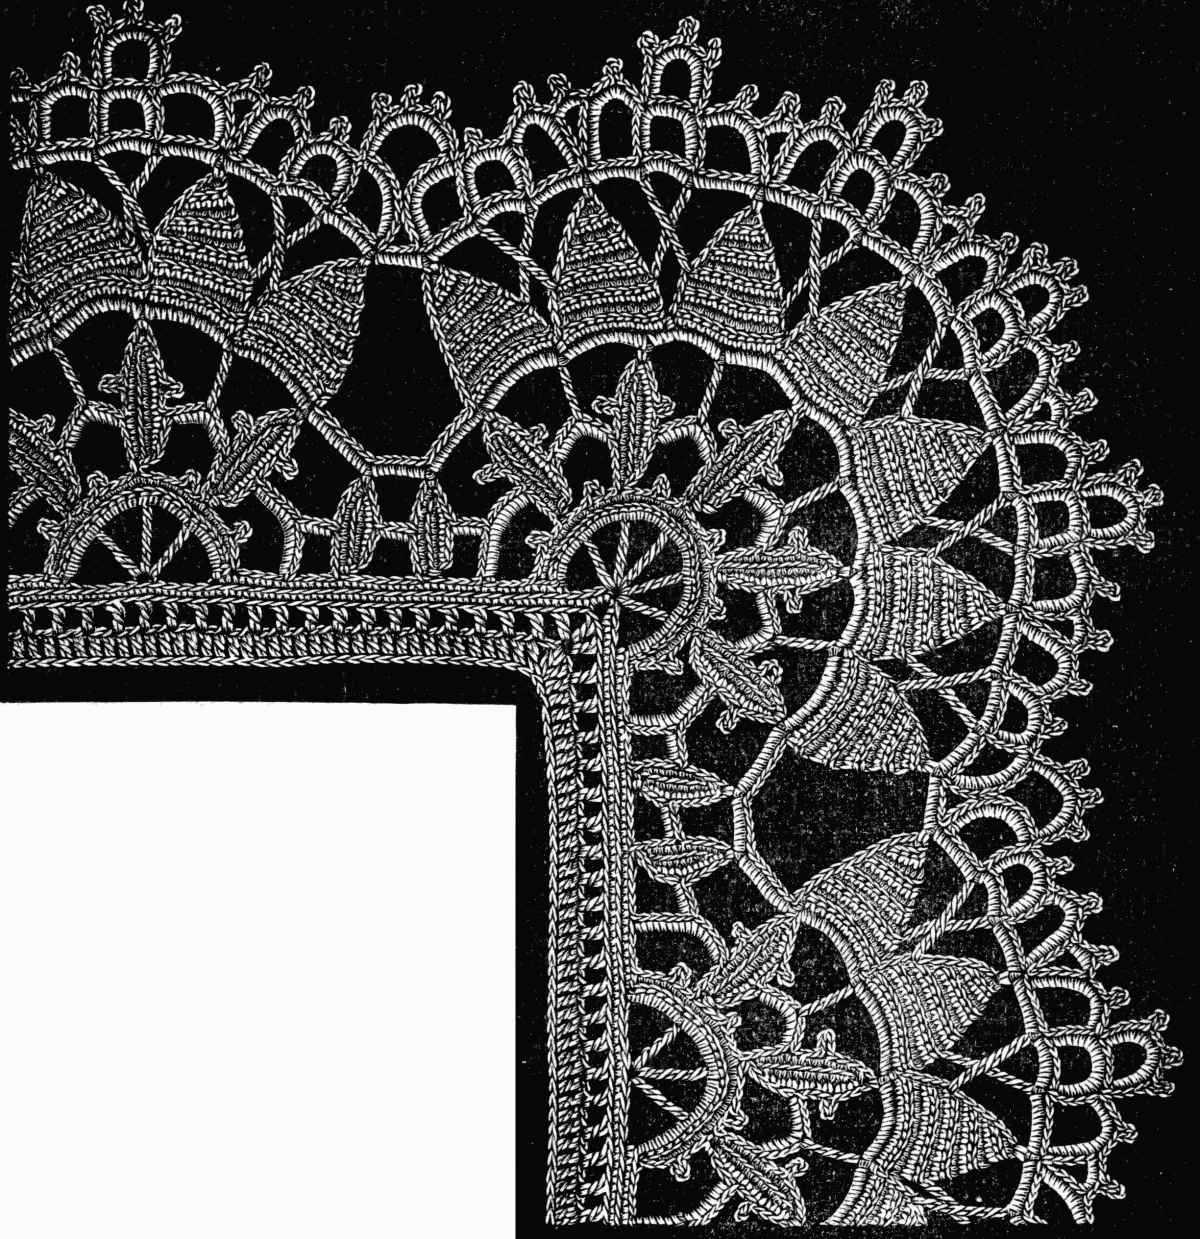 Fig. 472. Lace with corner, formed by increasing on the outside.
Materials: Fil d'Alsace D.M.C No. 30, Fil à pointer D.M.C Nos. 20 to 30, Cordonnet 6 fils D.M.C Nos. 15 to 30, or Fil à dentelle D.M.C Nos. 25 to 50.[A]
3rd row—Counting from the 2nd of the 3 corner stitches, and towards the left, make 1 plain on the 53rd, 52nd, 51st and 50th plain stitches; 8 chain, miss 1 chain, 1 plain on each of the 7 chain stitches = on the other side of the 8 chain, also 1 plain on each stitch, 3 plain on the 8th chain, 1 plain on each of the first 7 plain.
On the next 11 stitches of the 2nd row: 1 plain = 4 chain, miss 4, 1 triple treble on the 5th of the 2nd row, 4 chain, 1 triple treble on the same stitch, 4 chain, 1 triple treble on the same stitch, 4 chain, miss 4, 1 single on the 5th = turn the work = on each treble of 4 chain: 7 plain; 28 in all; 1 single on the 10th of the 11 plain = turn the work = miss the 28th plain, and on the 27 others make: 3 plain, 1 picot, 3 plain = 11 chain, miss the 11th, 10 plain on the others = on the 2nd side of the chain: 4 plain, 10 chain, join them to the 6th of the first 11 plain of this row = on the 10 chain: 5 plain, 3 chain, join them to the 5th plain of the 1st leaf, made in this row = on the 3 chain: 3 plain = on those of the 10 remaining chain stitches: 6 plain = along the leaf: 3 plain, 1 picot, 3 plain = on the stitch at the point of the leaf: 3 plain = then down the 2nd side: 3 plain, 1 picot, 7 plain = over the next of the 28 plain: 3 plain, 1 picot, 4 plain = * 11 chain, miss the 11th, 10 plain = on the second side of the chain: 4 plain, 6 chain, join them to the 4th of the last 7 plain of the 2nd leaf = on the 6 chain: 9 plain. Continue on the 3rd leaf of this row: 3 plain, 1 picot, 3 plain and 3 plain on the stitch at the point of the leaf = on each of the next 3 stitches: 1 plain, then 1 picot, 7 plain = on the 28 stitches: 4 plain, 1 picot, 3 plain **. Repeat from * to **, and here follow: 3 plain, 1 picot, 3 plain.
On the 2nd row: *** 5 plain, 10 chain, join them to the 4th of the last 7 plain of the 3rd leaf; 11 plain over the 10 chain = on the 2nd row: 5 plain, 8 chain, miss 1 chain, 1 plain on each chain = on the second side: 4 plain, 3 chain, join them to the 6th of the last 11 plain = 3 plain on the leaf, 3 plain on the stitch at the point, 7 plain, and repeat from *.
On the 2nd row and for the corner: 9 plain, **** 4 chain, 1 triple treble on the 2nd of the 3 corner stitches and repeat 4 times from **** = 4 chain, miss 4 of the preceding row, 1 plain on the 5th = turn the work, on each bar of 4 chain, 6 plain, 36 in all, join the last to the 8th of the 9 plain = going back over the 36 plain: 3 plain, 1 picot, 3 plain, 11 chain, miss the 11th, 1 plain on each of the 10 chain = on the 2nd side of the chain: 4 plain, 10 chain, join them to the 4th of the 9 plain = over the 10 chain: 5 plain, 3 chain, join them to the 4th plain of the last leaf, 3 plain = on the remainder of the 10 chain: 6 plain.
Proceeding along the leaf: 3 plain, 1 picot, 3 plain, 3 plain on the stitch at the point, 3 plain, 1 picot, 7 plain *****. Again on the 36 plain, make: 3 plain, 1 picot, 3 plain, 11 chain, miss the 11th, 10 plain = on the 2nd side of the chain: 4 plain, 6 chain, join them to the 4th of the last 7 plain of the last leaf, 9 plain over the chain stitches = on the leaf: 3 plain, 1 picot, 3 plain, 3 plain on the stitch at the point, 3 plain, 1 picot, 7 plain ******. Repeat 3 times from ***** to ****** and add 3 plain, 1 picot, 3 plain. Continue along the 2nd row: 4 plain, 10 chain and on these 11 plain = 4 plain, 8 chain, returning, miss the 8th, 7 plain on the others = on the 2nd side of the chain: 4 plain, 3 chain, join them to the 6th of the last 11 plain = on the 3 chain: 3 plain = on the leaf: 3 plain, 3 plain on the stitch at the point of the leaf, 7 plain.
4th row—1 plain on the 1st leaf of the 3rd row: * 7 chain, 1 plain on the 2nd leaf = 7 chain, 1 triple treble on the 5th of the 9 plain between 2 leaves = 7 chain, 1 plain on the 3rd leaf = 7 chain, 1 triple treble, 7 chain, 1 plain on the 4th leaf = 7 chain, 1 plain on the 5th leaf; 5 chain, 1 plain on the 1st leaf of the corner scallop. Repeat from *, with this difference, that, in the corner scallop you must have 4 triple trebles.
5th row—on the first 7 chain of the 4th row: 7 plain, * on the next chain stitches: 12 plain = turn the work, and crochet to and fro, decreasing by 1 stitch in each row, until you have only 2 stitches left = along the leaf: 10 plain and repeat 3 times from * = 7 plain on the next 7 chain, 6 plain on the 5 chain, 7 plain on the 7 chain.
The corner scallop has 7 points = the 12 first stitches must be divided as follows: * 1st point: 12 plain in the first interval = 2nd point: 10 plain in the 2nd interval and 2 plain in the 3rd interval = 3rd point: 7 plain in the 3rd interval and 5 plain in the 4th **. Repeat once from ** to *.
6th row—* 1 plain in the 1st leaf, 5 chain, 1 crossed quadruple treble, the branches of which are joined by 5 chain; repeat twice from * = 1 plain, 4 chain, 1 plain in the 1st leaf of the next scallop = 5 chain, 1 crossed quadruple treble, the branches of which are joined by 5 chain and joined to the 6th stitch of the 2 next points = 5 chain and so on.
7th row—6 plain on the first 5 chain of the 6th row, 6 plain on the next chain = 8 chain; carry the chain back to the right, and join it on, between the 6th and 7th plain = 4 plain on the 8 chain, then 8 chain, take it back, and join to the 1st plain = 12 plain on the 8 chain = continue on the small scallop: 3 plain, 1 picot, 8 plain = on the other 5 chain: 6 plain = 8 chain, join them again to the 4th of the 8 plain on the scallop = on the last 8 chain: 3 plain, 1 picot, 8 plain = on the 2 next bars of 5 chain: 12 plain = 8 chain, join them to the 7th of the last 12 plain = on the 8 chain: 5 plain = 8 chain, join them to the 1st of the last 12 plain = on the 8 chain: 5 plain, 3 chain, join them to the 4th plain of the 3rd finished scallop = over the 3 chain: 2 plain, 1 picot, 2 plain = on the next scallop: 3 plain, 1 picot, 3 plain = in the half finished scallop: 6 plain = 8 chain, take it back and join it to the 1st of the last 6 plain = on the 8 chain: 5 plain, 1 picot, 3 plain, 1 picot, 5 plain to finish the scallop below: 5 plain = on the 6th row: 6 plain, 8 chain, join them to the first of the last 5 plain of the last scallop = on the 8 chain: 3 plain, 1 picot, 8 plain.
The little scallops must be carried on round the corner point, as they were on the 3rd, 4th and 5th trebles of the other points.
Lace with corner, formed by decreasing on the inside (fig. 473).—For the stars—8 chain, close the ring; 3 chain, 15 trebles in the ring; close = 3 chain, miss 1 treble of the last row, 1 treble, 5 chain, 1 treble on the upper part of the last treble = alternate 7 times: 1 chain, 1 crossed treble divided by 2 chain, lastly 1 chain, close the ring, fasten off.
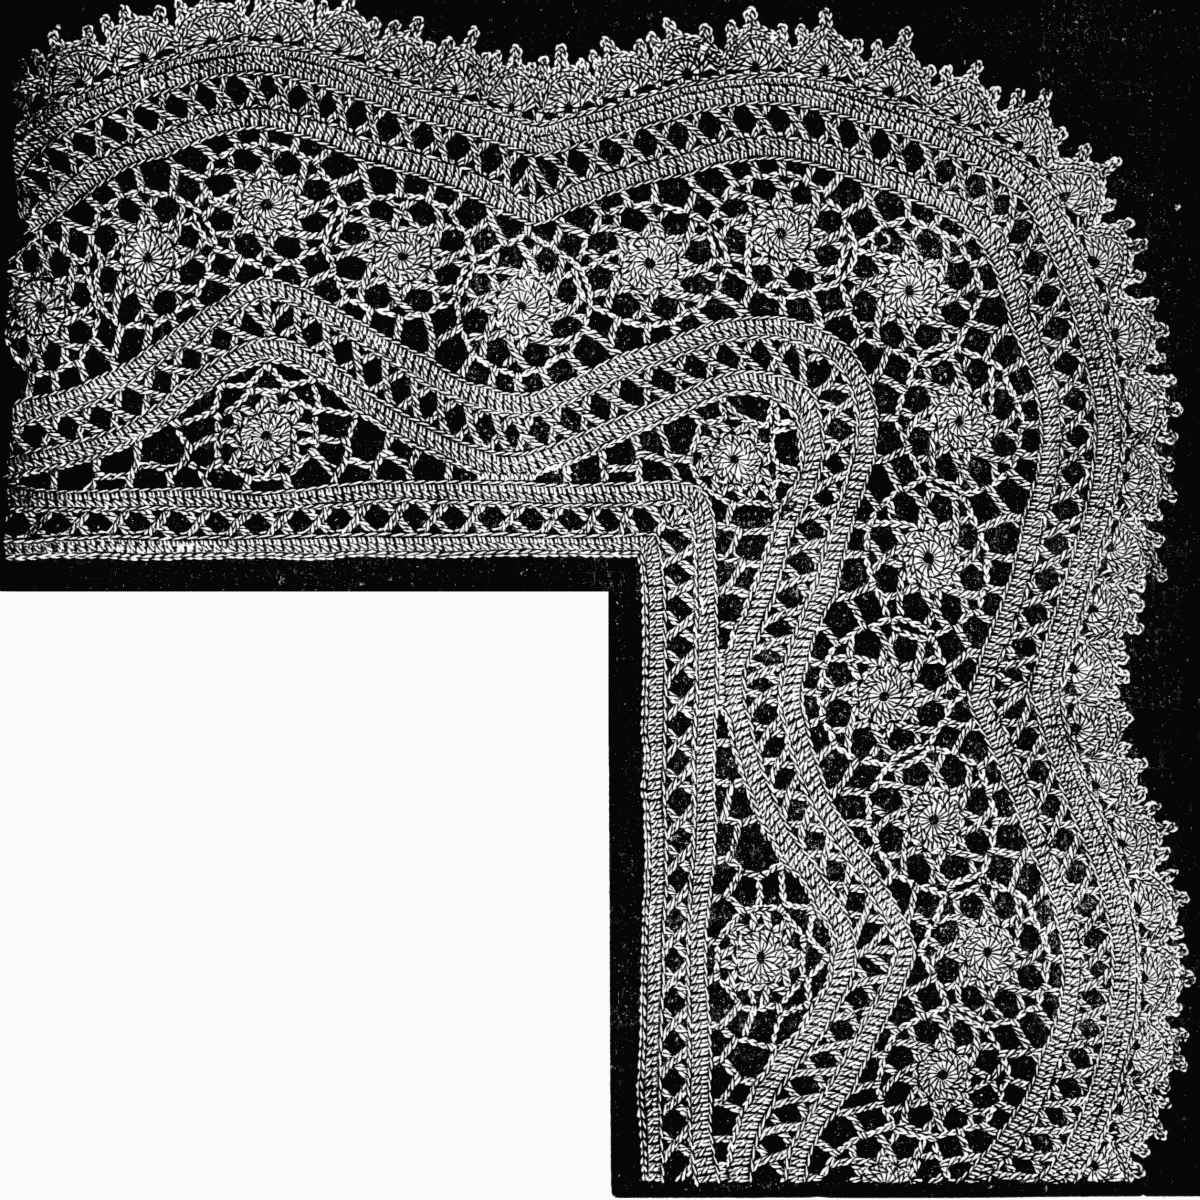 Fig. 473. Lace with corners formed by decreasing on the inside.
Materials: Fil d'Alsace D.M.C Nos. 30 to 70, Fil à pointer D.M.C No. 20 or 30, Coton pour crochet D.M.C Nos. 10 to 18, or Cordonnet 6 fils D.M.C Nos. 4 to 60.[A]
Colours: White, Écru naturel or any other colour of the 450 shades of the D.M.C colour card.
2nd row—* over the 2 chain stitches of the 3rd crossed treble of the 11th star: 1 treble, 3 chain = over the 1st chain stitch between the 3rd and 4th crossed trebles: 1 treble, 3 chain = over the next 2 chain stitches: 1 double treble, 3 chain = 3 overs, in the next space: 1 double treble and 1 double treble in the 1st space of the 10th star; connect the two trebles together, 3 chain, 1 double treble, 3 chain, 1 treble, 3 chain, 1 treble, 3 chain, 1 connected treble as before, 3 chain ** 1 plain over the 2 chain stitches of the last crossed treble of the 9th star. Repeat from ** to *, therefore backwards.
Each of the next trebles comes, either over 2 chain stitches of the crossed treble, or over the chain stitch between the crossed trebles *** 3 chain, 1 treble, 3 chain, 1 double treble, 3 chain, 1 triple connected treble, 3 chain, 1 double treble, 3 chain, 1 treble, 3 chain **** 1 single; repeat, in the reverse order, therefore, from **** to ***.
When the outside row is finished, make a similar row on the inside of the stars; at the corner 3 trebles are to be made 3 times over each of the middle stars.
3rd row—1 treble above and below, on each stitch of the second row.
4th row—consists entirely of crossed trebles = * miss on the upper edge: 3 times 1 treble, and 5 times 2 trebles = on the next trebles of the preceding row: 1 double treble, miss 2 stitches, 1 double treble, miss 2 stitches, 1 double treble = draw up the last loops of the 3 trebles together = repeat the same thing backwards = here follow: 8 crossed trebles separated each by 1 treble of the preceding row **; the 8th and the 9th crossed trebles are together in the corner treble of the preceding row. Repeat from ** to * = here follows 1 row with 1 treble on every stitch below.
The row on the side of the footing is worked as above described = at the corner, and after having made the 3rd connected treble, * miss 5 times 2 stitches, 6 times 1 stitch, 3 times 2 stitches, 3 times 3 stitches, ** 3 triple trebles connected together above, miss 3 stitches underneath; repeat from ** to *, followed on both sides by a row of trebles.
In the corner of the inside row of trebles connect the loops of 5 pairs of trebles, in the centre connect the loops of 3 trebles, and again the loops of 5 pairs of trebles.
For the 1st star of the footing: 8 chain, close the ring; 3 chain in the ring, 15 trebles, close = 3 chain, miss 1 treble, 1 treble, * 3 chain, 1 treble on the stitch of the 1st treble, miss 1, 1 treble in the 2nd stitch, draw the loops of the 2 trebles together **. Repeat 6 times from * to **; add 3 chain and close = 5 chain, join them to the 15th treble of the last row; 5 chain, 1 plain on the first chain stitches between 2 trebles; 4 chain, join them to the 7th treble; 4 chain, 1 plain on the next chain stitches, 3 chain, join to the treble over the 3 connected triple trebles, 3 chain, 1 plain on the next chain stitches, 4 chain, join them to the 8th treble, 5 chain, 1 plain on the 5th treble, cut off the thread.
The corner star is made like the one just described, and is joined on, as follows: 3 chain, join them to the 17th treble on the left of the last row (counting from the triple treble) = 3 chain, 1 plain on the first chain stitches between 2 trebles = 3 chain, miss 4 trebles, join them to the 5th = 3 chain, 1 plain on the 2nd set of chain stitches between = 6 chain, miss 5 trebles, join them to the 6th = 3 chain, 1 plain on the 3rd of the 6 last chain = 3 chain, join them to the corner stitch, 3 chain, 1 plain on the last 3 chain = towards the right: 3 chain, join to the 5th treble = 3 chain, 1 plain on the preceding, 3 chain, 1 plain on the 3rd set of stitches between, 3 chain, miss 4 trebles, join to the 5th treble = 3 chain, 1 plain on the 4th set of stitches between, 3 chain, miss 4 stitches and join = 3 chain, 1 plain on the 5th double treble, fasten off.
On the 3 first trebles of the preceding row of the inside edge, counting from the outermost stitches which are to be seen to the right in the illustration, 1 plain, 3 chain, miss 4 trebles, 1 treble = 3 chain, miss 3 trebles, 1 double treble, 3 chain, 3 overs, pass the needle over the double treble, crochet off one over = miss 3 stitches, 1 double treble, crochet off the 2 remaining loops = 3 chain, 4 overs, crochet off 2 loops, 1 double treble over the chain treble of the star, crochet off the remaining loops = 3 chain, 3 overs over the treble made on the 5 chain, crochet off 2 loops = 1 treble on the 5th set of stitches between, crochet off the remaining loops = 3 chain, 1 treble on the 6th set of stitches between = 3 chain, 1 treble on the 7th set of stitches between = 3 chain, 3 overs, 1 treble on the 8th set of stitches between; crochet off 1 over, 1 double treble on the 5 first chain stitches of the star, crochet off the remaining loops = 3 chain, 3 overs, 1 treble over the 2nd double treble, 1 double treble, miss 2 trebles of the preceding row, complete the treble = 3 chain, 3 overs, crochet off 1 over, joining it to the last double treble; crochet off the overs = 1 treble on the 5th treble of the preceding row, crochet off the loops = 3 chain, 1 treble on the 4th treble = 3 chain, miss 4 stitches = on each of the 6 following trebles: 1 plain = 3 chain, miss 3 trebles, 1 treble, 3 chain, miss 3 trebles, 1 double treble; 3 chain, 3 overs, over the double treble crochet off 1 loop, 1 double treble on the 4th treble after the plain stitches, crochet off the last overs = 3 chain, 3 overs, over the last double treble crochet off 1 loop, 1 double treble on the 5th intervening space of the corner star, crochet off the loops = 3 chain, 1 plain on the 7th double treble of the star = 3 chain, 1 double treble on the 8th intervening space = 3 chain, 3 overs, over the last double treble crochet off 2 loops, 1 double treble on the 3rd treble of the preceding row, complete the treble = 3 chain, 3 overs, over the double treble crochet off 2 loops, 1 treble on the 4th treble, complete the treble = 3 chain, 1 treble on the 4th treble, 3 chain, miss 3, 3 plain.
One row of trebles to finish with; draw the 5 corner trebles together and add: 1 row of crossed trebles and 1 row of plain trebles, each time drawing the 5 corner loops together into one.
1st row of the outside border—1 plain on every one of the 7 next trebles of the row beneath, 5 chain; turn back, join them to the 7th plain and so on.
2nd row—1 plain on the 4th of the 7 plain, 9 trebles on the 5 chain.
3rd row—1 plain on each of the first 2 trebles of the 2nd row, 1 picot, 2 plain, 1 picot, miss 1 stitch, 2 plain, 1 picot, 2 plain and so on.
Square with coloured tufts (fig. 474).—The following are different counterpane patterns which should be worked in coarse cotton; our engraving represents a single square, worked in two colours, in raised crochet. By joining a number of such squares together, 4 or 6 colours can be introduced into one covering with very good effect.
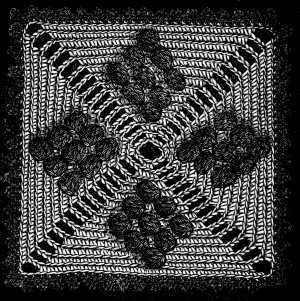 Fig. 474. Square with coloured tufts.
Materials: Coton pour crochet D.M.C Nos. 6 to 10, or Coton à tricoter D.M.C Nos. 6 to 12.[A]
Colours. White and Rouge-Turc 321, or écru and Bleu-Indigo 321, Rouge-Géranium 353 and Brun-Caroubier 356, Bleu d'Azur 3325 and Brun-Rouille 3312, Vert-Bouteille 494 and Bleu-Prunelle 489.[A]
Cast on 13 chain and close the ring.
1st row—1 plain on the 1st of the 13 chain, 5 chain, 1 plain on the 4th chain, 5 chain, 1 plain on the 7th chain, 5 chain, 1 plain on the 10th chain, 5 chain, 1 plain on the 13th chain.
2nd row—1 plain on the 1st plain of the 1st row * 1 plain on the 1st of the 5 chain; 5 chain, 1 plain on the 5th chain. Repeat 3 times from *.
3rd row—5 plain on the 5 chain, 5 chain, 5 plain and so on.
4th and 5th rows—continue to increase, as in the 3rd row.
6th row—after the 3rd plain, 1 tuft in the contrasting colour (see fig. 431).
The contrasting colour is to be introduced into the work at the first tuft, and cut off when the last is finished.
The ends of the coloured threads must be worked in under the stitches of the next row. The square may be of any size; it is bordered by small picot scallops by means of which the different squares are joined together.
Stripes for counterpanes (fig. 475).—We recommend the use of Soutache D.M.C or Lacets superfins D.M.C (braids) for the coloured stitches, in the place of cotton. The dark stitches standing, so to speak, on another ground of stitches the pattern will look brighter, if it be worked in a flat material that will spread out more than cotton does.
The stripe, worked in its entire length and always on the right side, must be begun by a chain of stitches of the length the stripe is to be.
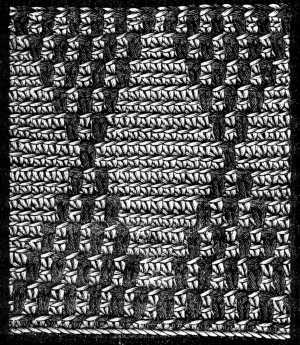 Fig. 475. Stripes for counterpanes.
Materials: Coton pour crochet D.M.C Nos. 6 to 8, or Coton à tricoter D.M.C Nos. 6 to 12 and Lacets surfins D.M.C No. 4, or Soutache D.M.C No. 2½.[A]
Colours: Gris-Lin 716 and Rouge-Bordeaux 497, Gris-Tilleul 393 and Bleu-Faience 484 or Brun-Caroubier 356 and Jaune-Rouille 308 etc.[A]
2nd row—1 plain stitch with white or unbleached cotton, on each second stitch of the preceding row; 1 long plain stitch with the coloured cotton or the braid, in each second loop of the chain stitch.
When red and white cotton are used, only one thread must be drawn through the 1st loop, and the other through the two last loops.
3rd, 5th, 7th, 9th, 11th rows—plain stitches of the colour of the grounding = 4th row—between every 5 coloured stitches 3 white = 6th row—between every 4 red, 5 white = 8th row—between every 3 red, 7 white = 10th row—between every 2 red, 9 white = 12th row—between the single red stitches, 11 white plain.
In the second half of the pattern the red stitches must increase in the same proportion as that in which they decreased before.
Pattern of a counterpane in Tunisian crochet (fig. 476). This pattern, on a reduced scale, of a counterpane in Tunisian crochet, though it is worked here in several colours, can be done all in one. The numbers of the stitches, as they are here given, refer of course to the pattern represented in our figure; if worked on a larger scale, the number of stitches would have to be increased every way in the proper proportion.
For the inner square, which is worked in a light material, make 20 chain stitches, on which you make 17 rows of plaited Tunisian crochet, fig. 445, then fasten off.
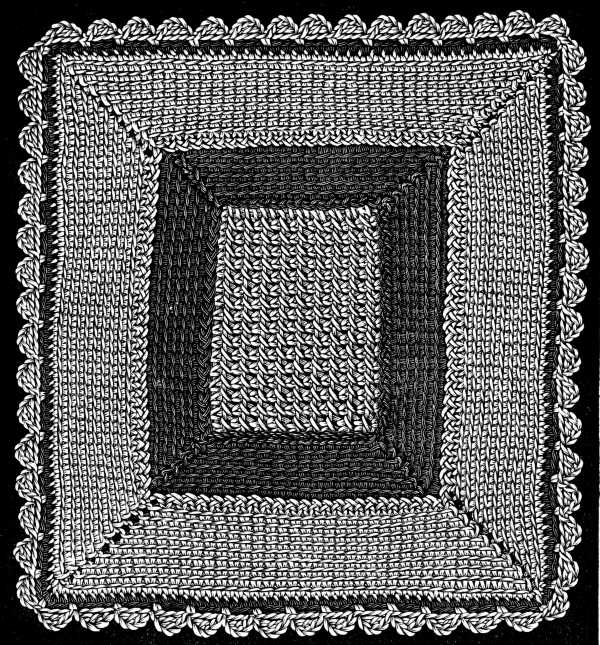 Fig. 476. Pattern of a counterpane in tunisian crochet.
Materials: Coton pour crochet D.M.C Nos. 6 to 8, or Coton à tricoter D.M.C Nos. 6 to 12.[A]
Colours: Gris-Amadou 385 and Rouge-Cardinal 346, Vert-Bouteille 492 and Violet-Mauve 316, or Bleu-Gentiane 479 and Gris-Écru 706.
When these rows are finished, you proceed to decrease on the right till you have only 2 stitches left; and then again to increase as at the beginning of the stripe. At each increase, after each double row you must pass the thread through the corresponding stitch opposite of the same row. When you have again got 7 stitches on the needle, join them as before to the square. Work round the 4 sides of the square in this manner and when you come to the last decrease, join the stitches to those of the first increase, and fasten off. The next stripes are to be worked in the same way; they may be made either wider or narrower, plain, or ornamented with a cross stitch pattern which you work upon them.
Pattern of counterpane worked in stripes (fig. 477).—This is intended for a child's coverlet and is worked in pale blue, Bleu-Indigo 334, and white; the stripes and the lace border, in white, the setting, partly in white, partly in blue.
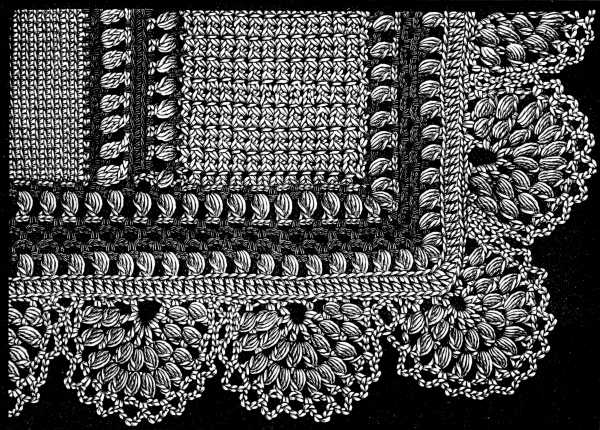 Fig. 477. Pattern of counterpane worked in stripes.
Materials: Coton pour crochet D.M.C Nos. 6 to 12, Coton à tricoter D.M.C Nos. 6 to 14, or Cordonnet 6 fils D.M.C No. 15.[A]
Coming back, make the loop of the first stitch and that of the second on the chain stitches of the preceding row = begin every row with 3 chain, which form picots along the edge of the stripe; when the stripes are finished, take a blue thread and make 1 plain stitch on each picot and 3 chain.
This blue row is followed by a white one, worked in cluster stitch, fig. 426, with 2 chain stitches between every 2 clusters.
Then follows another blue row of one plain stitch on each chain stitch of the previous row. The second blue row consists entirely of plain stitches worked along the long sides of the stripes, which are joined together afterwards, but not along the short sides until the counterpane is finished; then the stitches should border all the 4 sides. The second stripe, which should be of the same width as the first, is worked in Tunisian crochet; for the edge make one row of plain stitches in blue, one of cluster stitches in white, and then again a row of plain in blue.
Join the stripes together on the wrong side with plain stitches, taking up one loop on the right and one on the left, alternately.
When you have joined the stripes, make the outer border, which consists of 7 straight rows and a scalloped lace edging.
1st row—in blue: 3 chain and 1 plain on each picot, 1 plain, and so on, down the long sides of the stripes = along the short sides, the side of the chain stitches or that of the previous row: 1 plain, 3 chain, miss 2, 1 plain.
2nd row—in white or unbleached: 1 cluster stitch, fig. 426, on each picot formed by the 3 chain stitches of the 1st row; on the corner picots, you must make 3 cluster stitches.
3rd, 4th, 5th rows—in blue: similar to the first. Increase at the corners by making: 1 plain, 3 chain, 1 plain on the same stitch.
6th row—in white or unbleached: similar to the 2nd row.
7th row—in blue: 1 treble on each of the stitches of the previous row.
Lace edging.—The scallops extend over 22 stitches of the previous row and on that account it is better to make the corners first, to count the stitches both ways so as to distribute the stitches that are left over, between the scallops.
Corner scallop.—Fasten on the thread to the left of the second of the stitches that were added to make the turn, make 6 chain, 1 single on the 4th treble to the right = 1 single on the next treble = turn the work = * 2 chain, 1 treble on the 6th chain, repeat 7 times from *, in all therefore 8 trebles = after the 8th treble: 2 chain, miss 1 treble, 1 single on the 2 next trebles = turn the work = 2 chain, 1 cluster stitch between each treble, in all 9 cluster stitches, then 2 chain, miss 2 trebles, 1 single stitch on the next 2 trebles = turn the work = 2 chain, 1 cluster stitch over the 1st, 2nd, 3rd and 4th pairs of chain stitches in the preceding row, and 2 cluster stitches and 2 chain over the 5th, 6th and 7th chain stitches; over the other chain stitches again: 1 cluster stitch; then 2 chain, miss 2 trebles, join to the 3rd treble = fasten off.
For the scallops on the right side, divide the stitches between the corner scallops into equal portions. Supposing that they are divisible by 22, count 9 stitches to the right, fasten on the thread at the 9th; * 7 chain, miss 2 trebles of the row beneath, 1 plain on the 3rd, 1 single stitch on the next = turn the work = 2 chain, 1 treble on the 7 chain, repeat 5 times from * and finish with 2 chain, 1 single on the 2nd lower treble, 1 single on the next treble = turn the work = 2 chain and 1 cluster stitch between each treble of the preceding row, 2 cluster stitches between the 3rd and 2nd trebles = after the 8th stitch: 2 chain, miss 1 treble, 1 single on each of the 2 next stitches = repeat 3 times over 2 chain stitches of the previous row: 2 chain, 1 cluster stitch = on the 4th, 5th and 6th chain stitches: 2 cluster and 2 chain; on the 3 last chain the same stitches as on the 3 first = then 1 single over each of the next 18 and repeat from *.
The final row consists of open picots, formed of 5 chain stitches and 1 plain, between each cluster stitch; after the last of these stitches and in the indent of the scallops on the straight line, only 2 chain stitches and 1 plain on the 3rd stitch.
Pattern in squares for counterpanes (fig. 478).—This pattern may be worked in the same stitch as the previous one, either in Tunisian crochet or in any other of the stitches already described.
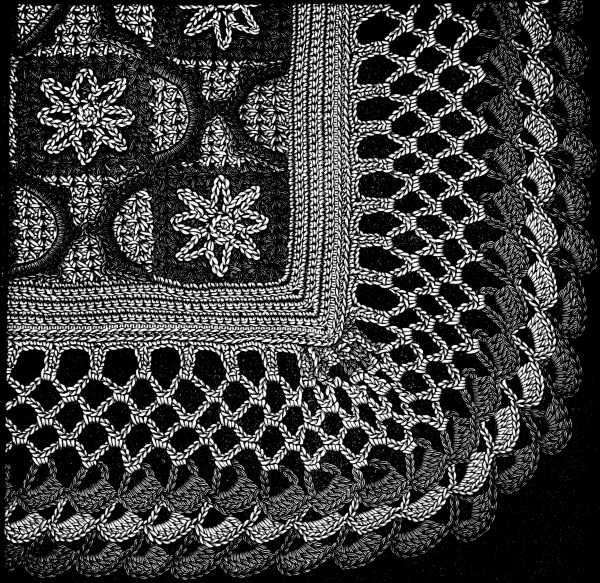 Fig. 478. Pattern in squares for counterpanes.
Materials: Coton à tricoter D.M.C Nos. 6 to 12, Cordonnet 6 fils D.M.C Nos. 1 to 5, or Coton pour crochet D.M.C Nos. 6 to 12.
Colours: Gris-Coutil 323 and Brun-Caroubier 303 or Bleu-cendré 448 and Rouge-Cornouille 449, Vert-Mousse 470 and Bleu d'Azur 3325.[A]
The 2nd stripe is begun in the light colour, and the stitches, made at the beginning of each row, are joined to those of the first stripe, as the stitches of the 3rd are to those of the 2nd and so on.
When you have made sufficient big squares, each consisting of 9 small ones, border them with seven rows of plain stitches, worked to and fro.
The 4 squares that form the corners are only to be bordered in this manner on two sides; the squares along the straight edges, on 3 sides, and only those that are intended for the centre of the counterpane, on all 4 sides. The separate parts are then either sewn or crocheted together on the wrong side. The dark squares are ornamented with small stars worked in the light colour, the light ones with scallops in the dark colour.
For the small stars—4 chain, close the ring; 2 plain on each stitch of the chain; 8 plain in all = after the 8th stitch: 8 chain, 1 plain on the 1st plain of the 8 plain stitches. Repeat the 8 chain 7 times and fasten off, then sew the star on in the centre of the dark square, taking care to spread out the little points formed of chain stitches at regular distances from each other. The scallops are worked from left to right; fasten the thread on at the point where 4 squares touch, then make a chain of 18 stitches and secure it at the opposite point. On the chain stitches: 6 plain, 1 picot, 7 plain, 1 picot, 7 plain, 1 picot, 6 plain = fasten off.
Repeat the same scallop over the second half of the square; when you come to the 2nd picot of the first scallop join the two picots. When both scallops are completed, fasten them on to the foundation by a few stitches on the wrong side.
The outside border of the counterpane is made separately, and is worked inwards from without and from left to right.
1st row—begin with the dark colour and make * 10 chain stitches, drop the loop, put the needle into the 1st of the 10 chain, take up the loop and draw it through the stitch; 2 chain and on the 10 stitches: 6 trebles quite close together. Repeat from * and go on repeating the sequence until the lace is long enough to trim the counterpane handsomely.
2nd row—in the light colour and similar to the 1st = only that in joining the chain stitches together, you make the single stitch on the chain stitches of the 1st row.
3rd row—in the dark colour and similar to the 2nd.
4th, 5th and 6th rows—in the light colour and from right to left: 7 chain, 2 plain on each loop of chain stitches of the previous row.
7th row—in the light colour and from left to right: * 2 plain on the treble of the lace, 11 chain, 2 plain on the next loop of chain stitches = these 2 stitches are made on the wrong side of the work = drop the loop, turn the work to the right, 3 plain on the last 3 chain, 8 chain **, and repeat always from * to **.
One row of plain made on each chain stitch and a 2nd row of trebles on the plain stitches completes the lace edging, which is afterwards sewn on to the counterpane.
Counterpane with fringed border (fig. 479).—This pattern requires three colours; we suggest the following as making a very effective combination: Rouge-Turc 321, Bleu-Indigo 311 and white.
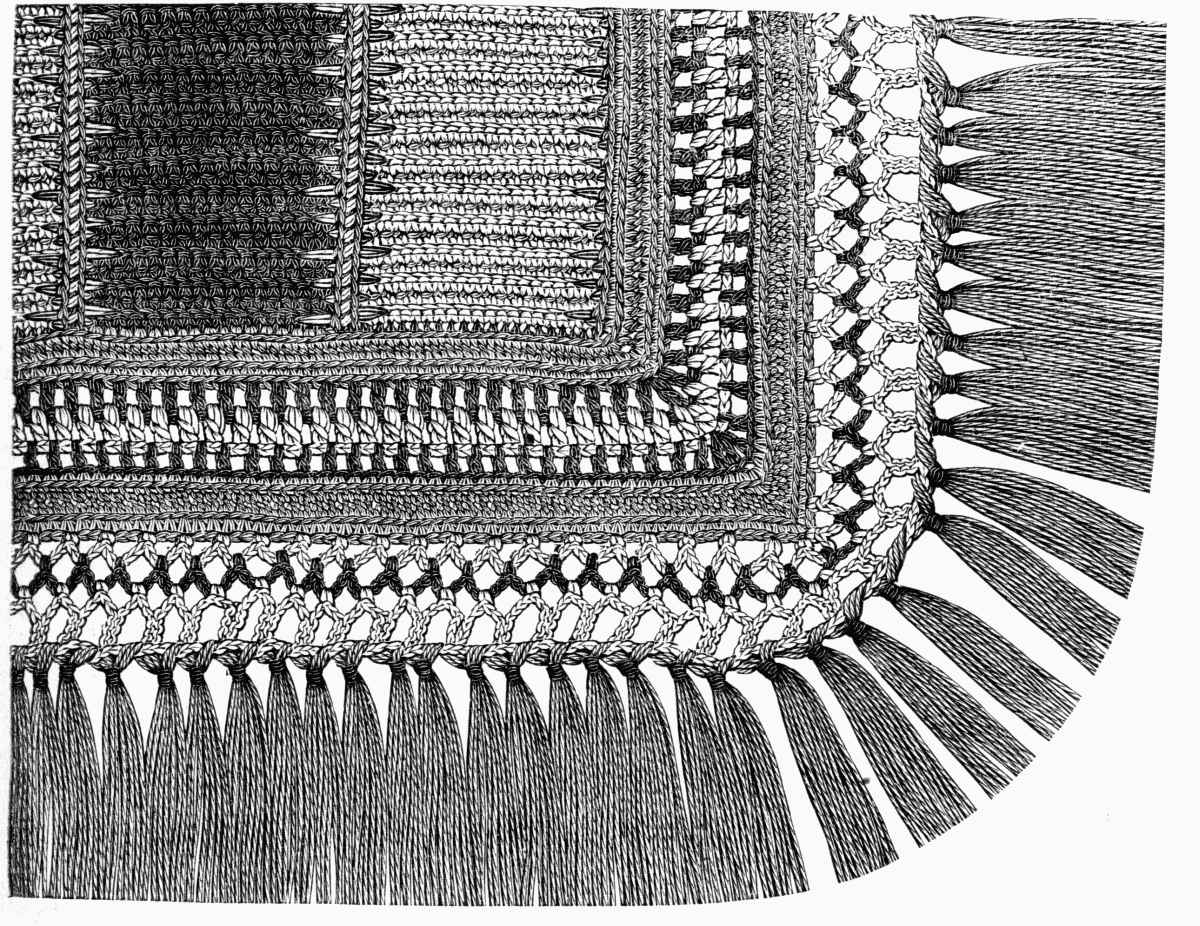 Fig. 479. Counterpane with fringed border.
Materials: Coton pour crochet D.M.C Nos. 6 to 10, or Coton à tricoter D.M.C Nos. 6 to 14.
Colours: White, Gris-Tilleul 331 and Rouge-Cornouille 449.[A]
These stitches must be worked parallel to each other along the two edges that are to be joined together.
The stripes are fastened together on the wrong side by single or plain stitches.
The outside edge consists of 15 rows: 1st row—in red: 1 row of plain stitches on the right side of the work.
2nd row—in red, and on the wrong side of the work: plain stitches.
3rd and 4th rows—in red, and on the right side of the work: plain stitches.
5th row—in dark blue and on the right side: 1 treble, 1 chain, miss 1 plain of the row beneath, 1 treble and so on.
6th row—in white, and similar to the 5th.
7th row—in blue, and similar to the 5th.
8th row—in red: 1 plain on each stitch of the preceding row.
9th row—in red and on the wrong side: 1 plain on each stitch of the preceding row.
10th and 11th rows—in red: and both on the right side, 2 rows of plain stitches.
12th row—in white: 5 chain, miss 3, 1 plain on the 4th stitch.
13th row—in dark blue and similar to the 12th.
14th row—in white: * 1 plain on the 5th stitch of the blue row; 10 chain, drop the loop, lay the chain stitches from left to right, put the needle into the 3rd chain stitch, counting from the beginning, take up the loop and draw it through the 3rd chain stitch, 2 chain and repeat from *.
15th row—in white: 1 plain on the picot formed by the chain stitches; 5 chain, 1 plain.
Into this last row you draw clusters of lengths of red cotton to form the fringe, and knot them together with blue, or if you prefer it, you may finish off the coverlet with a hairpin fringe.
Counterpane composed of squares and olive shaped figures (fig. 480).—There are many who shrink from undertaking a large piece of work because it becomes inconvenient to handle and carry about. The counterpane here represented has the advantage of being made up of a number of quite little pieces, which are worked separately and joined together afterwards.
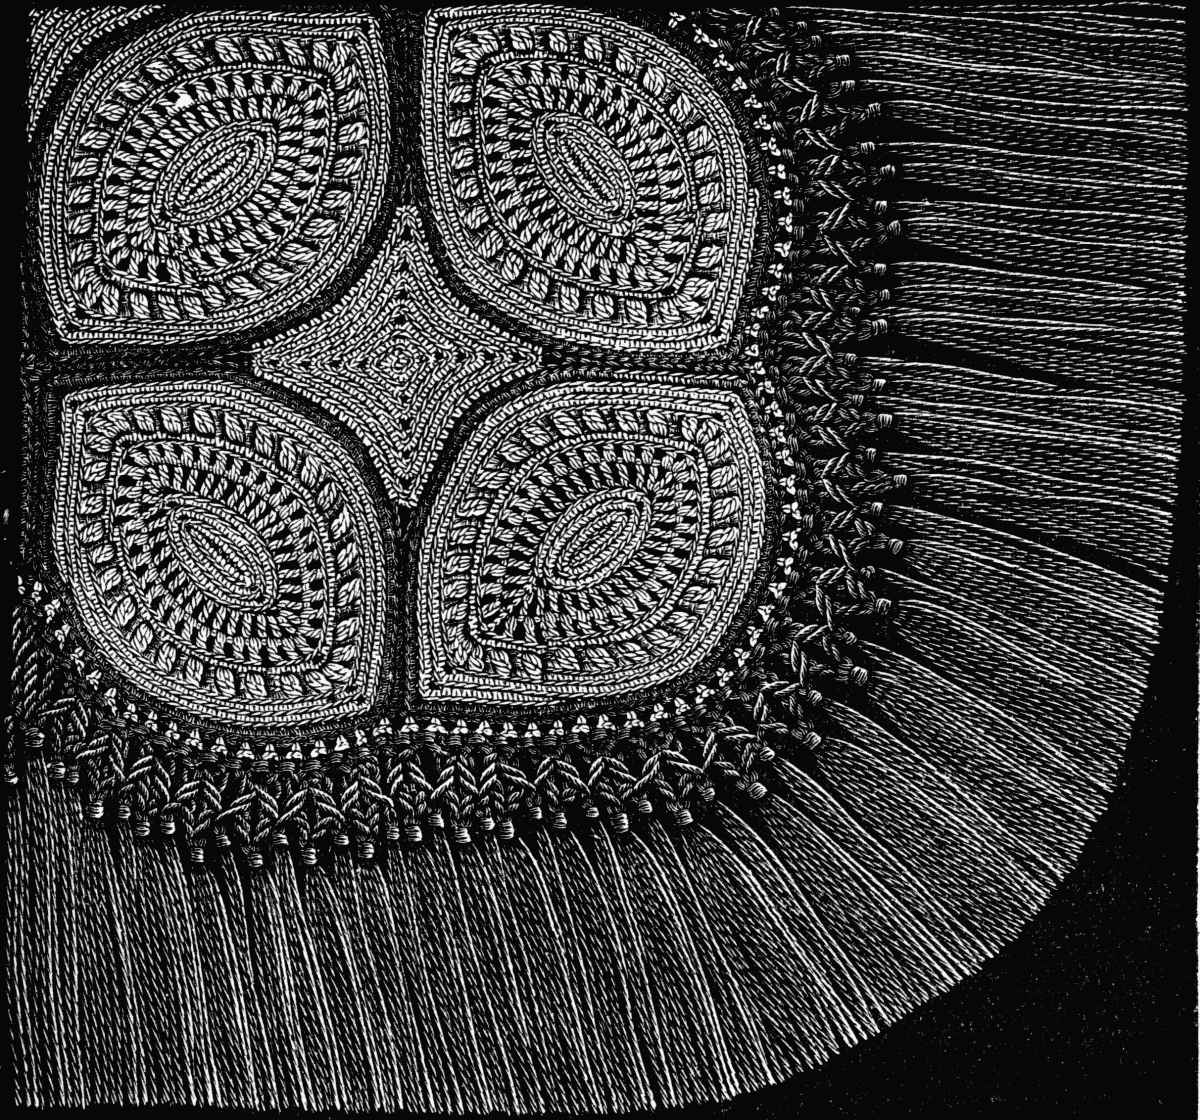 Fig. 480. Counterpane composed of squares and olive shaped figures.
Materials: Coton pour crochet D.M.C Nos. 6 to 10, or Coton à tricoter D.M.C Nos. 6 to 10.
Colours: White and Rouge-Turc 321, or Écru and Rouge-Cerise 3318, Gris-Coutil 323 and Bleu-Gentiane 478.[A]
The olive shaped figures begin with 9 chain stitches, on which you make 8 plain stitches and on the 9th: 3 plain for the corner.
On the second side of the chain: 8 plain and 3 besides on the corner stitch, and so on for 3 rows; in the last row there should be 28 stitches.
These 3 rows are to be considered as one only.
2nd row—3 chain, 1 treble on the plain stitch that follows * 1 chain, 1 treble and repeat 11 times from *; 1 chain, 3 trebles with 1 chain between them on the corner stitch, ** 1 chain, 1 treble, repeat 12 times from **.
On the last stitch at the corner, again 3 trebles with 1 chain; close the round with 1 single stitch.
3rd row—1 chain, 1 single on the chain stitch that follows the 1st treble of the last row; 3 chain, 1 double treble between the lower trebles, 1 chain and so on, until you have 35 trebles, counting the two sets of 3 trebles at the corner.
4th row—here you can change the colour: 1 plain on each of the stitches of the last row; 3 plain at the corners.
5th row—similar to the 4th.
6th row—2 plain, 1 cluster of 2 double trebles on the same stitch of the 4th row as the 5th stitch of the last row is on; miss 1 plain.
Continue in this manner along the whole row, taking care that the 9th and 22nd cluster come just at the corner.
7th and 8th rows—these two last rows should be worked in the same colour as the inside of the figure.
Be careful always to make the increase at the point; a 9th row in the dark colour may further be added, to connect the figures, by passing the thread from the wrong side to the right, between the 13 last stitches of two of the points of the figures. The space between these olive shaped figures is filled by a pointed square of chain stitches.
In the 1st and following rows you miss 5 stitches at the point where the figures meet, and continue to decrease in this manner until the space is filled up. The fringe is made in the dark colour, either directly on to the plain crochet, or after a few rows of open-work.
Squares for chair-backs (fig. 481).—This is a design for cut-work, out of an old collection by Sibmacher, which we have adapted to crochet. It will be found most effective, worked in any of the given materials; we have worked it with admirable result, both in Cordonnet 6 fils D.M.C No. 15 and Fil à dentelle D.M.C No. 150.
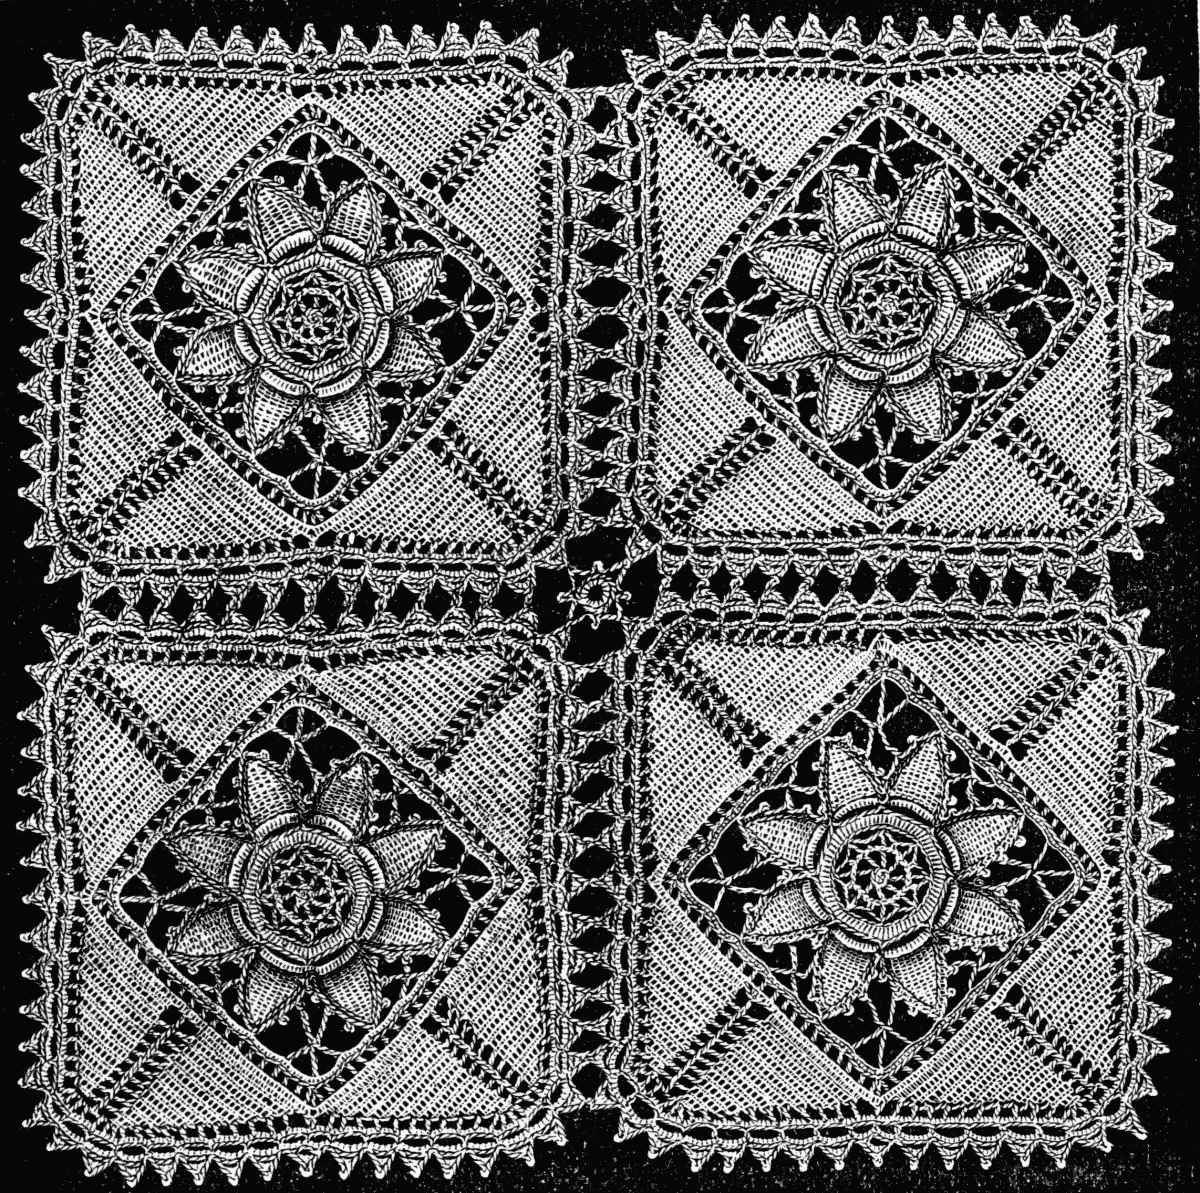 Fig. 481. Squares for chair-backs.
Materials: Fil d'Alsace D.M.C Nos. 30 to 100, Cordonnet 6 fils D.M.C Nos. 20 to 50, or Fil à dentelle D.M.C Nos. 25 to 70 in white or écru.[A]
2nd row—1 chain, 2 plain on each chain, 8 in all; draw the loop of the last stitch through the 1st chain.
3rd row—6 chain, 1 treble *, 3 chain, 1 treble, repeat 6 times from *. In all, with the 3 chain, 8 trebles.
4th row—4 plain, over each treble of 3 chain.
5th row—6 chain, 1 plain on the 2nd of the plain stitches beneath, * 3 chain, 1 treble, over the treble beneath, 3 chain, 1 plain on the 2nd stitch of the row beneath. Repeat 6 times from *, then add 3 chain, 1 plain on the 3rd of the 6 chain.
6th row—7 chain, 1 plain over the treble of the last row; repeat the same series 7 times.
7th row—3 chain, 1 treble over the treble beneath; 1 treble on each chain stitch, 2 trebles on each plain stitch of the row beneath; in all, 72 trebles, including the 3 chain.
8th row—* 8 chain, 1 plain between the 2 trebles that were added, therefore between the 8th and the 9th = turn the work = make 12 plain on the wrong side = turn the work back to the right side = take up 1 loop of each of the 12 stitches for the Tunisian stitch that is made on 10 rows, and decreasing by one stitch in each row, alternately on the right and left = draw up the 3 last loops together and make, descending on the right side: 1 single stitch on each row of the pyramid you have just made, finish with 1 plain on the stitch that follows the 8 chain. Repeat 7 times from *.
9th row—all along the pyramid: 3 plain, 1 picot, 3 plain, 1 picot, 3 plain, 1 picot, 2 plain, 2 plain at the point. Repeat the same number of stitches on the 2nd side, and down the sides of all the pyramids = after the 9th row, fasten off.
10th row—fasten on the thread at a stitch at the point of a pyramid, * 7 chain, 5 overs, join the loop to the 2nd picot on the side of the pyramid where you are working, draw the needle back through 2 overs, make 2 overs more, and put the needle into the middle picot opposite and draw the needle twice through 2 loops, thirdly through 3 and each time after that, through 2 loops = 6 chain, 1 double treble, join to the 3rd over, 7 chain, 1 plain = on the next pyramid 7 chain, 1 septuple treble, join it to the next middle picot = draw the needle thrice through 2 loops, 1 triple treble to join to the middle picot opposite, draw the needle back through the loops, and at the 4th over, through 3 loops, and each time after that, through 2 loops, 7 chain, 1 quadruple treble, join it to the 4th over, 7 chain, 1 triple treble, 7 chain, 1 plain on the next pyramid. Repeat 3 times from *.
11th row—1 chain, 1 plain on each of the stitches of the previous row and 2 plain on those forming the corner; fasten off.
12th row—1 single on the first plain, 5 chain, 1 treble on the 3rd plain, 2 chain, 1 treble on the 3rd plain and so on to the corner and until you have 14 trebles = on the corner stitch: 2 chain and 1 treble more; then proceed as you did on the first side. There should be 18 trebles and 19 times 2 chain between the corner trebles; all four sides should be alike.
13th row—1 plain on each stitch of the last row, not counting the 3 which are to be made at the corner.
14th row—14 single over the preceding stitches *, 1 chain, 24 plain; miss 4 plain of the last row, not counting the 2 increased stitches which must be left empty = after the 24th stitch turn the work, miss 2, 21 plain, passing the needle under the 2 loops of the row beneath = turn the work = 1 chain, 20 plain = turn the work = 19 plain = continue to decrease in the same proportion, until you have 3 stitches left and fasten off. In all the intakes miss the last stitch but one, coming back, and the 1st going, and always begin on the right side with 1 chain.
For the second half of these triangular figures which are worked from right to left, fasten on the thread to the 5th stitch after the increase and make 24 plain = 7 plain should remain between the two triangular figures formed of plain stitches = turn the work = 21 plain, miss the 2 last stitches, 1 plain on the stitch the thread is fastened to = turn the work = miss 1 stitch, 19 plain, 5 overs, put the needle through the 4th of the 7 stitches between, bring it back twice, each time through 2 loops, make 2 overs more, put the needle through the last stitch of the 3rd row opposite, bring it back twice through 2 loops, then once through 3 loops and twice through 2 loops = turn the work = 18 plain and so on, until you have made 10 transverse trebles = fasten off, then repeat the same series of rows on the other sides.
15th row—do not cut off the thread on the 4th side but work backwards: 3 single over the chain, 5 chain * 1 treble on the stitch whence the 5 chain proceeded, 2 chain, 1 treble on the last plain of the first half of the close parts of the pattern; 2 chain, 1 treble in the middle of the first part of the 10th transverse treble; 2 chain, 1 treble on the second half of the preceding treble, 2 chain, 1 treble on the 1st plain of the second half of the close parts; 2 chain, 1 treble on the 3rd and last upper stitch of the close part; 2 chain, 1 treble on the same stitch as the last treble. Then along the edge, 10 trebles, joined by 2 chain, one of which trebles should always be on a row of plain stitches = after the 10th treble: 3 chain, 1 plain on the 5th plain of the 13th row, 3 chain, again 11 trebles connected by 2 chain = after the 11 trebles: 2 chain ** and repeat 3 times from * to **.
16th row—on every 2 chain stitches: 3 plain.
17th row—7 chain, 1 plain on the 6th plain of the last row; repeat 7 times = for the 9th and 10th scallops only: * 5 chain. The plain stitch that follows the 9th scallop should come exactly over the corner stitch of the 13th row = after the 10th scallop: 1 plain; then 13 scallops with 7 chain, 1 plain on the 6th 5 stitch of the row beneath. Repeat twice from * = after the 4th scallop 2 smaller scallops, and up to the end of the row, 5 scallops more of 7 chain each.
18th row—make 7 plain over 7 chain, 5 chain, drop the treble, bring the needle back with the loop through the 3rd plain = on the 5 chain: 3 plain, 1 picot, 3 plain = on the 7 remaining stitches: 2 plain—on the 9th scallop of 5 chain, only: 5 plain = on the 10th scallop of 5 chain, only: 3 plain = then 7 chain, bring them back and join them to the 3rd plain of the 9th scallop and finish the picot.
When these squares are made use of in any number and have to be joined together, you must join 13 picots and leave the 14th free. The four empty picots in the centre are connected by a small star.
Crochet star (fig. 482).—This is one of the most graceful and delicate crochet patterns we know. For the purpose of reproduction here, we have had it worked in all the different sizes of D.M.C cotton but it looks best in a fine material; in Fil à dentelle No. 150, it can bear comparison with the finest needle-made lace.
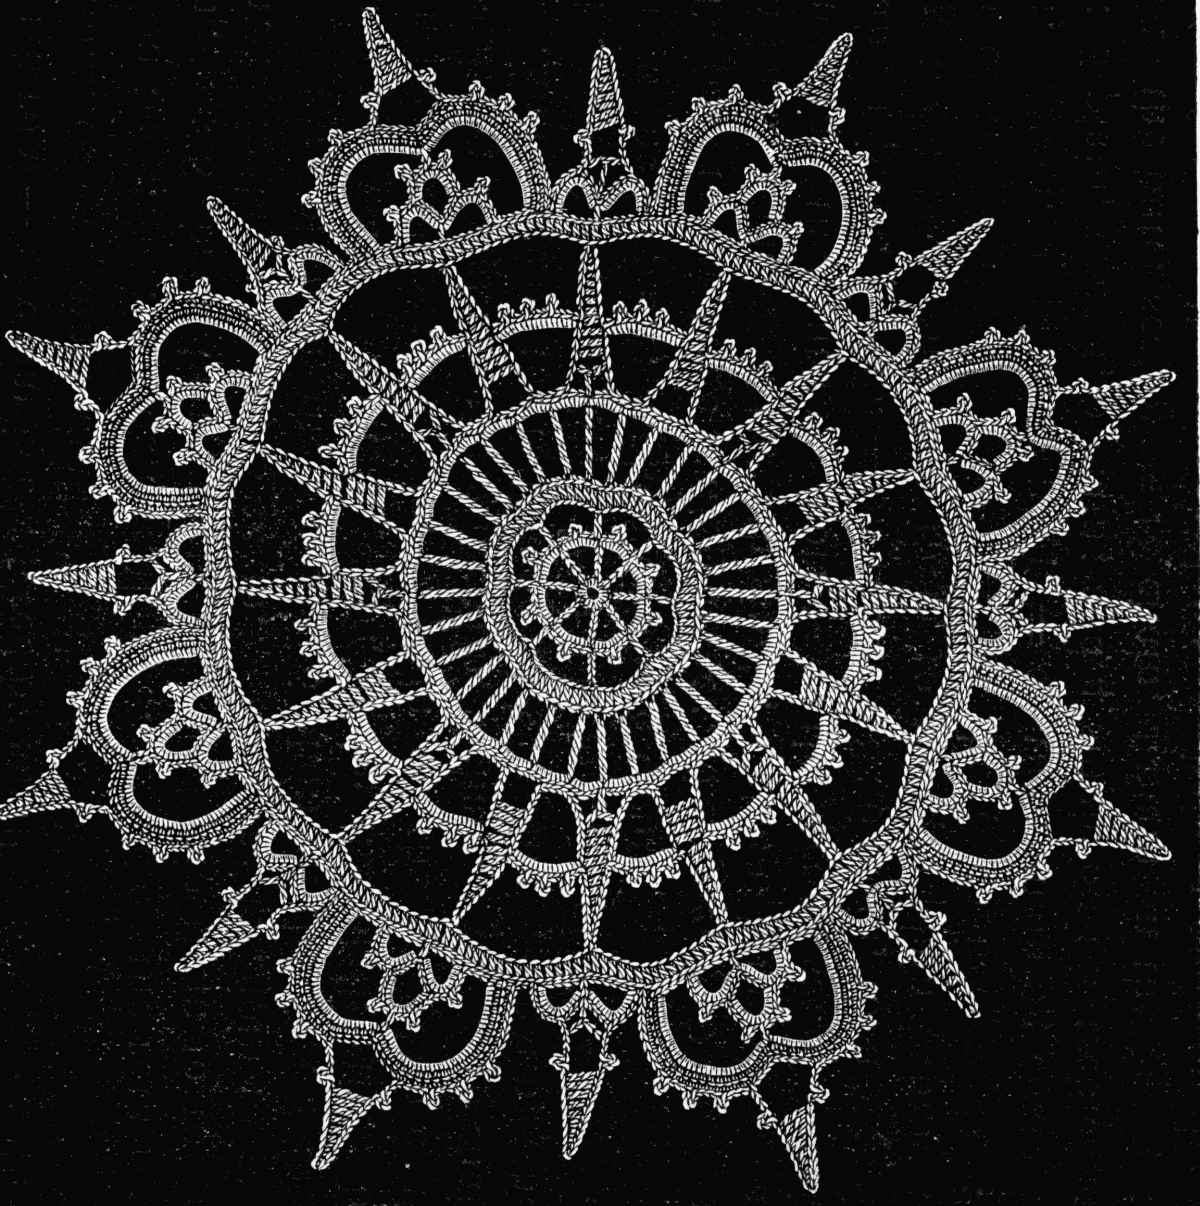 Fig. 482. Crochet star.
Materials: Fil d'Alsace D.M.C No. 30, Cordonnet 6 fils D.M.C Nos. 25 to 80, or Fil à dentelle D.M.C Nos. 25 to 150.[A]
2nd row—9 chain, 1 double treble, * 4 chain, 1 double treble; repeat 6 times from * = after the 7th treble: 4 chain, 1 single on the 5th of the 9 chain.
3rd row—1 chain, 4 plain, * 1 picot, 4 plain; repeat 7 times from * = carry the thread to the last stitch through the 1st plain.
4th row—12 chain, 1 treble on the stitch over the treble beneath, * 9 chain, 1 treble; repeat 6 times from * = after the 7th treble and the 9 chain: 1 single on the 3rd of the 12 chain.
5th row—3 chain, 1 treble on each stitch of the row beneath; including the 3 chain, 80 trebles in the whole circumference = after the last treble: 1 single on the 3 chain.
6th row—11 chain, 1 quadruple treble on the 2nd treble of the last row; 4 chain, 1 quadruple treble on the 3rd treble and so on, in all 32 trebles including the 7 chain.
7th row—1 chain, 5 plain on 4 chain.
8th row—3 plain on the 3 first chain, * 16 chain, miss 1, ** 1 single, 1 plain, 1 half treble, 2 trebles, 1 treble 1½ long, 2 double trebles, 1 triple treble, 1 treble 3½ trebles long, 1 quadruple-treble ***, 3 chain, miss 4 plain of the 7th row, 5 plain, 16 chain, join them, counting upwards from below, to the 5th treble of the first pyramid = on 7 chain: 3 plain, 1 picot, 3 plain, 1 picot, 3 plain, 1 picot, 3 plain; join the last loop of the last plain and the loop of the 7th chain; 8 chain. Repeat from ** to *** = on the middle of the last quadruple treble: 1 double treble towards the bottom, finish the treble, 3 chain, miss 4, 5 plain ****. Repeat 7 times from * to ****.
Coming back to the 1st point make along it: 8 single stitches, then 7 chain, join them to the 5th treble of the 16th point = over the chain: 3 plain, 1 picot, 3 plain, 1 picot, 3 plain, 1 picot, 3 plain and finish with 9 single to carry the thread to the top of the point.
9th row—1 chain, 1 plain, * 15 chain, 1 plain at the top of the point and repeat 15 times from *.
10th row—3 chain; 1 treble on each stitch of the 9th row; 256 trebles in all, including the 3 chain.
11th row—The star is bordered by small and large scallops, surmounted by points similar to those inside.
You begin by the small scallop and make on the 10th row: 5 single, * 8 chain, bring them back and join them to the 1st of the 5 single; 1 plain, 8 chain, miss 4 trebles, join them to the 5th; 14 plain on the 8 chain, 6 plain on the first 8 chain = turn the work = 5 chain, 1 treble on the plain stitch between two scallops; 5 chain, 1 plain on the 7th plain of the 1st scallop; 2 plain in the 5th chain, 2 chain, 1 picot, 10 chain, miss 1, and make on the following ones: 1 single, 1 plain, 1 half treble, 2 trebles, 1 treble 1½ treble long, 1 picot, 2 chain, 2 plain on the 5 chain; 8 plain on the 8 chain.
To pass to the large scallop make: 16 single, 8 chain, bring them back, 1 plain on the 5th single, 8 chain, bring them back again to the 5th = turn the work = on the second set of 8 chain: 6 plain, 1 picot, 9 plain = on the first 8: 6 plain, then 8 chain, bring them back and join them to the 4th plain behind the picot of the finished scallop = on the 8 chain: 5 plain, 1 picot, 5 plain, 1 picot, 5 plain = on the remaining chain below: 3 plain, 1 picot, 6 plain; add 4 single on the trebles and pass to the outer scallop = 18 chain, 1 plain on the 3rd of the 5 plain of the small upper scallop; 18 chain, 1 plain on the 4th of the 16 single = turn the work = 25 plain on the last chain stitches, and 25 on the first; 1 single on the 3rd single = turn the work = 1 plain on each of the preceding 50 plain stitches; join the last to the under row with a single stitch = turn the work = 10 plain, 1 picot, 3 plain, 1 picot, 3 plain, 1 picot, 4 plain, 2 chain, 1 picot, 10 chain, miss 1, 1 single, 1 plain, 1 half treble, 2 trebles, 1 treble 1½ treble long, 1 double treble, 1 treble 2½ trebles long, 1 triple treble, 1 picot, 2 chain and join them to the 6th plain stitch, counting from the middle.
Then 4 plain, 1 picot, 3 plain, 1 picot, 3 plain, 1 picot, 10 plain, 11 single on the trebles. Repeat 7 times from *.
Star with little squares (fig. 483).—Begin with 4 chain stitches, close the ring.
1st row—5 chain, * 1 treble, 2 chain. Repeat 6 times from *, to number altogether 8 trebles including the 5 chain; 1 single on the 3rd chain.
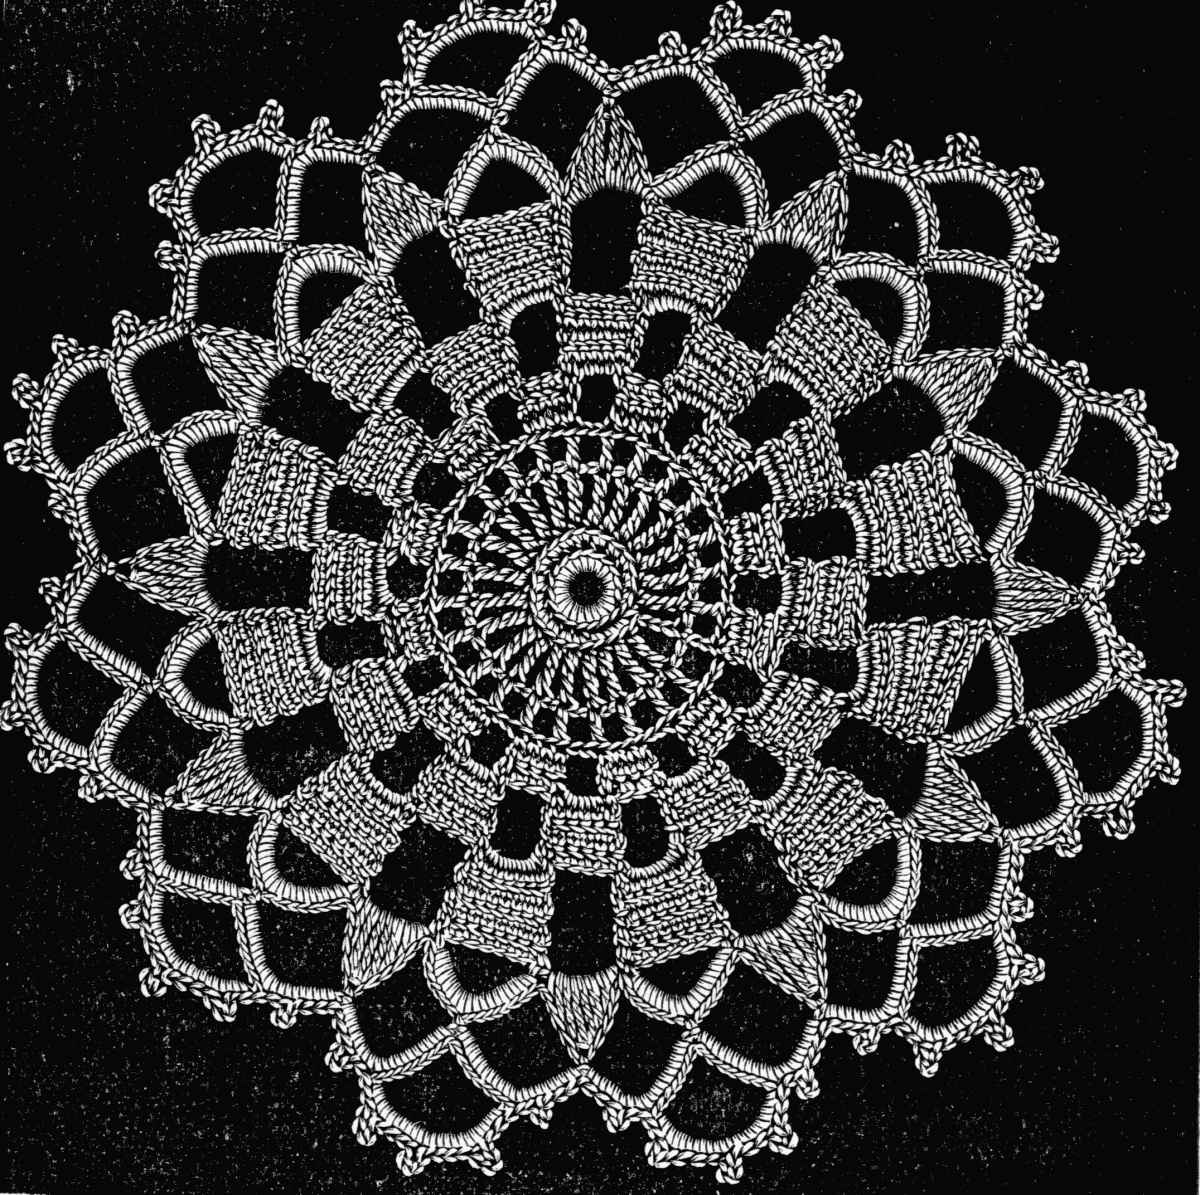
2nd row—6 chain, * 1 triple treble on the 1st chain stitch, 2 chain. Repeat 23 times from * and join to the 4th chain.
3rd row—6 chain, * 1 double treble on the treble beneath, 3 chain. Repeat from * through the row; join to the 4th chain.
4th row—1 plain on the treble = on the 3 chain: 5 plain, 1 plain on the treble; work 5 times to and fro over these stitches, put the needle through the 2 threads of the last stitch = after the 5th row: 10 chain, then 5 plain on the 3 next chain.
In turning the work and going from the 2nd to the 3rd, from the 4th to the 5th row, carry the thread behind the chain stitches, so that they may blend with the plain stitches; make in all 12 little squares with 11 spaces between; after the 12th, square: 5 chain, 1 single on the 5th row of the first square.
5th row—on each of the 6 plain of the 1st square: 1 single = on the 7th: 1 plain = 7 plain on the 5 chain = 1 plain on the 1st stitch of the 2nd square = 6 rows of plain, 14 chain, 1 plain on the 5th stitch of the next square = then make 6 rows of plain and wind the thread round the chain stitches.
6th row—1 single on every stitch of the last square, 1 plain on the last stitch above the 7 chain = on the 7 chain: 9 plain, 1 plain on the 1st stitch of the next square below = 9 rows to and fro.
7th row—after the 12th square: 9 chain, 1 single on the 1st plain, * 14 chain, 1 plain on the last plain = on the 9 chain: ** 1 chain, 1 plain, 1 treble 1½ treble long, 2 double trebles 2½ trebles long ***, 5 triple trebles ****. Repeat from *** to **, then proceed from * to ****.
8th row—19 plain over the 14 chain, 1 single on each treble; stop them at the 12th square and at the 3rd triple treble.
9th row—12 chain, 1 plain on the 10th of the 19 plain; 12 chain, 1 plain on the triple treble, and proceed in the same way throughout the whole length of the row.
10th row—on the first 12 chain stitches: * 5 plain, 1 picot, 12 plain = on the second 12 chain: 7 plain, 10 chain, bring them back to the 5th of the 12 plain of the first scallop = on the 10 chain: 4 plain, 1 picot, 4 plain, 1 picot, 4 plain, 1 picot, 4 plain, = on the 12 chain: 5 plain, 1 picot, 7 plain. Repeat 12 times from *.
Crochet collar (fig. 484).—We have avoided as far as possible describing articles in this book that are subject to the changes of fashion, the present collar composed of squares, stars, lozenge-shaped figures and a lace edge, is of a shape that will never be out of date. Fine and delicate work like this can only be executed in a very fine material, and we recommend unbleached thread as being more effective than white. The soft tone and the gloss of unbleached thread give the work an antique look, unobtainable in a white material. Fil à dentelle D.M.C No. 120 is the best for the purpose.
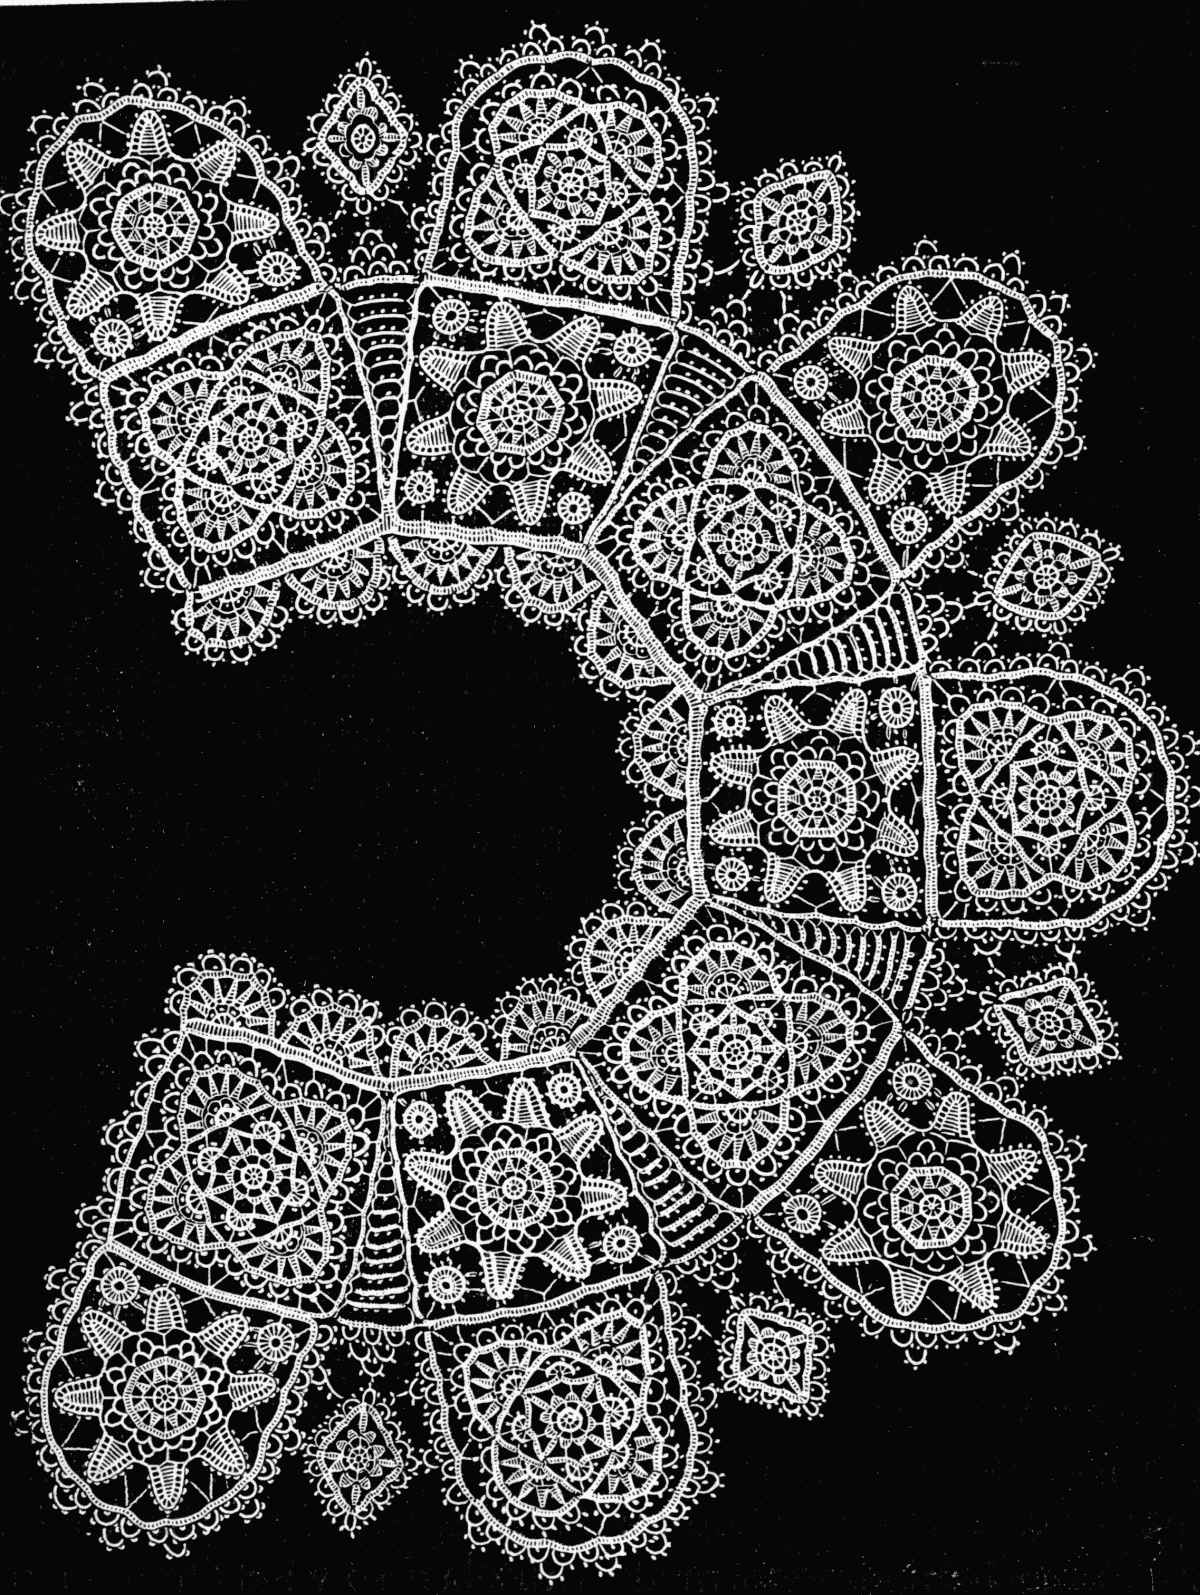 Fig. 484. Crochet collar.
Materials: Fil d'Alsace D.M.C No. 100, Cordonnet 6 fils D.M.C No. 120 or Fil à dentelle D.M.C No. 120, écru.
Inner squares: 1st row—4 chain, close the ring; 5 chain, * 1 treble on the ring, 2 chain; repeat 6 times from * and fasten the thread to the 3rd chain stitch.
2nd row—1 chain, 3 plain over 2 chain; 1 plain over each treble.
3rd row—8 chain, * 1 treble on each treble of the 1st row, 6 chain. Repeat 6 times from * = 8 trebles in all, including the first chain stitches.
4th row—* 10 chain; returning over the chain stitches: 1 plain, 1 half treble, 4 trebles, 1 half treble, 1 plain, join to the 1st chain stitch = on the 6 chain of the 3rd row: ** 1 plain, 1 half treble, 1 treble, 3 double trebles, 1 treble, 1 half treble, 1 plain ***. Repeat once more from ** to ***, then 3 times from * to *** = along the first leaf to the 10th stitch: 10 single.
5th row—starting from the point: * 7 chain, 1 triple treble on the 5th stitch of the small scallop of the 4th row: 7 chain, 1 triple treble on the next scallop, 7 chain, 1 plain on the 10th stitch of the 2nd leaf. Repeat 3 times from *.
6th row—1 chain, * 3 plain on the stitch that forms the point of the leaf; 1 plain on each chain stitch and each treble of the last row = 16 stitches in all, up to the 2nd treble = turn the work = coming back: 1 chain, 1 double treble on the 4th plain, 1 chain, 1 double treble, 1 chain, 1 double treble, 1 chain, 1 double treble, 1 chain, 1 double treble, 1 chain, miss 3 plain, join to the 4th plain = turn the work = make on each chain stitch, 2 plain and on each treble 1 plain and 1 picot over the 1st, 2nd, 4th and 5th treble; 8 plain **. Repeat 3 times from * to **.
7th row—1 chain, 1 plain on the 2nd of the 3 stitches at the point, * 9 chain, 1 double treble between the two first picots of the semicircle formed in the last row; 8 chain, 1 triple treble on the 3rd treble of the semicircle, 8 chain, 1 double treble between the 3rd and 4th picots of the semicircle, 9 chain, 1 plain on the stitch at the corner.
8th row—19 single on the chain stitches of the 7th row, 1 chain, 3 plain on the corner stitch, 24 plain on the chain stitches and trebles = turn the work = coming back: 2 chain, 1 double treble on the 20th plain; on the same stitch add: 2 double trebles with 2 chain; finish with: 2 chain, join them to the 5th plain = turn the work = on the chain stitches: 1 plain, 1 picot, 1 plain, 1 plain on the treble. Repeat this series 4 times = add: 4 plain on the chain stitches of the 7th row = turn the work = 5 chain, 1 double treble on the 1st treble of the small semicircle; then again 3 times, 3 chain, and twice 1 double treble on each of the trebles beneath = after the last 5 chain: join to the 4th plain.
The points in this row are made with: * 1 plain on the chain stitches, 8 chain, miss 1 stitch = coming back: 1 single, 1 plain, 1 half treble, 1 treble 1½ treble long, 3 double trebles, 1 plain on the 5 chain stitches. The 2nd point must be placed one half of it, before, and the other half behind the picot; make altogether 7 points = after the 7th: 8 plain on the chain stitches of the 7th row = then work backwards, without however turning the work: 7 chain, 1 chain on the stitch at the top of the point and repeat 7 times from * = after the 8th set of 7 chain stitches: 1 chain; 1 plain on the 9th plain, bringing the thread forwards from the right side to the wrong = 2 chain; take the thread back to the 3rd plain from the wrong side to the right = 1 treble on each chain stitch, 1 picot above each point, add 4 trebles and 14 chain, join them to the 4th treble that comes after the 1st picot.
On the 14 chain: 5 plain, 1 picot, 4 plain, 1 picot, 4 plain, 1 picot, 5 plain, 4 trebles to the next picot, 1 picot, 4 trebles; 14 plain, join them to the treble nearest the 1st scallop and so on = make 7 scallops in all; after the 7th add 2 trebles on the 2 chain stitches = after the 2nd treble make 2 plain, followed by the 3 stitches at the corner = in the next scallop, you fasten by 1 single, the 1st picot of the 1st scallop to the 3rd picot of the last scallop. When you have finished the four sides of the figure above-described, fasten off your thread.
The edging of these squares should be begun on the narrower of the inner sides and at the 3rd little scallop: * 1 plain on the middle picot of the 3rd little scallop, 7 chain, 1 double treble on the 1st picot of the 4th scallop; 7 chain, 1 triple treble on the 2nd picot of the same scallop, 6 chain, 1 double treble on the 3rd picot of the same scallop, 6 chain, 1 plain on the middle picot of the 5th scallop; 10 chain, 1 treble on the middle picot of the 6th scallop, 11 chain **, 1 quadruple treble on the middle picot of the 7th and 1 quadruple treble on the middle picot of the 1st scallop following and draw the last loops of the 2 trebles up together. Repeat once from * to **. Carry the trebles all round the figure on the picots just referred to.
For the second half of the edging which becomes a little wider: *** 10 chain, 1 treble on the 6th scallop, 11 chain, 2 quadruple trebles, the last loops of which you join to the middle picots of the 7th and 1st scallop; 11 chain, 1 treble in the next scallop; 10 chain, 1 treble in the 3rd scallop; 7 chain, 1 treble 2½ long, 8 chain, 1 treble 3½ long, 8 chain; 1 double treble, 8 chain, 1 plain, 12 chain, 1 treble, 14 chain, **** 2 quadruple trebles, the last loops of which are joined together. Repeat from **** to ***, that is the reverse way = finally add 1 more whole row of plain and 3 plain stitches at the corners = on the wider side you should have 99 stitches, not counting the increases at the corner.
To make the same figure, forming a part of the large outside scallops, repeat the same rows you have in the inner square up to the 7th row, the first half of which you make exactly the same as before. In the second half of the row of chain there should be 1 chain stitch less in each intervening space than there were in the first half.
8th row—make the first half of this row like the 8th row of the inner square = over the 2nd half, one quarter of which is 4 chain stitches narrower, the little wheels are made like the others with 7 picots. The number of chain stitches and the trebles of the setting are also the same, but instead of 7 points you have to make 5 and over these, 5 small scallops instead of 7.
The setting, towards the top is made exactly in the same manner as the wide part of the upper square, that is, as from the 3rd scallop of the first semicircle to the 5th scallop of the 2nd. From this point, the series of stitches changes, so as to form a rounded edge: * 7 chain, 1 plain on the 6th scallop; 15 chain, 2 triple trebles joined by the last loops to the 7th and 1st scallop; 14 chain, 1 plain on the 2nd of the 5 scallops; 15 chain, 1 plain on the 3rd scallop; 15 chain, 1 plain on the 4th scallop, 15 chain **, 2 triple trebles joined by the last loops in the 5th and 1st scallop. Repeat once again from ** to * = add 1 row of plain on each stitch of the preceding row; 3 plain on the two top corner stitches. You will thus have 3 figures with a rounded edge on one side.
The second kind of square consists of 8 leaves inside and is begun in the same way by 6 chain formed into a ring.
1st row—5 chain, 1 treble, 2 chain, * 1 treble, 2 chain. Repeat 6 times from * and join to the 3rd of the 5 chain.
2nd row—1 chain, 3 plain over 2 chain, 1 plain on each treble.
3rd row—9 chain, * miss 1 stitch = coming back: 1 single, 1 plain, 1 half treble, 1 treble, 1 double treble, 1 triple treble, 1 treble over the treble of the 2nd row; 7 chain. Repeat 7 times from * = after the 8th point: 7 single along the 1st.
4th row—* 1 plain on the stitch you missed at the point, 5 chain, 1 triple treble on the treble of the 3rd row, 5 chain. Repeat 7 times from *.
5th row—3 chain, 1 treble on each stitch of the 4th row; join to the 3rd of the 3 chain.
6th row—10 chain, 1 plain on the treble over the triple treble of the 4th row: 10 chain, 1 plain on the treble above the little point.
7th row—15 plain on the 10 chain = on the 3rd scallop only: * 7 plain, 10 chain, come back to the second scallop, bring the thread back from the wrong side to the right between the 7th and 8th plain stitches, 15 plain on the 3rd scallop, 8 plain on the next scallop, 15 plain and repeat 6 times from *.
When the 16th scallop is finished, pass to the point of the 1st scallop by means of 7 single, then add the 10 chain to pass to the 8th scallop above; when that is finished, fasten off, and fasten on again to one of the 8 scallops.
8th row—* 21 chain, miss 1 stitch, 1 plain, 1 half treble, 1 treble, 1 treble 1½ treble long, 1 double treble, 1 treble 2½ trebles long, 1 triple treble, 1 treble 3½ trebles long, 1 quadruple treble, 1 treble 4½ trebles long, 1 quintuple treble. After passing through the 3rd loop, make 1 quadruple treble, between the 2 plain scallops; then finish the quintuple treble, 7 chain, 1 plain on the 2nd scallop and repeat 7 times from *.
9th row—* 7 plain on the 7 chain; 1 plain on each stitch of the pyramid, 3 plain on the stitch at the point; 4 plain on the 7 chain on the opposite side = turn the work = ** 1 chain, miss 1 plain, 1 treble on the 2nd stitch = after the 5th treble, leave out no more stitches between the trebles ***; place the 8th, 9th and 10th trebles on the 2nd of the increased stitches. Repeat on the opposite side from *** to ** and join to the 4th of the plain stitches = make 17 trebles in all, then one plain over each chain, 1 plain on each treble and 1 picot after every 3rd plain = after the 4th and up to the 8th picot, leave only 2 plain between: 11 picots in all = in conclusion: 3 plain more on the 7 chain and repeat the whole 7 times from *.
The little wheel at the top of the square is begun with 10 chain for the ring = 16 plain on the ring, 4 chain, * 1 treble, 1 chain = repeat 14 times from *; 16 trebles in all, including the chain stitches = then on each treble and each chain stitch: 1 plain; after 4 plain: 1 picot; connect the wheel first on the right.
The 2nd picot is to be fastened to the 9th picot of the large scallop = proceed with: 3 times 4 plain with 1 picot = after the 3rd plain, fasten the picot to the 3rd picot of the next large scallop and complete the small wheel. The left wheel is made and inserted in the same manner as the right one. The wheels at the bottom of the square require for the foundation ring: 14 chain, on which you make 21 plain = on these: 4 chain, * 1 treble, 1 chain = repeat 19 times from *; 21 trebles in all, including the chain stitches = 3 plain, 1 picot, 3 plain, 1 picot, 3 plain, 1 picot, 3 plain, 4 chain, join to the 8th picot of the 2nd scallop; 4 chain, finish the picot, 3 plain, 1 picot, 3 plain, 8 chain, join to the 10th picot of the scallop, 8 chain, complete the picot; 3 plain, 1 picot, 3 plain, 8 chain, join to the 2nd picot of the 3rd scallop, 8 chain, close the picot, 3 chain, 1 picot, 3 plain, 4 chain, join to the 4th picot of the 3rd scallop; 4 chain, complete the picot, 3 plain, 1 picot and so on, until you have 14 picots round the wheel. Repeat the same wheel to the left between the 4th and 5th scallop.
The edging of this second kind of square is also slightly different; fasten the thread to the 6th picot of the 1st scallop before the small wheel, then working from right to left, count: * 10 chain, 1 treble on the 2nd empty picot of the small wheel; 8 chain, 1 triple treble on the 4th picot of the wheel = upwards: 9 chain, 1 double treble on the 6th picot of the wheel; 9 chain, 1 plain on the 6th picot of the 8th scallop, 12 chain, 1 plain on the 7th picot of the scallop, 11 chain **, 1 quadruple treble on the 9th picot of the 8th scallop and on the 3rd picot of the 7th; draw the last loops of the two trebles up together. Repeat once more from ** to *, then: 1 plain on the 6th picot of the 6th scallop; *** 12 chain, 1 sextuple treble on the 9th picot of the 6th scallop, retain 2 loops of the treble on the needle, make 4 more overs, join the treble to the 3rd picot of the 5th scallop; finish the bars, 12 chain, 1 plain in the 6th picot of the next scallop = 12 chain, 1 double treble on the 2nd picot of the 7 empty picots of the bottom wheel; 9 chain, 1 quadruple treble on the 4th picot; 12 chain, 1 double treble on the 6th picot, 14 chain, 1 plain on the 6th picot of the 4th scallop, 14 chain ***, 1 septuple treble, in the 9th and 3rd picots of the 4th and 3rd scallops ****. For the preceding treble, you pass first through 4 loops only, then make 4 more overs for the other half of the treble, and finish the last loops one by one. Repeat from **** to ***. One row of plain stitches completes the square.
After having made the square similar to that of the upper one, you have merely to add the large wheels at the top.
The setting of chain stitches and trebles is begun at the first scallop between 2 wheels = 1 plain on the 6th picot of the 1st scallop; 14 chain, 2 quintuple trebles, of which the last loops only are joined together, on the 9th and 3rd picot of the 1st and 2nd scallop, = 14 chain, 1 plain on the 6th picot of the next scallop; * 14 chain, 1 treble on the 2nd empty picot of the wheel; 10 chain, 1 quadruple treble on the 4th picot, 10 chain, 1 treble on the 6th picot; 14 chain, 1 plain on the 6th picot of the 3rd scallop; 14 chain, 2 sextuple trebles on the 10th and 2nd picot of the 3rd and 4th scallop; 15 chain, 1 plain on the 6th picot of the 4th scallop; 16 chain, 2 sextuple trebles on the 10th and 2nd picot of the 4th and 5th scallop; 16 chain, 1 plain on the 6th picot of the 5th scallop; 15 chain ** 3 septuple trebles on the 10th and 2nd picot of the 5th and 6th scallop. Repeat from ** to *; and make 4 figures with rounded edges. When all the figures are finished, join them together by trebles of a suitable length.
Introduce the thread at the corner stitch on the widest side of the 2nd 8 pointed star and make: 1 plain, 6 chain, miss 3 stitches, 1 plain on the 3 next stitches, 4 chain, miss 2, 1 plain on the next 3 plain stitches.
Make 11 loops in this manner, each consisting of 4 chain and 3 plain, then 2 loops of 3 chain and 2 plain = then miss as many stitches of the square at the edge of the collar as were left empty in the second square; 2 plain and draw the loop each time through the 2 last stitches of the opposite square = 1 chain, 1 single on the 2nd chain stitch of the opposite side; 1 chain, 3 plain on the edge of the first square, 1 chain, 1 single, 1 chain, miss 3 stitches, 3 plain, 5 chain, bring the loop from the wrong side to the right = on the chain stitches: 4 plain, 2 chain, miss 3, 3 plain.
From this point onwards, fasten all the bars of chain stitches to the loops produced by the same stitches in the 2nd square. Thus, the 1st bar consisting of 5 chain, the 2nd will consist of 7 chain on which make 7 plain, and then add 2 more chain. Nowhere must the two first chain stitches be uncovered.
The 3rd bar must consist of 9 chain, 9 plain and 2 chain = the 4th of 11 chain, 5 plain, 1 picot, 5 plain, 2 chain = the 5th of 13 chain, 4 plain, 1 picot, 4 plain, 1 picot, 4 plain, 2 chain = the 6th of 16 chain, 6 plain, 1 picot, 6 plain, 1 picot, 6 plain, 2 chain = the 7th of 18 chain, 5 plain, 1 picot, 4 plain, 1 picot, 4 plain, 1 picot, 5 plain, 2 chain = the 8th of 21 chain, 5 plain, 1 picot, 5 plain, 1 picot, 5 plain, 1 picot, 5 plain, 2 chain = the 9th of 24 chain, 5 plain, 1 picot, 5 plain, 1 picot, 5 plain, 1 picot, 5 plain, 1 picot, 5 plain, 2 chain = the 10th of 26 chain, 6 plain, 1 picot, 5 plain, 1 picot, 5 plain, 1 picot, 5 plain, 1 picot, 6 plain, 2 chain = the 11th and last of 28 chain, 32 plain, 2 chain, fasten off.
As the square with the semicircles in it, has more plain stitches in the edge than the one with the eight-pointed star in it, the stitches must be divided so that you miss 3 from time to time, instead of two. When the 7 top figures are finished, join the 7 bottom ones to them, each separately, by a row of plain stitches, made on the wrong side of the work. Below the first square with the semicircles, comes the eight-pointed star, below the next eight-pointed star, the square with the semicircles, and so on.
A narrow edging forms the outside border, the foundation of which is a row of plain stitches running all along the squares. At the middle of the square you decrease by 2 stitches, and at the point where two squares meet, by 3. When you reach the left side and the end of the row, make 3 plain on the corner stitch, then: * 5 plain, 1 picot, 5 plain, 14 chain, join them to the first of the 5 first plain (drop the thread at each scallop and bring it forward from the wrong side to the right) = on the 14 chain: 5 plain, 1 picot, 11 plain, 1 picot, 5 plain = along the square: 5 plain, 1 picot, 5 plain, then 14 chain, join them to the first plain = over the 14 chain: 5 plain, 1 picot, 5 plain, 14 chain, join them in turning back between the 5th and 6th of the 10 plain of the 1st scallop; 5 plain, 1 picot, 5 plain, 1 picot, 5 plain, 1 picot, 5 plain; on the half-finished scallop: 5 plain, 1 picot, 5 plain ** = on the plain stitches of the edge: 4 plain, 1 picot, 4 plain, 12 chain, come back, join to the 1st of the 4 plain = on the 12 chain: 4 plain, 1 picot, 4 plain, 1 picot, 4 plain, 1 picot, 4 plain *** = repeat on the same figure once from * to *** and once from * to **.
This makes 77 stitches, the number there ought to be on the wide side of the straight-edged figures.
The scallops vary a little on the rounded sides. There, you should have 110 stitches, counting from the corner to the treble that marks the middle at the bottom. The single scallops, between the triple scallops of the border, are also all made over 8 stitches; the first triple scallop is made over 20 stitches, the 2nd, 3rd and 4th triple scallop over 16 stitches.
Make no single scallop after the 4th triple one; which is immediately succeeded by the 5th triple scallop, over 16 stitches.
Altogether, round each star, there are 9 triple and 8 single scallops. After the 8th single one, make 3 plain stitches on the 2 chain stitches of the connecting bar.
On the 32 plain stitches of the last bar: 8 plain, 1 picot, 4 plain, 12 chain, bring them back and join to the 5th of the 8 plain = on the 12 chain: 5 plain, 2 chain, draw the loop through the picot in the middle of the last single scallop, 2 chain, close the picot, 8 plain, 1 picot, 5 plain = in the bar: 4 plain, 1 picot, 4 plain, 12 chain, bring them back and fasten them to the 1st plain = 5 plain, 1 picot, 4 plain, 12 chain, join them to the 4th plain of the 1st scallop; 5 plain, 1 picot, 8 plain, 1 picot, 5 plain = in the half-finished scallop: 4 plain, 1 picot, 4 plain = in the bar: 4 plain, 1 picot, 4 plain = 12 chain, bring them back and fasten them to the 1st plain. 4 plain, 1 picot, 4 plain, 12 chain, join them close to the scallop above = 5 plain, 1 picot, 4 plain, 12 chain, bring them back and join them to the 4th plain of the 2nd scallop; 5 plain, 1 picot, 5 plain, 1 picot, 5 plain, 1 picot, 5 plain = in each of the 2 half-finished scallops: 4 plain, 1 picot, 5 plain = finish with 4 plain, 3 plain on the 2 chain and repeat from * round all the rounded parts.
The lozenges that fill the empty spaces between the large figures are made in 7 rows, on a ring formed of 4 chain.
1st row—5 chain, 1 treble on the ring, 2 chain, 8 trebles in all, including the bar of chain stitches.
2nd row—3 plain over 2 chain, 1 plain over each treble.
3rd row—7 chain, 1 treble over the treble beneath, 5 chain, 1 treble; 8 trebles in all.
4th row—* 1 plain, 1 half treble, 1 treble, 1 double treble, 1 treble 2½ trebles long; ** repeat the reverse way to * = 1 plain on the treble, 7 chain, miss 1 stitch, 1 plain, 1 treble, 1 double treble, 1 treble, 1 plain. Repeat twice from * to **, followed by: 9 chain, miss 1, 1 single, 1 plain, 1 half treble, 2 trebles, 1 half treble, 1 plain, 1 single ***. Repeat once from * to ***, then again from * to **, and add 5 single all along the scallop.
5th row—9 chain * 1 plain on the top stitch of the small leaf, 7 chain, 1 treble on the middle stitch of the scallop, 7 chain, 1 treble on the next scallop = 9 chain, 1 plain on the leaf, 9 chain, 1 treble on the scallop, 7 chain, 1 treble on the next scallop, 7 chain and repeat once from *.
6th row—1 plain on each stitch of the row before, 3 plain on the points.
7th row—on each side of the lozenge 3 little scallops on 8 chain, with 3 picots and 1 picot below the scallops and between every 4 plain; the scallops at the points extend over 4 stitches only, so that the picot below is left out.
These lozenges are fastened on two sides to the middle picot of the triple scallop; then, starting from the 3rd scallop of the lozenge you make, 8 chain, join them to the middle picot of the 1st triple scallop; coming back over the 8 chain: 5 plain, 1 picot, 5 plain and finish the scallop. The next scallop, at the point of the lozenge, is fastened by a picot of 6 chain, to the middle picot of the 6th scallop underneath the connecting bar. Repeat the same on the 2nd side and make 6 lozenges in all.
The lace that finishes off the collar at the neck must be made to stand up, and is begun by a row of trebles on the plain stitches.
From the corner as far as the 2nd treble of the 4th scallop, make triple trebles, from the 4th scallop to the 6th chain stitch after the 5th scallop, make double trebles, from this point to the 2nd scallop of the next semicircle, only single trebles, then again double trebles and finish with triple trebles as at the beginning. Decrease by 2 or 3 stitches in each square.
When this row of trebles is finished, fasten off, and fasten on again on the right and on the base of the 1st treble which you border with 4 chain, then follow: * 15 plain on the row of trebles, put the needle in under the 2 loops of the trebles = turn the work = 2 chain, 1 double treble, miss 4 plain, 1 double treble on the 5th stitch, 2 chain, 1 double treble, 2 chain, 1 double treble, 2 chain, miss 4 plain = turn the work = bring the loop to the front; ** 1 plain, 1 picot, 1 plain, 1 plain on the treble; repeat 3 times again from ** and add 4 plain on the trebles = turn the work = 6 chain, 1 double treble over the treble beneath; again 3 times 6 chain stitches and 1 double treble; join the 4th set of 6 chain to the 4th plain = bring the thread back to the front: 1 plain on the 6 chain = 8 chain, miss 1, and make on the others: 1 plain, 1 half treble, 2 trebles, 1 treble 1½ treble long, 2 double trebles, 1 plain stitch on the 6 chain. The next point comes above a treble; you make 7 points in all. After the 7th: 5 plain, then 7 chain, 1 plain on each point between the points and join.
Join the 8th set of 7 chain on to the 4th plain of the first treble = then add: 2 chain, draw the loop from the wrong side to the right through the 1st plain stitch; 8 trebles, 1 picot, 4 trebles, 12 chain, bring them back over the picot, join it between the 4th and 5th trebles; 5 plain, 1 picot, 5 plain, 1 picot, 5 plain, 1 picot, 5 plain.
Over each point: 1 picot and over the picot 1 scallop, like the one made in the square. On the 7th point only 1 picot = after the last treble on the last chain: 2 chain; then go on with the plain stitches until you have 27 and repeat from *.
In the semicircles that follow you leave out the first and last little scallops, the first and the last scallop must be joined together by the first and the last picot; in the last semicircle, make 6 little scallops, the same as you did in the first.
Crochet chair-back (fig. 485).—The close leaves in plain stitch of the large centre star, the 4 corner figures forming a cross and the diagonal figures, all have to be made separately and sewn on afterwards in their proper place. To join the separate parts neatly together, draw a square the size of the work on a piece of thick paper or waxcloth, divide it into 8 parts by means of straight and diagonal lines, sew the separate pieces of crochet upon it, face downwards, in their proper places and make the trebles on the wrong side of the work.
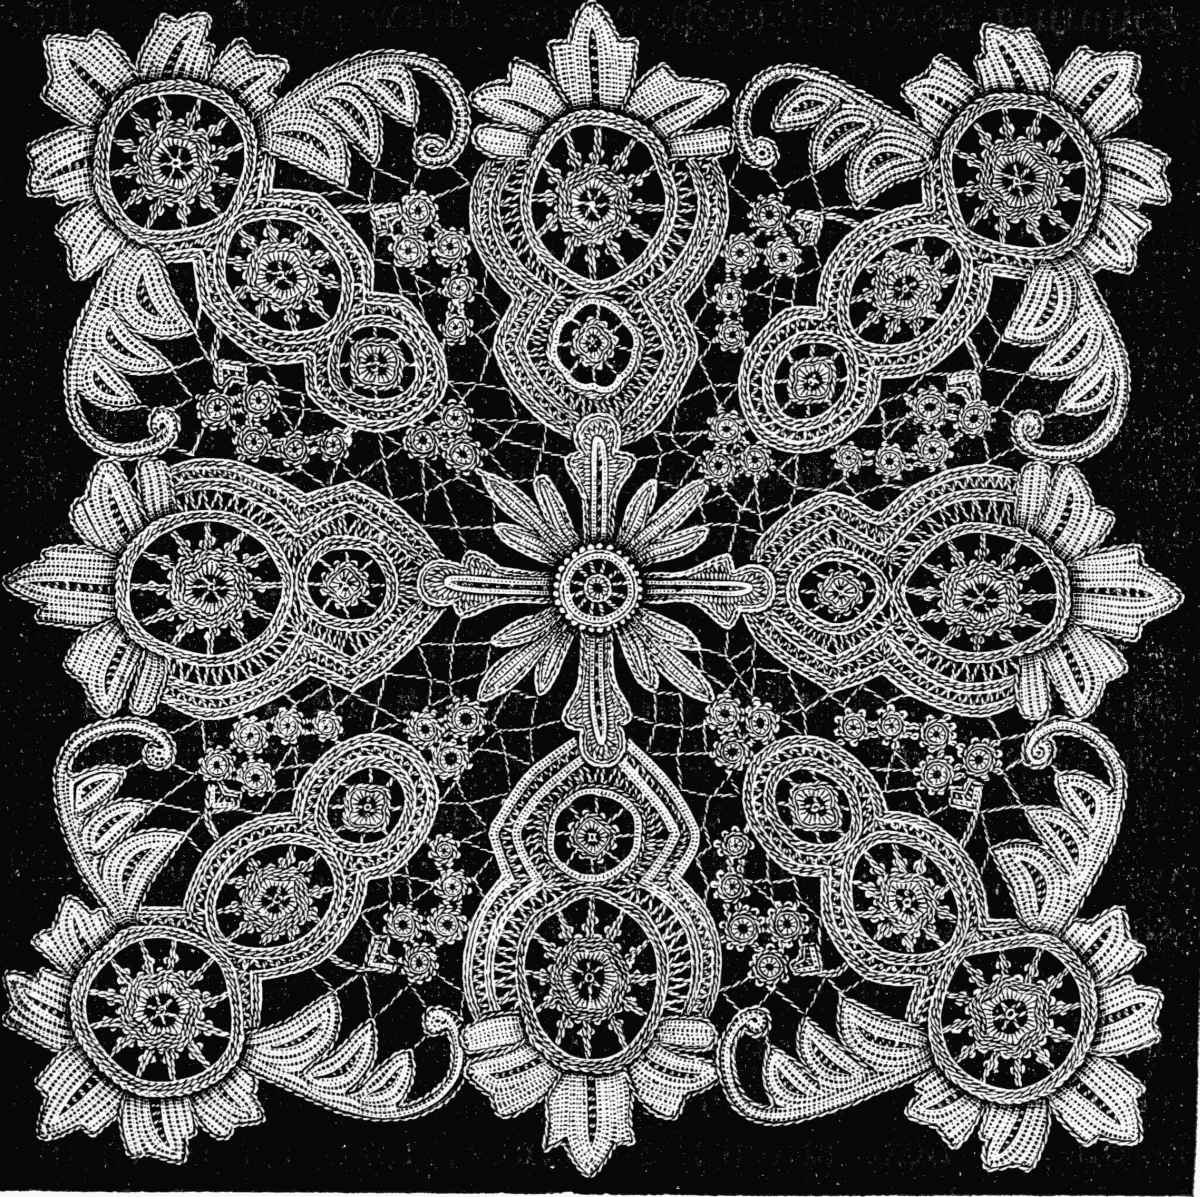 Fig. 485. Crochet chair-back.
Materials: Fil à dentelle D.M.C No. 50 for the close figures and No. 120 for the connecting bars.[A]
1st row—23 plain on the 12 chain.
2nd row—9 chain, 1 double treble on the 2nd plain, 4 chain, 1 treble and so on until you have 12 trebles, including the 5 chain.
3rd row—1 plain on each chain stitch and each treble; 60 plain in all.
4th row—3 plain, 1 picot, altogether 20 picots in the row, then fasten off.
The leaves round the ring have 3 petals, 1 large and 2 small; you begin by the large one, and make the small ones afterwards. The petals should be begun from the point and not from the bottom as is generally done—30 chain; coming back: 4 single, 4 plain, 5 half trebles, 8 trebles, 4 half trebles, 4 plain stitches, 3 plain on the 1st chain = on the second side of the chain make the same number of stitches but in the reverse order.
Small petal on the left—21 chain, miss 1, 5 plain, 3 half trebles, 5 trebles, 3 half trebles, 3 plain, 3 plain on the top. Repeat the same series of stitches in the reverse order on the second side = at the 10th stitch of the large petal and counting upwards from below, draw the thread through the 10th stitch of the small petal, and do the same through the 9 next stitches = for this purpose drop the loop each time and draw it back through the opposite stitch, from the wrong side to the right. After making the same petal on the right, fasten off; fasten on again at the outer edge and edge the 3 petals with 1 plain on each stitch and 3 plain on the stitch at the point; make 4 leaves with 3 petals each.
Between the pointed leaves, which are afterwards placed on the diagonal line of the square, come some very long leaves which are rounded towards the top—29 chain, miss 1, 5 plain, 2 chain, 1 treble on the 3rd of the chain stitches; carry on the trebles until you have, on coming to the last chain, 7 trebles = turn the work and make 1 plain on each stitch of the row = turn the work = 1 plain on every stitch all round = turn the work = * 9 plain, 4 half trebles, 3 trebles, 2 double trebles, join the last loops of the 2 last trebles together; set the 20th and 21st double treble on the same stitch = the 20th treble 2½ trebles long; the 21st a triple treble = on the next plain stitch; 1 treble 3½ trebles long and 1 quadruple treble = again on the next stitch: 2 trebles, the first of them 4½ trebles long, the 2nd a quintuple one = on the 3rd plain: 2 quintuple trebles, 4 chain, 1 plain on the plain stitch of the 2nd row and next to the last quintuple treble, 1 half treble, 1 treble, 2 double trebles on one stitch, 2 triple trebles on one stitch **, 1 quadruple treble on the 2 next stitches. Repeat from ** to *, therefore in the reverse order.
To make the large star which is the first of the figures placed on the diagonal line, make: 4 chain, close the ring.
1st row—10 chain,* 1 double treble on the 4 chain, 5 chain. Repeat 4 times from *, 6 trebles in all.
2nd row—over 5 chain: 1 half treble, 1 treble, 1 treble 1½ treble long, 1 double treble, 1 treble 2½ trebles long **, 1 triple treble. Repeat once from ** to * and 5 times from * to **.
3rd row—1 plain on each stitch of the 2nd row.
4th row—3 plain, 1 picot, 2 plain, * 2 chain, 1 picot, 5 chain, miss 1 = coming back: 4 plain, 1 picot, 2 plain = on the plain stitches of the 3rd row: 2 plain, 1 picot, 3 plain. Repeat from *, with this difference that the trebles that are placed over the half trebles of the 2nd row must begin with 3 chain. Make, altogether, 12 long bars, 6 of them beginning with 2 chain and 6 with 3; these bars remain empty; after the 12th you fasten off.
5th row—fasten on the thread to the top stitch of a treble, 11 chain, 1 plain. Repeat this series 11 times.
6th and 7th row—1 plain on each stitch of the 5th row, then 1 plain on each stitch of the 6th row.
8th row—over 9 bars and 8 spaces: 3 plain, 1 picot, 3 plain and so on. Add nothing further to the 2 rows of plain stitches of the 10th, 11th and 12th picots.
For the second star of the corner figure 4 chain, close.
1st row—8 chain, 1 treble, * 5 chain, 1 treble. Repeat 3 times from *; 5 trebles in all, including the chain stitches.
2nd row—* 1 chain, 1 half treble, 1 treble, 1 treble 1½ treble long, 1 double treble, 1 triple treble **. Repeat from ** to *, and the whole series 4 times.
3rd row—* 1 chain, 3 plain, 1 picot, 2 plain, 2 chain, 1 picot, 4 chain = coming back, 4 plain on the 4 chain, 1 picot, 2 chain = on the stitches of the 2nd row: 2 plain, 1 picot, 2 plain, 3 chain, 1 picot, 5 chain, miss 1, 4 plain = coming back: 1 picot, 3 plain. Repeat 4 times from *, fasten off.
4th row—fasten on at the point of one of the bars and make from one bar to the other: 9 chain, 1 plain on each bar.
5th row—1 plain on each stitch of the last row.
6th row—1 plain on each stitch of the last row and join the 4 last stitches to the 4 that are under the 11th treble of the 1st star, taking care to put the trebles one above the other.
The 3rd star also begins with 4 chain formed into a ring.
1st row—8 chain, 1 treble, 5 chain, 1 treble, 5 chain, 1 treble, 5 chain, join them to the 4th of the 8 chain.
2nd row—2 chain, * 1 half treble, 1 treble, 1 treble, 1½ treble long, 1 double treble **. Repeat from ** to * and then, 3 times from * to **.
3rd row—1 plain on each stitch of the 2nd row.
4th row—1 chain, 2 plain, * 1 picot, 3 chain, 1 picot, 5 chain. Repeat 3 times from *; after the 8th picot: 3 chain.
5th row—15 chain, 1 triple treble on the 5th and on the 2nd plain stitch between 2 picots, 9 chain, 1 triple treble and so on. Altogether, including the chain stitches, 8 trebles and 8 times 9 chain; join to the 7th chain.
6th and 7th row—1 plain on each stitch of the previous row; join the 4 last stitches again to the 4th stitch of the 2nd star and fasten off.
The open work border is made from the 1st large star, beginning near the 9th treble at the point where the picots leave off. After fastening on the thread: 5 chain, miss 2 plain, 1 plain on the 3rd = at the point where the circles meet, miss 3 or 4 stitches on each side and carry the treble over the indent of the scallop.
After finishing the picots of chain stitches on the two sides and as far as the 3rd treble of the large star, fasten off; fasten on again on the right of the large star: 4 chain, 1 plain on the 3rd chain; put the needle only through the 2 upper loops of the chain stitch; in the indent, connect 3 picots by 1 chain stitch; 2 chain and 1 plain between the next plain stitches. Fasten off. The 2 next rows both begin on the right and consist of plain stitches only; in the indent of the rings join 3 stitches of the preceding row together by 1 plain.
The 5 leaves over the circles—Begin with the middle and largest one—25 chain, miss 1, 3 plain, 2 chain, miss 2, 1 treble, 2 chain and so on, 7 trebles in all = turn the work = 1 plain on each stitch, passing under only 1 loop of the stitches = on the stitch you missed: 3 plain; on the second side: 1 plain on each stitch = turn the work = do as in the last row = turn the work = do as in the 2 last rows, excepting as regards the 5 last stitches which you leave untouched = turn the work = 15 plain, * 1 chain = turn the work = 12 plain = turn the work = 12 plain on the 12 plain and on all those you missed **. Fasten off the thread. On the 2nd side of the leaf: draw the thread through the 6th stitch, counting upwards from below and on the side that is not indented, 15 plain and repeat from * to ** = then make: 1 row of plain, putting the needle through both the loops of the lower stitches = at the points of the leaves: 3 plain, in the indents of the leaves miss 1 stitch.
First leaf on the right of the large leaf—25 chain, miss 1, 3 plain, 1 chain, 1 treble on the 3rd chain; 7 trebles in all = turn the work = 1 plain on each stitch, 18 stitches altogether, to the corner stitch; 3 plain on the corner stitch. The 2nd side is worked like the 1st.
Add 3 more rows of plain stitches and increase 3 plain on the stitch at the point = in the 3rd row leave the 5 last stitches empty = turn the work = 11 plain, 1 chain = turn the work = 11 plain and 5 plain on the 5 stitches that were passed over; fasten off.
On the opposite side fasten on the thread on the wrong side at the 8th stitch counting from the point: 12 plain, 1 chain = turn the work = 12 plain = turn the work = make plain stitches up to the end of the leaf and border it, like the large leaf, with plain stitches = join the 8 first stitches to the corresponding ones in the large leaf = make 4 leaves all alike.
2nd leaf on the left—19 chain, miss 1, 3 plain, 2 chain, 1 treble on the 2nd chain; 7 trebles in all = turn the work = 1 plain on each of the preceding stitches, 3 plain on the stitch at the point = turn the work = 1 row of plain stitches = turn the work = 1 row of plain = turn the work = 1 row of plain, excepting on the last 7 stitches = turn the work = 14 plain, 1 chain = 3 more rows to and fro with 11 plain; fasten off, and fasten on again on the 2nd side at the 6th stitch counting from below: 2 rows of 11 plain and 1 row to the end of the leaf = then encircle this leaf, like the others with plain stitches, join the 8 last stitches to the last 8 of the large leaf = make 4 leaves all alike.
3rd leaf on the right—18 chain, miss 1, 2 plain, 1 chain, 1 treble on the 3rd chain, 5 trebles in all = turn the work = 4 rows of plain worked to and fro; on the stitch at the point: 3 plain = after the 4th row: 4 trebles, 8 plain, 1 chain, 4 plain, 1 chain, 4 plain, 1 chain, then plain stitches to the end = fasten off. On the second side, fasten on to the 6th stitch counting downwards from the top: 9 plain = coming back: 3 plain, 1 chain, 7 plain = coming back: 7 plain, 1 chain = then to the end of the leaf, 1 plain on each stitch.
3rd leaf on the left—14 chain, miss 1, 2 plain, 2 chain, 1 treble, 2 chain, 1 treble, 2 chain, 1 treble, 2 chain, 1 treble; 4 rows of plain all round, 3 plain on the stitch at the point, and 3 plain on the added stitch. After the 4th row: 14 plain = turn the work = 10 plain = turn the work = 3 single, 7 plain = coming back: 7 plain = coming back again: 7 plain; after the last plain, 1 single on each plain up to the top = fasten off.
On the second side of the leaf: 9 plain = turn the work = 5 plain = turn the work = 5 plain, 1 single on each of the remaining stitches = turn the work = surround the whole leaf with plain stitches; 3 plain on each stitch at the point; join the 8 last stitches to the 8 last of the 2nd leaf.
Branch on the right and 1st leaf—28 chain, miss 1, 4 plain, 1 chain, 1 treble on the 3rd chain, 1 chain, 1 treble on the 3rd chain, 1 chain, 1 treble 1½ treble long on the 3rd chain, 1 chain, 1 treble 1½ treble long on the 3rd chain, 1 chain, 1 treble on the 3rd chain, 1 chain, 1 half treble on the 3rd chain, 1 chain, miss 2 stitches, 5 plain = on the second side of the chain: * 1 plain on each stitch, 3 plain on the 2nd of the missed stitches. Repeat 3 times from *. After the 4th row of plain: 6 chain = turn the work = 1 row of plain on both sides and plain stitches on the 6 chain; fasten off the thread. Counting back the last stitches, fasten on the thread at the 18th stitch, make one more row of plain, fasten off.
2nd leaf of the branch—22 chain, miss 1, 3 plain, 1 chain, 1 half treble on the 3rd chain, 1 chain, 1 treble on the 3rd chain, 1 chain, 1 treble on the 3rd chain, 1 chain, 1 half treble on the 3rd chain, 1 chain, 1 plain on the 3rd chain, 1 plain on each of the remaining stitches; 4 rows of plain, to and fro, in each of the stitches of the last row. The rows touch, and therefore encircle the leaf.
3rd leaf—16 chain, miss 1, 2 plain, 1 chain, 1 treble on the 3rd chain, 1 chain, 1 treble on the 3rd chain, 1 chain, 1 treble on the 3rd chain, 1 plain on each of the remaining stitches, 4 rows of plain, to and fro round the leaf; 3 plain on the stitch at the top of the leaf and 3 on the one at the bottom.
When these 3 leaves are finished, join them together on the wrong side so that the end of the 2nd leaf is parallel with the last treble of the 1st leaf, and the end of the 3rd leaf parallel with the 1st of the last plain stitches of the 2nd leaf. Having sewn these 3 leaves together, carry on the plain stitches with the thread of the 3rd little leaf over the two others. Fasten off the thread, join it on again at the 10th plain stitch of the 3rd little leaf, counting the stitches downwards from the top = 40 chain, 1 single on the 34th chain = on the ring: 10 plain, 1 plain each chain and 1 plain on each stitch of the leaves = then, make 3 more rows of plain and 2 plain on every second stitch of the 10 stitches in the ring.
Having reached the chain stitches, fasten on the thread, turn the work and continue the other rows. When the rows of plain stitches are finished, draw a thread through the chain stitches and pull them gently together.
Branch on the left and 1st leaf—22 chain, miss 1, 3 plain, 2 chain, 1 treble on the 2nd chain, 2 chain, 1 treble 1½ treble long, 2 chain, miss 1, 1 treble, 1½ treble long, 2 chain, miss 1, 1 treble, 2 chain, miss 1, 1 treble, 2 chain, miss 1, 1 plain on each of the remaining stitches. The remainder the same as for the right leaf.
2nd leaf—16 chain, miss 1, 2 plain, 2 chain, 1 treble, 2 chain, miss 1, 1 treble, 2 chain, miss 1, 1 treble, 2 chain, miss 1, 1 treble, 2 chain, miss 1, 1 plain on each of the remaining stitches. The rest the same as for the right leaf.
3rd leaf—12 chain, miss 1, 2 plain, 2 chain, miss 1, 1 treble, 2 chain, miss 1, 1 treble, 2 chain, miss 1, 1 treble, 2 chain, miss 1, 1 plain on each of the remaining stitches. The remainder, as well as the little ring, the same as for the right leaf. Make altogether 4 leaves for the right side and 4 for the left.
Calyx of the small flowers.—11 chain = turn the work = 1 plain on the first 5 chain, 3 plain on the 6th chain, 1 plain on the 5 other chain = turn the work = * 2 chain, 1 treble on the 1st plain, 1 chain, 1 treble, 1 chain, 1 treble, 1 chain, ** 3 trebles on the second of the 3 plain, on the 6th chain, repeat once from ** to * = turn the work = 1 plain on each of the preceding stitches, 3 single on the added stitch = turn the work = 1 single on the first 2 plain; plain stitches as far as the middle stitch; 13 chain, miss 1, 1 plain on each chain stitch, 6 plain, 2 single. Fasten off. Make 8 calices in all.
Small flowers of three different sizes—Make altogether, 24 large, 12 of medium size, and 16 small.
For the large flowers—18 chain, close the ring, 24 plain on the 18 chain; 1 plain on every stitch of the preceding row and 1 picot after every second plain stitch. Join the first and the last picots of 2 large flowers to the calyx, the 2nd and the 3rd picots of one large flower to the 10th and 11th picots of the other. Join the 1st and 11th picots of the 3rd flower to the 8th picot of the first and to the 5th of the second flower.
For the medium-sized flowers—14 chain, close the ring = 20 plain on the ring, then a second row of plain with 1 picot after every second plain stitch.
These flowers connect the centre figure with the corner one.
For the small flowers—10 chain, close the ring = 16 plain on the ring, then a second row of plain stitches with a picot after every second stitch. Sew the medium-sized flowers and the small ones to the big ones with overcasting stitches.
As regards the bars of chain stitches that complete the pattern they can easily be copied from the illustration.
No comments:
Post a Comment